General
Company Masthead
Your company's name and, optionally, address and phone number(s), will appear on invoices, statements, checks, etc. Users with the EDI module should enter a "Remit-to" masthead if customers send payments to a different location.
Preferences
If desired, select your color preferences for reports.
Start Sequence Number
Select a starting point for any record identified by a number, such as orders, trucks, *invoices (see note), employee IDs, and so on. Pick up where you left off with your previous system, or start with a new convention. It's best to start sequence numbers before saving the first record but you can do so at any time—the program will apply the sequence number to the next record saved. Once you establish a sequence, please exercise caution when re-starting a number, particularly for shipping orders.
- Go to Setup > General > Sequence Numbers.
- Click "Find." A list of editable keys appears.
- Highlight the desired key.
- In the header, change the "Format" field to the first number in the sequence. The code may contain letters and numbers, up to 8 characters.
- "CP-1000," for example, could begin CompuPlants' preferred truck naming sequence.
- "Alt Format" applies only to invoices (invoicem) and vouchers (voucherm):
- The alternate format for invoices applies to credit memos.
- The alternate format for vouchers applies to debit memos.
- "Integer Seq." and "Max Seq." are used only where you've checked "Auto Generate Purchase Orders" in the customer file (Pricing tab). Commonly used for mass merchants, it can also work with other customer types. "Key" must match the sold-to/bill-to customer code. Leave Format and Alt Format blank.
* These fields cannot contain letters or special characters. - (Optional) Record the date and time that the sequence number was last changed.
- Click "Save."
Sequence Numbers Commonly Started Upon Installation:
- shipping orders (orders)
- paychecks (checkm)
- bank deposits (depositm)
- employee numbers (employee)
- cash receipts (paymentm)
- purchase orders (potrxm)
- mass pulls (pullm)
- truck numbers (truckm)
- vouchers (voucherm)
- * master orders: See User-Defined Master Order Number
Change Password
Non-admin users may use this form to change their CompuPlants login password and/or their SMTP email password when the respective admin option is set to "0" (pwmode, emailconfig). If the admin user manages one or both passwords, then he/she must do so via the regular Users form in the Administration module.
Financials
See also: Financials > General Ledger Accounts
Payables
1099 Vendor Codes
CompuPlants supports those codes that are listed on this form (informational only).
Receivables
| Setting | Description | Used For |
|---|---|---|
| States | For each state you do business with, enter the contact information for that state's plant health inspection services. Certificates are sent via email or fax. Indicate the preferred method of contact by selecting the appropriate radial button, and be sure you have the correct email address or fax number on file (the email address should be saved in the field labeled "Certs Address"). Even for states that do not require proof of certification when a host plant is shipped, you must still create a record for that state and flag it as "Certifications Exempt." | Truck Certificates |
| Sales Reps | Assign a code for each sales rep; enter name, commission rate, and contact info | Commissions |
| Customer Types | Enter a code (up to 3 characters) and description for each type of customer you serve, such as garden center, grower, mass merchant, landscaper, etc. | Mailing |
| Payment Terms | Enter all payment periods that your company uses, along with early payment discount amounts | Invoices |
| How Pay | Assign a single-letter code for each payment method and provide a description; optionally, check "Full Pay Invoice when Posting Orders" for cash and/or check payment methods, and the system will automatically create a cash receipt when you post an order. | Payments |
| Credit Leeways | Determine how much leeway, if any, you are willing to give for credit limits (dollar amount), days past due (number of days), credit year (number of years), and customer deposits (select a cut-off date). If you have placed restrictions on customer credit, the program checks leeways before issuing a stop or warning. Check "Deposit Matches Order" to have the program search for a matching cash receipt. If found, it checks the Received flag on the Credit Info tab in order entry. Note that these settings apply to all customers. | Credit Monitoring |
| Sales Journal Types | Informational only. | Financials |
| Payment Types | Enter all manners in which customers may decrease their balance, such as refund, discount, prepay, overpay, and credit used. Check "Print on Statement" to categorize it as an external code; or leave this unchecked for an internal code. CompuPlants uses internal codes when performing certain processes, such as linking a pre-paid order receipt to a deposit when one is required for a customer. Lastly, check "Discount given for sales reports" if... | Payments |
| Credit Reason Codes | Assign a code and describe each credit reason, such as "shortage" or "damaged". | Credit Memos |
| Sales Types | Enter the various sales types that could influence the commission rate on an order (either full, partial, or zero commission). Enter a two-digit number code, a more detailed description, and select a payscan value (optional). Checking "Consignment" and/or "Intercompany" renders those orders with this sales type non-commissionable (if you have purchased the Commissions module). For sales types associated with trade shows or free products, you may wish to check "Exclude from Sales Reports." Sales type is not required to save a shipping order, but you can change that by setting the admin option "salestypereqd" to "1". *Codes 80 and above are reserved for CompuPlants' use. | Commissions |
Customer Price Styles
Every customer must have a default price style. There are two basic styles: default and net delivered. The default style shows the product catalog price on the line, then tallies discounts, freight, and royalties separately at the bottom of the invoice. Net delivered, on the other hand, shows the adjusted price on the line. From these basic styles, feel free to create variations. For instance, you may wish to factor the discount into the line price, but list freight and royalty charges at the bottom. Enter a letter or special character to denote the adjusted price (optional).
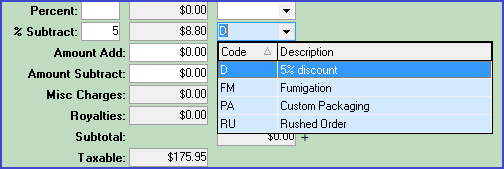
Be aware that, if using a net delivered style, this could inflate the subtotal when rounding to the nearest penny. For example, a customer orders 100 container plants, which cost $2.07 each, and receives a 15% discount. The subtotal should amount to $175.95. If you were to first apply the discount, the adjusted price per item is $1.7595. Rounded to the nearest penny, then multiplied by 100, the subtotal increases to $176. The five-cent difference can become substantially greater across hundreds or thousands of products.
We encourage you to calculate the adjusted price out to four decimal places, thereby avoiding any unwanted rounding issues. This can be done by modifying the line price format in Fast Report (see Fast Report's documentation for specific instructions).
Notes:
* Net delivered is not compatible with graduated volume discounting schedules.
* You may only include freight in the adjusted price per line for SM orders that inherit this amount from the master order. See the "Tip" under Master Order Quick-Change grid for more information.
Discount Types
Discount types may vary by customer type, growing times, price groups, graduated pricing models, and any other discount programs your nursery offers. When you select a discount type in order entry, it triggers the price group(s) and/or graduated volume discount program associated with it.
A discount type might be "June-July Pricing," while one of its price group counterparts might be "Azalea" (be sure to associate each relevant product with a price group in the product catalog). Additionally, you could create discount types by customer, then associate various price groups and/or a graduated volume pricing schedule with that customer. Set up graduated volume discounts in Setup > Receivables > Volume Discount and price groups in Inventory > Products > Price Groups.
Volume Discount
This is a graduated volume discount, which applies an order-level discount based on how much the customer spends during a specified period of time.
The discount for the order is based on the amount discountable on the current order plus cumulative amounts from open orders and shipped orders during the volume date range. This date range is generally a year, though it may vary. It may coincide with the calendar year or not, and the order ship date must match the date range in the discount program. If the ship date on the open order(s) is blank, the order(s) will not be counted in subsequent calculations. This discount applies to only the sum of the products on the order, before freight, taxes and additional amounts are applied. The current order will only calculate the discount for items marked discountable.
After saving your graduated volume discount programs, you may wish to set the default discount type and a "Starting Volume" in the customer file. Users typically update the starting volume at the beginning of each cycle.
Freight Setup
| Setting | Description |
|---|---|
| Carriers | Enter an abbreviated name and full name for each carrier, a.k.a. ShipVia, you use; select a default freight method and weight type (optional). See also oefreightfromshipvia. |
| Freight Zones | Enter each freight zone, as determined by the carrier, with associated freight percent, fuel percent, and drop charge. This table works in conjunction with freight method III (Freight Zones). |
| Freight Master | No longer used; reference-only. |
| Freight Detail | The program refers to this table when the freight method is Ship Via - Zone - Units. Using pre-set carriers and zones, create a graduated volume table where the freight amount decreases as the number of units increases. 10 units, for instance, might cost $2.00 to ship; 50 units may cost $1.50 (amount is cumulative, not per unit). In order for this method to work, each product must have a shipping unit or freight group assigned to it in the product catalog. Also, the shipping units on an order must be equal to or less than the amount set on the table. |
| Freight Groups | Organize freight groups by product size, identify number of shipping units for the size, then associate each product with the desired freight group. This reduces future maintenance by requiring you to edit only the freight group rather than shipping units for each product. |
| Freight Sizes | The program uses this table when the freight method is set to III (freight zones) and "amtfrgpct" is set to "3". Establish ship zone / product size combinations, then determine a rate. |
Sales Tax
Locality Tax Rates
Use this form to set up tax rates by locality (which can be the state or county)—including those localities without taxes. Then, in the customer file, set a default locality. This information will be used for Sales Tax Reports in the Receivables module.
- Click "Insert."
- Enter a code in the Locality field. It may contain up to 15 characters. We suggest combining the state and/or county abbreviation with a "TAX" or "NOTAX" indicator. For example:
- WA-NOTAX
- WA-TAXED
- WA-CLARK
- Select the appropriate GL tax account.
- Check all taxes that apply: freight, royalty, and/or assessment.
- Enter the tax rate without the percent sign (e.g. 8.75).
- Click "Save."
- Repeat the process to input additional tax localities.
- Navigate to Receivables > Customers (Sold-to/Ship-to) > Pricing Tab, and save a default locality.
Inventory
UPC Numbers
Provide the UPC-A number for "product." The "prefix" is the number assigned to your company by the UPC Council. The "suffix" is your own starting number. The "length" should be "0". With this information, the program automatically generates UPC numbers in the product catalog.
Product Type
Product type, a required field in order entry, determines the following characteristics of a shipping order:
- the GL account to which the order is posted (if postglsales is NOT set to "1")
- whether the order is restricted to a particular product
- the primary discount method for the order
- volume type
- whether the availability panel reflects a single-date or multiple-date inventory system
- how the order want quantity should be distributed among assortments
- period type (for NRP only)
Product Type & Discount Settings
A product type can implement one of three discount methods:
- Discount by order (restricted)
- Discount by product type (unrestricted)
-
* Each product type represented on the order receives its respective discount rate.
- Discount by order (unrestricted)
| Setting | Discount by order (restricted) | Discount by product type (unrestricted) | Discount by order (unrestricted) |
|---|---|---|---|
| Restrict Product/Orders | Check | Leave unchecked | Leave unchecked |
| Discount By | Order | Product | Order |
| Discount | PT Discount 1, 2, or 3 | PT Discount 1, 2, or 3 | Default Discount |
| *Product Catalog | Assign a Product Type to each relevant product (see figure 1). | Assign a Product Type to each relevant product (see figure 1). | Omit this step. |
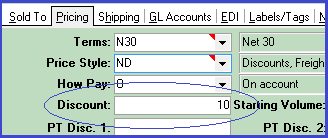
| *Customer File, Pricing Tab | Enter discount rates in PT Discount 1, 2, and/or 3 fields (see figure 2) . | Enter discount rates in PT Discount 1, 2, and/or 3 fields (see figure 2) | Enter a discount rate in the "Discount" field (see figure 3). |
Figure 1
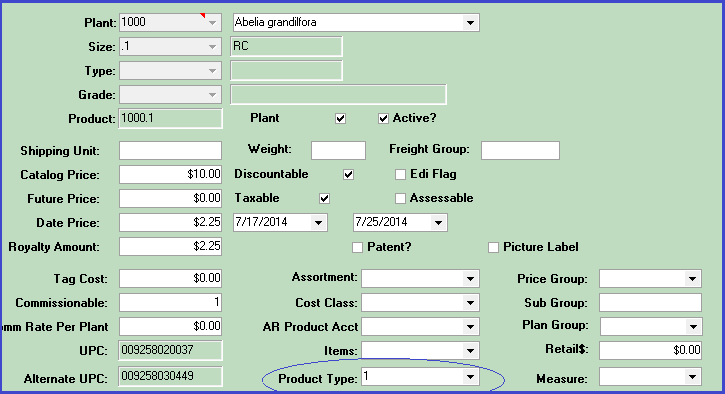
Figure 2
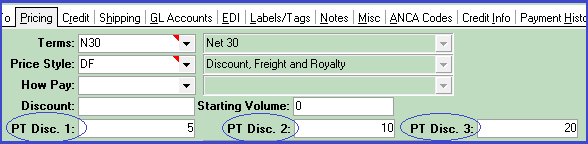
Figure 3
Volume Type
Coming soon.Order Entry Sell Date Options
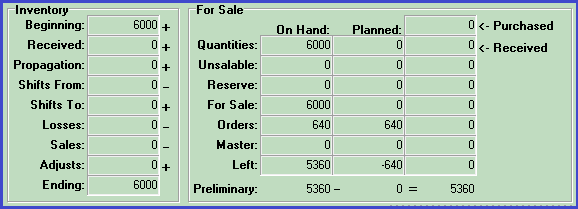
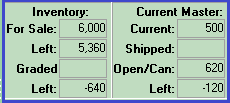
If your nursery practices a multiple-date availability system, you may wish to set product type(s) to "use order entry sell dates for inventory available." When this product type is applied to an order, the "For Sale" and "Left" quantities depend on the sell date entered on the order detail page. For example, you might have 600 Pansy "Citrus Orange" 8-packs for sale on 9/1/15, but only 300 for sale on 9/8/15. When the sell date is 9/1/15, the availability panel shows 600 for sale; when it's 9/18/15, the panel shows 300 for sale. You must click "Save" between sell date changes to refresh the availability panel.Assort Method
For orders associated with assortments: decide which approach the system should take when distributing the want quantity among products. "Template" applies a fixed increment while or "Percentage" applies a percent.Period Types
For those customers with the NRP module.Reason Codes
Reason codes apply to field inventory procedures: Supply a reason for a given transaction type. You may save multiple reason codes per transaction type. This form can also be found in Inventory > Inventory Locations > Reason Codes.
Assortments
Create assortment groups here, which are required for using the Allocations > Assortments program. They are also required for making substitutions from an assortment.
Packing Types
List the various methods used for packing: rack, pallet, box, shelf, etc; used for measures (see next topic).
Measures
Measures help you determine how many racks or pallets are needed for a particular product. Measures are aligned with packing types. So, if the packing type is a rack, determine the number of plants per shelf, then the number of plants per rack. If it's a pallet, identify the number of plants per pallet. Assign each product a "Measure" in the product catalog.
During order processing, the application calculates the number of shelves or racks needed for each item, and provides this information on the order summary page as well as the Orders 5.6 grid. On the latter grid, right-click anywhere and select "Show Summaries" to activate the totals row at the bottom of the grid.
Items
If your nursery handles plant accessories, such as holiday-themed decorations, greeting cards, vases, and so on, CompuPlants distinguishes these products from your regular product catalog with the "Item" ID. In order entry, these special products appear on the Decorations tab. Use this form to save the various accessories your nursery may tag on to an order, then continue set up by adding the accessories as plant numbers then products in the product catalog.
Optional: Limit the number of add-ons a user may pick per product. If ribbon is limited to two picks, for instance, the user will not be able to add more than two colors of ribbon to a single product. Also, to ensure that you're using only as much inventory as necessary, you might prefer to match the item size to the product size. Under these circumstances, the user could pick only foil size #2 to match #2 container plant, for example; foil #3 would not be displayed.
Inventory Setup Options
Inventory Options
These settings apply to users with single-date product availability. Other tools and reports throughout the program filter data according to these dates, including the inventory panel in order entry, Item by Customer Committed (Report), and Allocations > Products.
Shipped Dates
This date range applies to graded inventory availability.
Product and Order Sell Dates
For a single-date availability system: Enter the date range you'd like to use when calculating availability in Inventory > Allocations and Orders > Shipping Orders (you may always customize date ranges for grids and reports). Shipping/Master orders with a want date equal to or less than the end date will factor into this data. Next year's inventory (if you have already entered it) will be excluded. We recommend leaving the begin date empty; otherwise, the application will omit orders that were placed before the begin date.
Inventory > Allocations:
Orders > Shipping Orders:
Royalty Excluded
Check to indicate that your product catalog price does not reflect added royalties. The application uses this setting when applying discounts and calculating freight.
Estimating
Field inventory nurseries: enter the begin and end dates for the current estimation period.
Orders
| Setting | Description |
|---|---|
| Page Styles | Page styles determine what gets printed on order documents (Orders 5.6). You can create them according to customer preferences or document type. If by customer preferences, set a default page style for each customer in the customer file (Pricing tab). If by document type, leave the customer default blank, then assign page styles to order documents in the next menu item, Documents. What you enter here overrides the customer file. |
| Documents | Set up order documents here: invoice, confirmation, quote, bill of lading, etc. Enter a two- or three-digit code in the "Document" field and a description. Then, identify each party receiving a copy of the document (customer, office, sales rep, etc.). Selecting a page style here overrides the customer default, so only enter one if that's what you intend to do. You may wish to associate a different copy color for each recipient of the document. The copy color applies to every header row on the document. If using the default report design, type "goldorders5.6" in Report Design Name. To use a modified report design, type the correct file name in Report Design Name. Learn more about copying designs here. When you wish to print a particular order document, refer to Order Documents to learn how. |
| Item Categories | This feature allows users to group products on orders into user-defined categories, such as promotional event ("May Promo"), market area ("Northwest"), and so on. In order entry, select an item category on the order detail page. When generating reports, go to Inventory > Reports > Product General Reports > Product by Item Category for detailed information on product sales by item category. Also, if you intend to duplicate products on a shipping order, you must associate the duplicate product with an item category. Otherwise, the application prohibits duplication by default. (You could create an item category called "Duplicate" for this purpose.) |
| Order Document Stages | CompuPlants has three built-in order phases: order entry (OE), ready to invoice (RI)—meaning inventory has been posted, and invoiced (IV). Some reports, such as Item by Customer Committed, use these stages to filter and/or organize data. You may add more stages, such as "Acknowledged," "Confirmed," and so on, then update an order's Doc. Stage (on the Order Info panel) as often as necessary. Opt to exclude certain stages from your availability data. Those customers who have purchased the Nursery Resource Planning module may opt to exclude planning orders. |
| Charge Codes | Save all types of add-on charges, such as fumigation, packing, handling, etc. These transfer to the order summary page: |
| User-defined Master Order # | When saving orders, by default the application does not distinguish between master orders and shipping orders. For example, if the most recent order entered into the system is a shipping order, #2345, and a master order follows, its number is #2346. You may define a unique alpha-numeric code for master orders here. See Orders: User-Defined Master Order for specific instructions on how to do so. |
| Canned Notes | Save time entering orders by selecting from a list of canned product notes. Access canned notes in the "Notes" field on the order detail page (Ctrl-Alt-N). |
| Order Prefs | Compile a list of common customer preferences, which you can then save as default preferences in the customer file (Pricing tab). For your convenience, these preferences appear in order entry (customer info panel under the Schedule tab) as well as on the orders grid in Allocations > Products. |
Trucks
Jobs
Enter Jobs
This form allows you to record contract jobs, which you can then associate with vouchers, checks, and credit memos. Enter a code, description, and the contract amount (optional).