Introduction
This page is designed to help new users configure necessary information and import their company data as they're transitioning to CompuPlants Gold. While all Setup menu items are explained in this guide, the steps in this tutorial do not follow the sequence of the Setup menu items. By the end of this tutorial, you'll be ready to use the program for your regular business needs.
1. Record Company Information (Setup > General)
Rather than inserting a new record here, you'll edit the existing demo data. Click "Find," then edit company name, address, phone/fax, and the color scheme for your report designs.
2. Set Up General Ledger Accounts (Setup > General)
GL account numbers are required in some features of the application, such as cash receipts and AR product accounts, so we've provided the accounts you'll need as defaults: Checking, Receivables, Sales, Freight Invoice, and Interest Income. You may keep these defaults, but the account number cannot be edited. If you wish to change the account number, you must delete the record and insert a new record. By leaving "Balance Sheet" unchecked, the application understands that the account appears on the Income Statement.
3. Determine Starting Numbers (Setup > General)
Order, Invoice, and Receipt numbers may contain 8 characters or less (numbers and/or letters). Before entering your starting numbers, go to Deletes > Delete Other Tables and Reset Sequences to clear any existing demo data.
4. Add New Users (Admin > Users)
There are two types of users: administrators and non-administrators. Administrators can add and delete users, control other users' permissions, and modify report designs. Non-administrators may also modify report designs with permission from an administrator.
The program is shipped with one user, "admin." You may edit the password for this user, but you cannot delete the user.
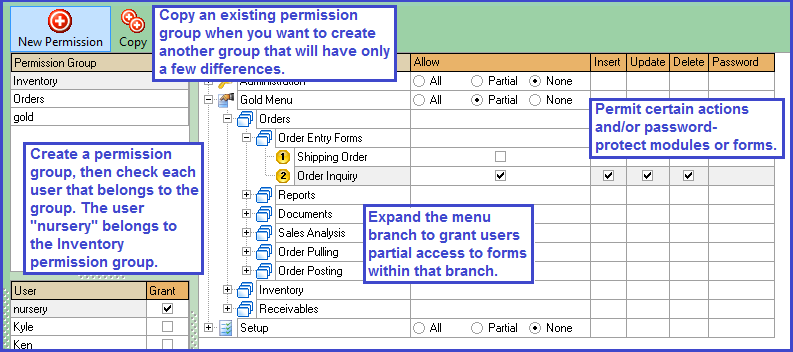
5. Establish Permission Groups (Admin > Permissions)
This form allows you to set specific permissions for non-admin users. You may set permissions by user, in which case you would give the permission group the same name as the user, or by a group of users, naming the group by department (e.g. "Orders").
- Go to Administration > Permissions.
- Click “New Permission.”
- In the dialog box, type the name of a new permission group.
- On the User table, include individual user(s) in the group by checking the box labeled "Grant."
- Assign group permissions:
- For unrestricted access to a module, select "All."
- For full restriction to a module, select "None." The module will not appear on the user's main menu.
- For partial access, check "Partial," then expand the module by clicking the plus (+) sign. Continue expanding topics until check boxes appear under the "Partial" column. Check each menu tree item that the user may access. Further delineate permissions with the "Insert," "Update," and "Delete" parameters to the right.
- (Optional) Enable password protection for any module or menu tree item by typing the password in the last column.
- Click “Save.”
6. Set Up Customers
a. Set Up Customer Menu Items
| Menu Item | Description |
|---|---|
| States | State information corresponds with the customer record. CompuPlants Gold ships with all 50 states saved in this form, so you do not need to enter state information. |
| Payment Terms | Enter all payment terms (with and without discounts) that your nursery uses. The payment period can be defined as the number of days after the invoice post date that a customer has to pay his or her invoice. If the payment term includes a discount, CompuPlants will apply the discount percentage to an invoice when the customer pays in full either on or prior to the due date. |
| Customer Types | Enter a code (up to 3 characters) and description for each type of customer you serve, such as garden center, grower, mass merchant, landscaper, etc. |
| Ship Via | Enter all the carriers that your nursery uses. You may store a default carrier in the customer file, which will be added to all shipping orders for that customer. |
| How Pay | Assign a single-letter code for each payment method and provide a description; optionally, check "Full Pay Invoice when Posting Orders" for cash and/or check payment methods, and the system will automatically create a cash receipt when you post an order.
Note: Be sure to assign a GL account number to the payment method. In addition, the GL account that you link to the payment method must have the "Bank Account" flag checked. For more information, see Set Up General Ledger Accounts. |
b. Enter Locality Tax Rates (Setup > Sales Tax)
Use this form to set up tax rates by locality (which can be the state or county)—including those localities without taxes. Then, in the customer file, set a default locality. This information will be used for Sales Tax Reports in the Receivables module.
The locality code may contain up to 15 characters. We suggest combining the state and/or county abbreviation with a "TAX" or "NOTAX" indicator. For example:
- WA-NOTAX
- WA-TAXED
- WA-CLARK
c. Import Customers and Customer Balances
Customers must be imported in two batches: one for customers where this ship-to address matches the sold-to address, and another for customers where the ship-to address differs from the sold-to address.
- First, go to Setup > Deletes and delete both customers and customer balances.
- Under Imports/Exports, open the "Import Customers" form.
- In Excel, format a spreadsheet according to the header row provided on the import form.
- When you're ready to import, click "Open" to trigger Windows Explorer, then navigate to and select the appropriate file.
- If importing single sold-to customers (where the ship-to address matches the sold-to address), check the flag.
- Once the selected file opens, delete row 1 by clicking into a cell within the row then clicking the minus ( - ) sign in the bottom left corner.
- Select "Validate." The program will catch any errors and highlight them. If necessary, make corrections to the spreadsheet, then re-upload and validate again.
- Select "Process."
Follow the same instructions to import bill-to customers (where ship-to address differs from sold-to address) and customer balances.
d. Review AR Product Accounts (Gold Menu > Receivables)
AR Product Accounts enable posting sales to the general ledger. While CompuPlants Gold does not support financial reporting, the program still encourages sound financial practices. And, should you wish to convert to CompuPlants Platinum in the future, initiating these practices now will facilitate a much smoother transition later.
CompuPlants comes with five AR product accounts pre-loaded: FREIGHT, INTEREST, PLANTS, ADDS (additional charges), and ROYALTIES. Each is linked to the corresponding GL account. You may adopt these, delete them and create new accounts, and/or make additional accounts, but note that these are the minimum you should have. If adopting these, be sure to change the default GL account number associated with each AR product account so that they match your own GL account numbers.
7. Set Up Inventory
a. Set Up Inventory Menu Items
- Provide the UPC-A number for "product." The "prefix" is the number assigned to your company by the UPC Council. The "suffix" is your own starting number. The "length" should be "0". With this information, the program automatically generates UPC numbers in the product catalog.
- Inventory Options: Check the flag "Royalty Excluded" to indicate that your product catalog price does not reflect added royalties. The application uses this setting when applying discounts and calculating freight.
b. Import Inventory Data
Please read our product setup guidelines before importing inventory data, then return to the Gold New User Guide when you're ready to import.
- Navigate to the appropriate import form and double-click the menu item.
- In Excel, format a spreadsheet according to the sample header row provided on the Import form.
- Click "Open."
- Browse for the appropriate file and select "Ok."
- Delete row 1 by clicking in any cell within the row, then clicking the minus ( - ) sign in the bottom left corner.
- Select "Validate." The program will catch any errors and highlight them. If necessary, make corrections to the spreadsheet, then re-upload and validate again.
- Select "Process."
c. Set a Future Date Price (Optional)
The parameter oestopcatprice establishes an end date for the current catalog price when a future price is saved in the product catalog. Enter a new date in the "Value" field.
8. Setup Orders
Enter default information for each of the following menu items under Setup > Orders.
| Setting | Description |
|---|---|
| Page Styles | Page styles determine what gets printed on Orders 5.6 documents. Create a page style that will be applied to all order documents (confirmation, quote, invoice, etc.). In each blank field, type the label as you wish it to appear on the document. |
| Documents | Set up order documents here: invoice, confirmation, quote, bill of lading, etc. Enter a two- or three-digit code in the "Document" field and a description. Then, identify each party receiving a copy of the document (customer, office, sales rep, etc.). If using the default report design, type "goldorders5.6" in Report Design Name. To use a modified report design, type the correct file name in Report Design Name. Learn more about copying designs here. |
| Item Categories | This feature allows users to group products on orders into user-defined categories, such as promotional event ("May Promo"), market area ("Northwest"), and so on. In order entry, select an item category on the order detail page. When generating reports, go to Inventory > Reports > Product General Reports > Product by Item Category for detailed information on product sales by item category. Also, if you intend to duplicate products on a shipping order, you must associate the duplicate product with an item category. Otherwise, the application prohibits duplication by default. (You could create an item category called "Duplicate" for this purpose.) |
| Document Stages | CompuPlants has three built-in order phases: live order (LO), pre-order (PR), and shipped (SH)—meaning inventory has been posted. Some reports, such as Product by Customer Committed, use these stages to filter and/or organize data. You may add more stages, such as "Acknowledged," "Confirmed," and so on. Update an order's Doc. Stage (on the Order Info panel) as often as necessary. Opt to exclude certain stages from your availability data. |
| Shipping Units | Record the number of shipping units per foot of a truck. Used to convert total number of shipping units to total number of feet when calculating the total volume of an order. You may have only one shipping code saved. In the product catalog, convert each product to an equivalent number of shipping units. |
9. Learn How to Use Reports & Grids
CompuPlants' reports and grids offer great flexibility for users looking to organize and filter information in various ways. Learn more about their functionality in our Platinum New User Guide.
Next Steps
You're now ready to transition to the Gold Menu, where you can enter orders, record inventory transactions, run reports, and much more. Please consult the Orders, Receivables, and Inventory help files for guidance with any of those tasks.