Enter GL Accounts
If you are setting up GL Accounts as a new user, please visit our New User Guide for important information regarding organizing the general ledger.
- From the General Ledger Accounts entry form, click "Insert."
- Enter the full account number, which may be only the chart number (for single division/department nurseries); or it may be the chart number preceded by the division and/or department number.
-
* The full account number cannot exceed 15 characters and it must be unique.
- Enter a brief description.
- If using the division code in the GL account number, select the appropriate division.
- If using a the department code, select the appropriate department.
- Enter the chart number (required).
- (Optional) Unit Budget: If this GL account is tied to an existing unit account, select the appropriate budget unit account here.
- Category: Select the appropriate category (required).
- Select all that apply: Balance Sheet, Debit, Bank Account, AR Control, AP Control.
-
* By leaving Balance Sheet unchecked, the application understands that the account appears on the Income Statement.
- Click "Save."
Below the entry form, the GL Accounts quick-change grid offers two additional editable settings:
- "Cost Center": Cost Centers, which are part of the Costing module, bridge inventory to financials. A cost center ID is assigned to both a product in the product catalog and to a GL account, furthering your product analysis capabilities.
- "Active": An account must be marked active in order to link transactions, such as checks and vouchers, to it.
Record a Journal Entry
Below are instructions for recording a standard journal entry, which is neither recurring nor reversing. For instructions on either of the latter types, please see below.
- Below Entry Forms, double-click General Journal Entries.
- Click "Insert."
- Enter an entry number. This can be a 15-character, alpha-numeric code.
- Enter today's date.
- (Optional) Enter a longer description for the journal entry.
- Click "Save," or go to directly to the detail page and the record will save automatically.
- On the detail page, click "Insert."
- Check "Debit" if the account associated with the entry is a debit account.
- Select the GL account associated with the entry.
- Enter the amount.
- (Optional) Reference...
- (Optional) Offer any pertinent information in the Notes field.
- (Optional) Associate the entry with a contract job. The job must be entered in the Setup module prior to saving the journal entry.
- (Optional) Work Code applies only to those with the Payroll module.
- Click "Save."
- Repeat steps 7-15 to insert another detail for this journal entry.
- When you have entered all details, click "Verify." The debit and credit amounts much balance each other out. If they do not, the program will display a message at the bottom of the screen. If necessary, amend the journal entry and verify again.
Record a Recurring Journal Entry
With the recurring journal entry feature, CompuPlants helps you save time by eliminating the need to enter journal entries every month for the same amount. Follow the instructions above for recording a journal entry, and be sure to flag it as "Recurring." You may supply a stop date or omit it. If a stop date is provided, CompuPlants compares the closing date to the stop date with each monthly close. When the closing date surpasses the stop date, it will no longer record the journal entry.
To create the recurring entry, you'll need add a step to your monthly closing routine before closing the period. Go to Post Journal Entries > Create Recurring Entries, select the current financial period and click "Execute."
Record a Reversing Journal Entry
A reversing journal entry reverses selected entries made in the immediately preceding accounting period. Follow the instructions for recording a journal entry, and be sure to flag it as "Reversing." Then, before closing the period in which the reverse is scheduled, go to Post Journal Entries > Reversing Entries and execute the process found there.
Build an Income Statement Style
Formatting your financial statements requires a fair amount of organizational skills. A financial statement consists of a series of sequences. A sequence can either contain a group of lines, or it can be a single line. Each title and subtotal forms its own sequence. Individual accounts can also be assigned separate line numbers if you want all accounts to appear on the income statement. If it's a less formal income statement, you may wish to group all accounts into the title sequence, so that the income statement shows only the sum of the grouped accounts.
The program arranges the lines in sequential order, so it's important that you plan the numbers ahead of time and stay in sequence as you insert each line. The formats you create here will be used to generate those reports under Financials Formatted.
1. Save an income statement style:
-
a. From Financials > Entry Forms > Income Statement Outliner, click "Insert."
b. Supply a Style code, which should be a unique identifier. It may be a 15-character, alpha-numeric code.
c. Enter a more detailed description of the income statement.
d. (Optional) Add pertinent notes in the Notes field.
e. Click "Save."
f. Click "Detail."
2. Create a title sequence:
-
a. Click "Insert."
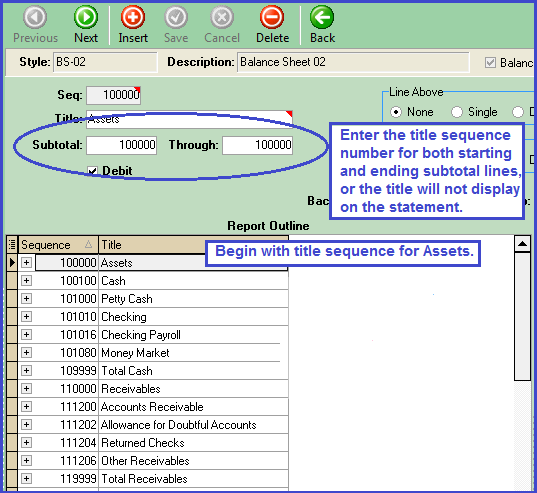
b. In the "Sequence" field, enter the starting sequence number. It helps to start with a high rounded number, such as 100 or 1000. You may display or hide sequence numbers when printing financial statements. If you choose to print them, consider matching the line number to the account number (note: this method does not work well with consecutive account numbers).
d. Enter the title for the account group.
e. Copy the sequence number (from step b) to both subtotal lines. This triggers the program to display this line as a title.
f. Check the debit flag if applicable.
g. Click "Save."
h. (Optional) If grouping accounts together, thereby viewing only the group summary, move all related accounts from the "Details to Place" grid to the "Report Outline" grid. Make sure the desired sequence is highlighted. If listing all accounts, skip this step and continue to step 3.
3. Create an account sequence (if listing all accounts on separate lines; if not, proceed to step 4):
-
a. Click "Insert."
b. Enter the sequence number, using a sequentially higher number than the previous sequence.
c. Enter the account name as the title.
d. Leave the subtotal lines blank.
e. Check the Debit flag if applicable.
f. Click "Save."
g. Move the related account from the "Details to Place" grid to the "Report Outline" grid.
h. Repeat these steps to create another account sequence within the same group.
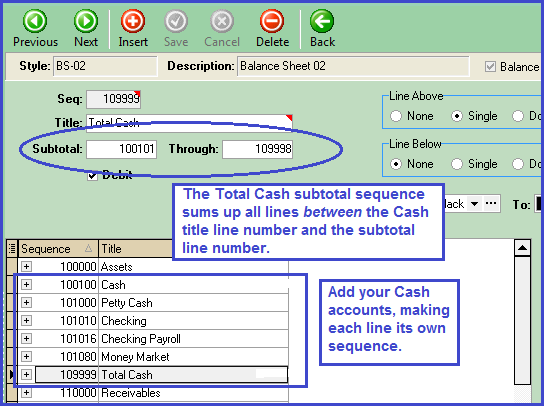
4. Create a subtotal sequence:
-
a. Click "Insert."
b. Enter the sequence number, staying in sequence with the last number used. Leave a cushion so that you can include more accounts in this subtotal in the future if necessary (at least 10-20 lines).
c. In the subtotal lines, set the beginning line to the line following the Title sequence number and set the ending line to the line preceding the subtotal sequence number.
d. Insert a single dividing line above the subtotal. Make sure the subtotal line is highlighted.
e. (Optional) Add background color(s) to the subtotal amounts. Color is applied on a gradient, beginning with the first and ending with the second.
f. Click "Save."
5. Create as many title, subtotal, and/or account sequences as necessary until all of your active accounts are included in the income statement.
6. When adding the last subtotal line, it is common to insert a double dividing line below the subtotal, separating it from the grand totals row.
Copy an Income Statement Style
You can easily copy an existing income statement style by going to Outliner Utilities and Setup > Make New Outliner.
- Enter the existing style code.
- Assign a code for the new style.
- Select an "Interval," or a number by which the program multiplies the original sequence numbers to arrive at new sequence numbers. For instance, with an interval of 5, the original sequence number "100" becomes "500" in the new style. You may set the interval to "1" to reuse the existing numbers.
- Click "Execute."
-
* The program also copies the original description to the new style. You may wish to call up the new style in Entry Forms > Income Statement Outliners and edit the description field.
Delete an Income Statement Style
You can delete a style from the Income Statement Outliner form. Or, go to Outliner Utilities and Setup > Delete Report Style to complete the same task.
Build a Balance Sheet Style
Formatting your financial statements requires a fair amount of organizational skills. The balance sheet—similar to the income statement—is constructed line-by-line. Each title, account, and subtotal is assigned its own line number. The program arranges the lines in sequential order, so it's important that you plan the numbers ahead of time and stay in sequence as you insert each line.
A financial statement consists of a series of sequences. A sequence can either contain a group of lines, or it can be a single line, in the case of titles and subtotals. We suggest formatting the title, account, and subtotal lines, then moving accounts from the right-hand grid ("Details to Place") into their respective sequences on the left-hand grid ("Report Outline").
1. Go to Entry Forms > Balance Sheet Outliner.
2. Save a new balance sheet style:
-
a. Click "Insert."
b. Enter a style code, which should be a unique identifier. It may be a 15-character, alpha-numeric code.
c. (Optional) Enter a more detailed description of the balance sheet.
d. (Optional) Add pertinent notes in the Notes field.
e. Click "Save," or click "Detail" and the program automatically saves the record.
3. On the detail page, create a sequence for the title line, "Assets":
-
a. Click "Insert."
c. In the "Sequence" field, assign the line a number (see note below).
d. Enter the title ("Assets").
e. Copy the sequence number to both the starting and ending subtotal fields. The program will then recognize this as a title line and display it properly.
f. Check the Debit flag.
g. Click "Save."
4. On the detail page, add the Cash group of accounts, which includes a title sequence, a sequence for each account, and a subtotal sequence:
-
a. Create a title sequence called "Cash", following the same steps above.
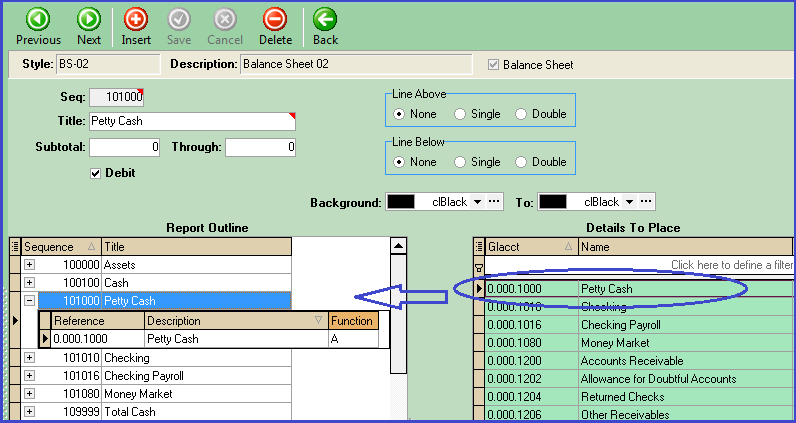
b. Create a sequence for each account, leaving the subtotal lines blank.
-
* Accounts can be grouped into the title sequence but, if done this way, the accounts do not appear on the balance sheet (or income statement) and the program shows only the sum of all account balances rather than individual balances (which could be acceptable for an informal statement). Creating a sequence for each account ensures that all accounts are listed with their respective balances.
5. From the Details to Place grid, move each related account to its respective sequence. The background turns to green, indicating that the record has been moved.
-
* You may find it more efficient to move accounts after you've created all sequences for the balance sheet.
6. Continue adding title sequences, account sequences, and subtotal sequences until all assets have been accounted for. After the last subtotal line, insert a "Total Assets" subtotal sequence and place a double line above it.
7. Construct the Liabilities & Equity section of the balance sheet in the same manner that you constructed the first half.
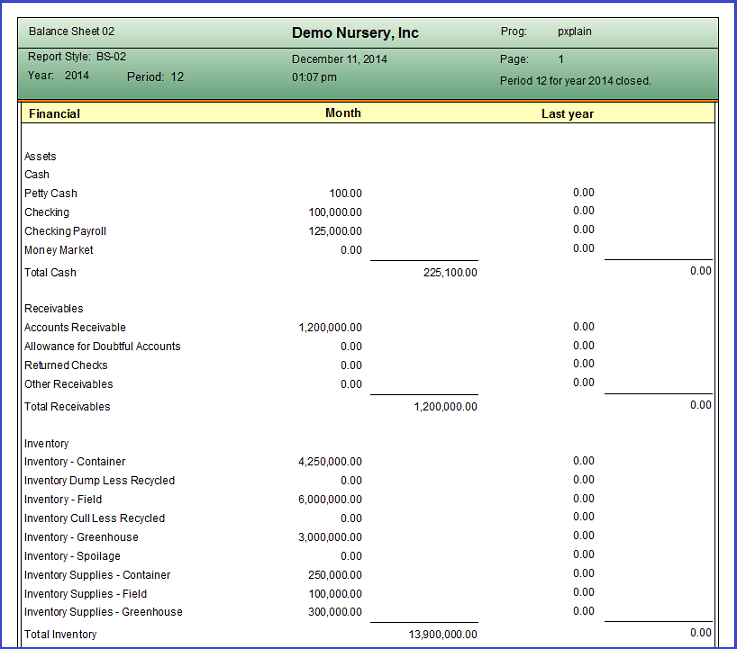
8. When you're finished, go to Reports > Financials Formatted > Balance Sheet, and generate a report using the style you just created. You may choose to print sequence numbers on the statement, or to omit them. Note any formatting errors or inconsistencies, and return to the Outliner to correct them if necessary.
Closing
Monthly Closing Process
This process includes five main steps: close the books, run a YTD trial balance, run an aged receivables and aged payables report, and compare balances.
- Close the current month:
-
a. Go to Financials > Closing > Monthly Close (Final).
b. Enter the account year, period, and the appropriate closing account.
c. Click "Execute."
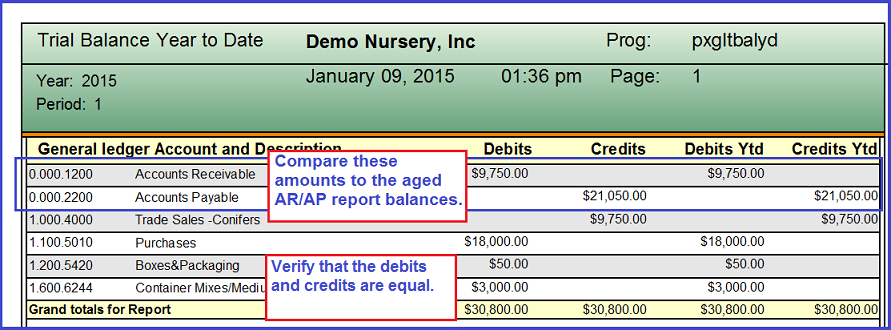
- Run a YTD trial balance:
-
a. Within the Financials module, navigate to Reports > Trial Balance Year to Date.
b. Enter the year, ending financial period, and Retained Earnings account.
c. Click "Preview."
d. You may wish to print this report and/or export to .pdf.
-
Note: Quickly check that the debits and credits are equal. If so, proceed to running the aged AR/AP reports. If not, resolve the issue before continuing.
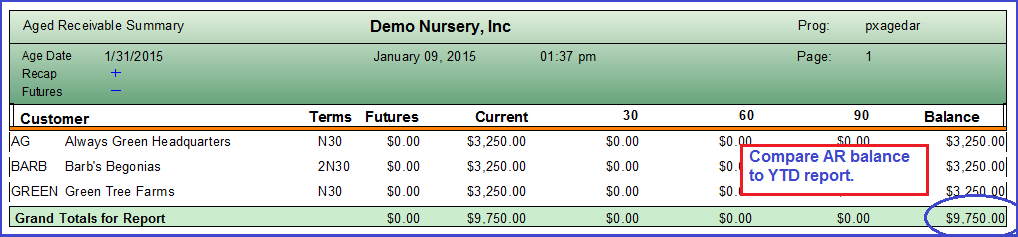
- Run the Aged Receivable Summary by Customer:
-
a. Navigate to Receivables > Reports > Aged Receivables > Aged Receivable Summary by Customer.
b. Select an aging date, which should be the last day of the month you closed in step 1.
c. Select number of days in each aging period (typically, these are 30, 60, 90, but may vary).
d. (Optional) Select "Print Recap" to include a totals section at the end of the report.
e. (Optional) Select "Future Columns" to display invoices entered after the aging date.
f. Click "Find."
g. On the customer table below, highlight all records (Control-A).
h. Click "Preview" and/or "Print."
- Run the Aged Accounts Payable summary report:
-
a. Navigate to Payables > Reports > Aged Accounts Payable.
b. Enter the aging date and aging periods as you did in step 3.
c. (Optional) Select to display vouchers dated after the aging date.
d. For the purposes of this report, search all records "by date".
e. Click "Find."
f. On the vendor table below, highlight all records (Control-A).
g. Click "Preview" and/or "Print."
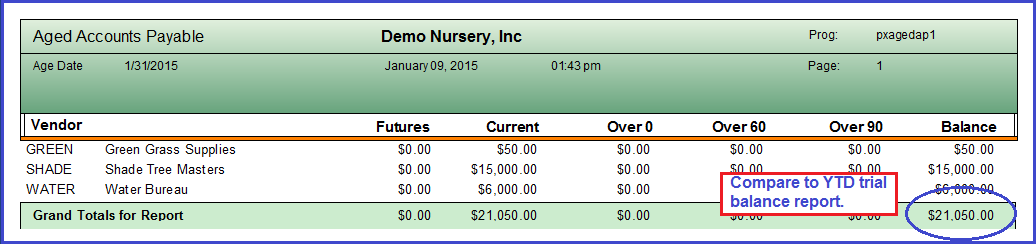
- Compare the AR/AP balances with your YTD trial balance.
- (Optional) Print a balance sheet and compare to the YTD trial balance.
Reports & Grids
Financials Formatted
These reports apply an income statement style that you've previously created. Learn more about building income statement styles here.
- Financial Report Formatting: Convenient for checking your Income Statement Outliner formatting and verifying subtotals. All other reports summarize sequence subtotals, while this report shows line-by-line amounts. You can also opt to show only the current period amounts. Leaving the flag unchecked will show YTD amounts.
- Income Statement, Financials with Budget, Financials with Last Year, Financials with Last Year & Budget, Financials 3-Year Comparison: Each of these reports offers a slightly different view, but each operates under the same controls:
- Accounting Year: Select the year you wish to report on.
- Accounting Period: Enter a financial period created in Setup > Financials > Close Dates.
- "Earnings": Refer to appropriate the general ledger account.
- Financial Type:
- Consolidate accounts for all divisions and departments OR
- Organize accounts by division with the option to report on a single division OR
- Organize accounts by department, with the option to report on a single department.
- Print Sequences: Prints sequence number on each title line.
- By Period Income Statement: This report is another variation of those in the preceding bullet, but displays amounts by period, beginning with the first financial period of the year.