Getting Started
Before You Begin
Before getting started with CP Inventory, you must have CP Platinum installed and configured on a desktop PC.
Note on CP Inventory Documentation:
On the side menu, procedures are organized by the application they're performed in. All tasks that are performed in the desktop application are organized under CP Platinum, and all tasks that are performed in the mobile application are organized under CP Inventory.
Also, procedures that are marked with an asterisk (*) pertain only to those customers who are hosting CP Platinum and CP Inventory on different servers. Where a procedure applies to both hosting arrangements, be sure to note where individual steps differ according to the hosting arrangement.
CP Inventory Workflow
Because all of your nursery's plant and inventory data is maintained in the CompuPlants Platinum database, CP Inventory must be able to communicate with your Platinum database. If CP Inventory and CP Platinum are hosted on the same server (either internal or external), this communication happens automatically. If, however, CP Inventory and CP Platinum are hosted on different servers, then additional administrative procedures are required in order for data to be shared between the two servers.
Administrators will handle most desktop-related tasks from the CP Mobile Express module. When the mobile and desktop apps are hosted on the same server, you can access the CP Mobile Express module through your main CP Platinum IP address. When the mobile and desktop apps are hosted on different servers, admins access CP Mobile Express by selecting the IP address of the mobile server when logging into CP Platinum. An abridged version of the desktop program lives on the mobile server and includes only three modules: Administration, CP Mobile Express, and Setup.
Data must be sent from the main CP Platinum host to the mobile host, and vice versa. Admins can manually send data between the two servers, or CompuPlants can automate this process at a specified time each day.
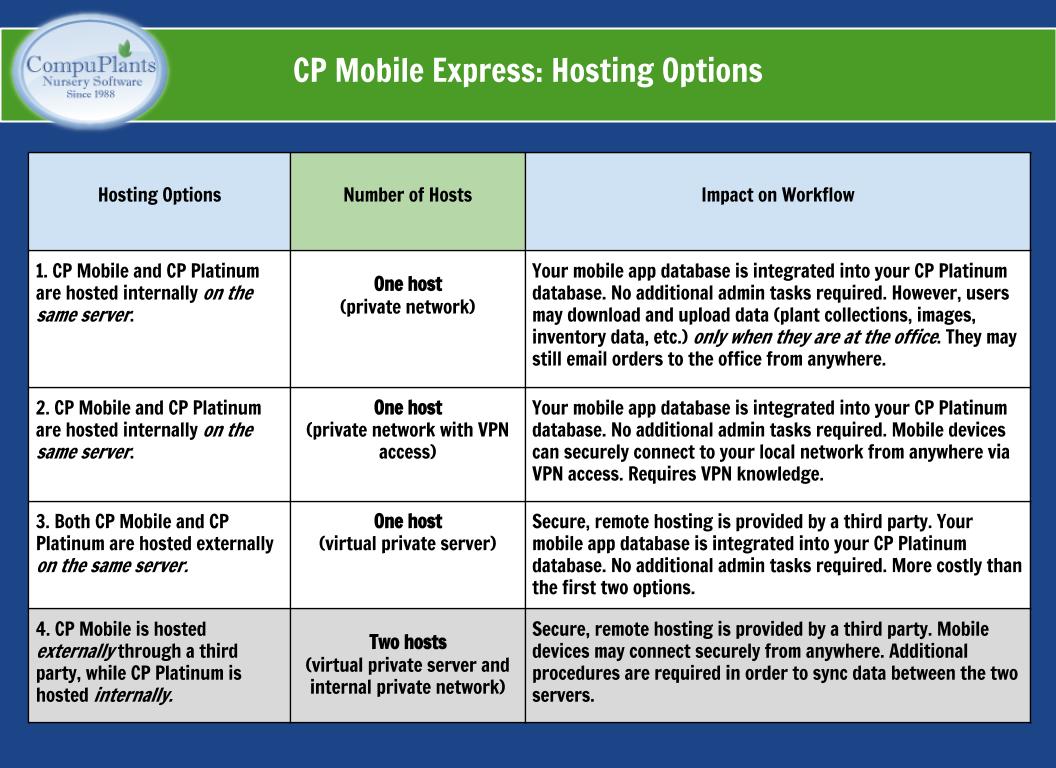
The following figure shows the most common hosting arrangements and their impact on a user's workflow.
Workflow Overview: One Host
This table provides an overview of the steps involved in using CP Inventory when it is hosted on the same server that hosts CP Platinum. From initial setup to conducting a count, this overview will serve as a helpful reference as you're getting started with the mobile app.
| Ordered Steps | Application |
|---|---|
| 1. Choose which table you wish to use for your product quantities: the Inventory Edit table or the Field Inventory table. Save your preference in the admin option mobileinmethod. | CP Platinum |
| 2. Download and install the mobile app. | CP Inventory |
| 3. Configure mobile device settings and test connection. | CP Inventory |
| 4. Authorize mobile devices. | CP Platinum |
| 5. Conduct a count. | CP Inventory |
| 6. (Optional) Preview and post mobile inventory. | CP Platinum |
Workflow Overview: Two Hosts
This table provides an overview of the steps involved in using CP Inventory when it is hosted on a different server from that which hosts CP Platinum. Each CP Platinum task includes a note indicating which location you must be logged into in order to perform the task: your main CP Platinum host IP address ("Main"), or your mobile CP Platinum host IP address ("Mobile")
| Ordered Steps | Application |
|---|---|
| 1. Save the host server IP address in the admin option hostmobileip. | CP Platinum (Main) |
| 2. Create a connection to CP Platinum on the mobile host and log into the new location. | CP Platinum (login screen) |
| 3. Choose which table you wish to use for your product quantities: the Inventory Edit table or the Field Inventory table. Save your preference in the admin option mobileinmethod. | CP Platinum (Mobile) |
| 4. Download and install the mobile app. | CP Inventory |
| 5. Configure mobile device settings and test connection. | CP Inventory |
| 6. Authorize mobile devices. | CP Platinum (Mobile) |
| 7. Conduct a count. | CP Inventory |
| 8. Preview and post quantities. | CP Platinum (Main) |
CP Platinum Procedures
This section provides instructions for all the procedures that integrate CP Inventory with your main CP Platinum program. Some procedures must be performed by an admin user, while others may be performed by ordering and inventory personnel.
Configure CP Inventory Admin Options
Host Server IP Address
If CP Inventory is hosted on a separate server, you must save the IP address for that server under the admin option hostmobileip. Those users hosting CP Platinum and CP Inventory on the same server should disregard this admin option.
- Log in to CP Platinum, selecting the IP address for your main CP Platinum host.
- Navigate to Administration > General > Prefs & Options.
- Conduct a search for the parameter "hostmobileip".
- Enter the IP address in the field labeled "Value".
- Click "Save". You can now share information between the mobile host and your main CP Platinum host.
Inventory Method
CP Inventory supports both container and field inventory maintenance and requires virtually no setup. Depending on your preferences, it can download data from the Inventory Edit table or from the Field Inventory table. Save your preferences under the admin option mobileinmethod:
- "sales" derives product quantities from the Inventory Edit table, for container nurseries
- "field" derives product quantities from the Field Inventory table, for field nurseries
Create a CP Platinum Connection to the Mobile Host
For nurseries that are hosting CP Platinum and CP Inventory on different servers, you will manage devices and complete other administrative tasks from a secondary instance of CP Platinum. This secondary instance, which is strictly for managing your CP Mobile apps, is hosted on the same server that hosts CP Inventory, and includes three modules: Administration, CP Mobile Express, and Setup.
- If you're currently logged into your main CP Platinum application, you can leave that window open.
- Open a new instance of CP Platinum by (for instance) double-clicking the desktop shortcut.
- In the login dialog, select "New". A second dialog opens.
- Save settings for the new connection:
- Location: User-defined value; you could enter "mobile" to indicate that this connection is the server hosting CP Inventory.
- Database: The database name (not the type of database); may be assigned by the admin user or by CP Support.
- Host/Server IP: This may be the host name or the 10-digit IP address of the mobile host. If using the IP address, it must be static.
- Port:
6312 For MySql or MariaDB hosted on Windows or Linux. Note: Other ports can be assigned. Check with your IT administrator. 6315 For C/base database hosted on Windows or Linux - Check the appropriate server settings:
Use cpNetApi This must be checked if using CP Platinum version 6.x. Note: This setting does not appear with vesion 7.x. Use compression Check this box for users connecting remotely. To improve performance, data is compressed on the host server before the user downloads it to his local machine, where it is uncompressed. Use SSL Ideal for remote connections and for those that want a more secure connection. Data is encrypted before being transferred between the host server and local machine. Note: Please contact CP Support if you would like to implement this feature, as the host server requires some additional configuration.
- Click OK to save the connection and close the dialog.
Log in to CP Platinum on the Mobile Host
- Open a new instance of CP Platinum.
- On the login screen, select the mobile host location.
- Enter the username and password associated with this location (these could be different from your main CP Platinum login credentials).
- Click "OK". You are now logged into the mobile server.
Authorize Devices
You will need to provide each user with your server IP address and database name. When users download the app to their phones, they'll enter this information in the application settings and connect to the server. Once the connection is made, a license request appears on the right side of the Manage Devices form. Each device will show a unique device ID.
Admins have three days to authorize the device. During that time, users have full permission to download and upload data. If the grace period expires and the device has not been authorized, however, the app will defect when the user attempts to connect to the server.
To authorize a device:
- Go to Administration > Manage Users & Devices, and click the Devices tab.
- From the License Requests grid, highlight the device you wish to authorize.
- Double-click the device ID, or click the left arrow, to move the device to the Current License grid. This authorizes the device.
Deactivate Devices
Once you reach the maximum number of licenses in use, the program will not allow you to authorize another device. However, you may deactivate a device to authorize a new license request. The number of active licenses cannot exceed the total device licenses you've purchased
Delete Devices
At this time, users are not allowed to delete devices.
Inventory Preview & Import Options
There are a few menu options for previewing and importing your mobile inventory counts. These options depend on your hosting arrangement and whether or not you wish to be able to print a record of the mobile inventory count before integrating the data into your main CP Platinum database.
Preview & Post: One Host
| Menu Option | Description |
| Inventory Preview | If you would like to be able to print a record of the latest count, use this form to do so before posting the quantities to inventory. Click "Find", then right-click anywhere on the grid and select "Export to Excel". Browse to the folder where you wish to save the file. |
| Post Inventory | This option would be useful to those customers who don't wish to print a record of the latest counts. Simply click "Find" to download the mobile count. When you are ready to post, select "Post Inventory". |
Preview & Post: Two Hosts
| Menu Option | Description |
| Inventory Preview & Export | Allows you to preview mobile inventory quantities and export the data to a spreadsheet. Click "Find" to display the uploaded quantities, then right-click the grid and select "Export to Excel" to save as a spreadsheet. Ensure that hostmobileip is configured before using this form.
Note: You must perform this procedure in CP Platinum on the mobile host.
|
| Import & Post | After exporting the uploaded quantities to a spreadsheet, use this form to import quantities. The uploaded quantities are automatically posted when the import is complete. Refer to Import Inventory Spreadsheets for instructions on importing.
Note: You must perform this procedure in CP Platinum on the main host.
|
| Import Mobile Inventory | This option would be useful to those customers who don't wish to print a record of the latest counts. Simply click "Download" to download the data from the mobile host. Click "Refresh" at any time to refresh the quantities. When you are ready, click "Post" to post the quantities.
Note: You must perform this procedure in CP Platinum on the main host.
|
CP Inventory Procedures
Download and Install CP Inventory
- iOS users: Go to the iTunes App Store on your mobile device to download the app.
- Android users: Download the APK installer Version 1.0 here.
- iOS users: Go to the iTunes App Store on your mobile device to download the app.
- Android users: Download the APK installer Version 2.0 here.
Configure Mobile Device Settings
Access settings by tapping the gear wheel in the upper left-hand corner of the screen. After minimal setup on your mobile device, you'll be ready to enter orders.
| Setting | Description |
|---|---|
| Server Address | Enter the IP address provided by CompuPlants. |
| Database Name | Enter the name of the database on your server, also provided by CompuPlants. |
| Test Connection | If you receive a "lost connection to server" message while using the app, run this test and your connection should be restored. |
| Username | Enter a unique user ID (it does not have to match the user's CompuPlants credentials). This information is displayed on CP Inventory reports so the administrator knows which user is responsible for an order; the mobile app does not require a user login/password. |
| WiFi Only | Communicating with the server over a WiFi connection prevents the app from using your valuable data. With this switch turned on, you can still save orders and log product quantities on your device. When you establish a WiFi connection, the application will automatically push data to the server. |
| Automatic Upload | If you turned the previous switch on, use this switch to control when the app uploads data to the server. As extensive uploads can consume considerable battery power, you might prefer to upload only when you have an alternate power source. If so, leave the switch off. |
Conduct a Count
- Download data from the server, preferably when you have a WiFi connection and/or alternate power source.
To edit all locations where a single plant is found, follow steps 2-8; or, proceed to step 9 to edit all plants in a single location. - Click the "Plant Search" button.
- Select a plant from your product list.
- You may select only one plant at a time.
- Click "Locations" to view a list of all locations where the plant is found.
- Tap a location.
- The application will display other plants found there as well.
- Type the product's current quantity into the quantity field.
- The background color turns to yellow to indicate that you've changed it.
- The application automatically saves changes.
- Return to the Locations page.
- Repeat steps 2-7 to update quantities in another location.
*To return to the main locations page, click the red X on the plants list, then click "Locations". - To edit quantities for all plants in a single location instead, simply click a location from the main Locations page and edit quantities as described in step 6.
- Upload data to the server.
- The data is translated to a report in Collection Logs.
- Import updated quantities from Collection Logs into the Inventory module (see Physical Count Procedures, #4).
- Currently, this must be done manually.