Introduction
CompuPlants Platinum is a feature-rich program that handles virtually every aspect of business management, so there's quite a bit to set up. To make this process easier, we've broken it down into clearly outlined steps with helpful screenshots and tips. The majority of the setup process occurs in the Conversion module, where you'll import all of your data. Once the initial imports are completed, you'll be ready to enter your beginning inventory and process orders. You can find documentation on those processes in our CompuPlants Platinum help.
Download & Install CompuPlants Platinum
Click here to download CompuPlants Platinum. Once downloaded, follow the instructions provided during the installation process to install the program.
I. Create Company Masthead
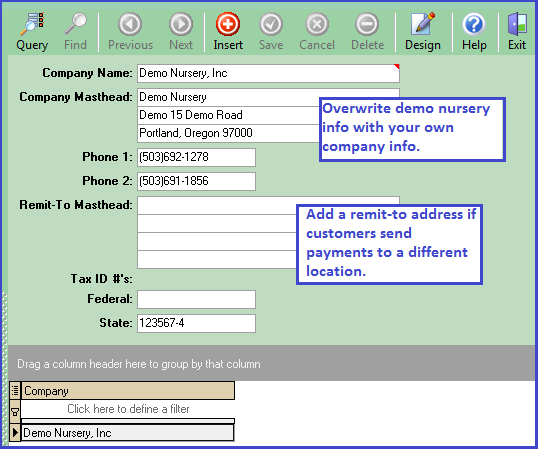
The masthead, which includes your company's name and, optionally, address and phone number(s), will appear on invoices, statements, checks, etc.
- Go to Setup > General > Company Masthead.
- Click "Find." Information for a demo nursery appears.
- Overwrite the masthead for the demo nursery with that of your own.
- (Optional) Enter a "Remit-to" masthead if customers send payments to a different location.
- Click "Save."
II. Set Up Users
CompuPlants accommodates multiple user accounts and varying degrees of user permissions. This setup stage involves three main steps, all of which are completed in Administration > User Setup.
- Add new users.
- Establish permission groups.
- Save user options.
1. Add New Users
CompuPlants comes with four default users:
- Admin: This is a superuser and the account used for setup. Do not edit username or delete user.
- Dev: This user views incoming transactions in the EDI module. Do not edit username or delete user.
- Truck: This user is involved in the Truck Watch program, so his or her email should be configured. Do not edit username or delete user.
- Nursery: This is a temporary, non-admin user. You may edit or delete this user.
- Go to Administration > User Setup > Manage Users & Devices.
-
In v7.0, this form shows two tabs: Users and Devices. The Users tab shows the total user licenses for CompuPlants Platinum (desktop program), while the Devices tab shows total device licenses for those users with a CompuPlants mobile app. Licensing for the mobile apps must be purchased separately. Mobile users can find instructions for managing devices on the CP Orders documentation page.
- From the Users tab, click “Insert.”
- Provide a username.
- Set the user status to "active." Every active user reduces the number of available licenses by one. The program will not allow you to add another user when all licenses are in use. You may, however, deactivate a user then create and activate another user.
- Enter a password.
- If the user is a sales rep, enter the Sales Rep ID.
-
Check the applicable account type:
- "Admin" gives the user full access to all menu modules and data.
- "Full Rep Access" applies to manager-level users with permission to access all sales rep information and is pertinent to the Sales Express module.
- "Only Hourly" applies to payroll reports.
- "Lock Grids" disables the new grid layout feature.
- (Optional) Design privileges relate to CompuPlants' integrated developer tools, where users may customize the main menu, field labels, add new fields and modules, change scripts, and more. Learn more in Developer Tools.
- Configure the user's email. This is for sending SMTP and is predominately used in 7.0, but also used in various programs in 6.0.
- Click “Save.”
Change Passwords
By default, only the admin user has the ability to change users' login and email passwords, as the Change Password form is housed in the Administration module. Coming soon: admins will be able to allow individual users to change either or both passwords, or they may continue to reserve this privilege for the admin only. Two admin options control these preferences:
- pwmode: set to "0" to allow users to set their own CompuPlants login passwords
- emailconfig: set to "0" to allow users to set their own email passwords
2. Establish Permission Groups
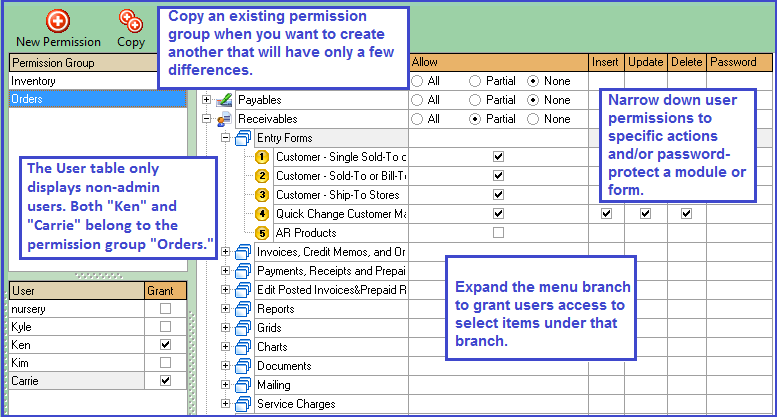
This form allows you to set specific permissions for non-admin users. You may set permissions by user, in which case you would give the permission group the same name as the user, or by a group of users, naming the group by department (e.g. "Sales").
- Go to Administration > User Setup > Permissions.
- Click “New Permission.”
- In the dialog box, type the name of a new permission group.
- On the User table, include individual user(s) in the group by checking the box labeled "Grant."
- Assign group permissions:
- For unrestricted access to a module, select "All."
- For full restriction to a module, select "None." The module will not appear on the user's main menu.
- For partial access, check "Partial," then expand the module by clicking the plus (+) sign. Continue expanding topics until check boxes appear under the "Partial" column. Check each menu tree item that the user may access. Further delineate permissions with the "Insert," "Update," and "Delete" parameters to the right.
- (Optional) Enable password protection for any module or menu tree item by typing the password in the last column.
- Click “Save.”
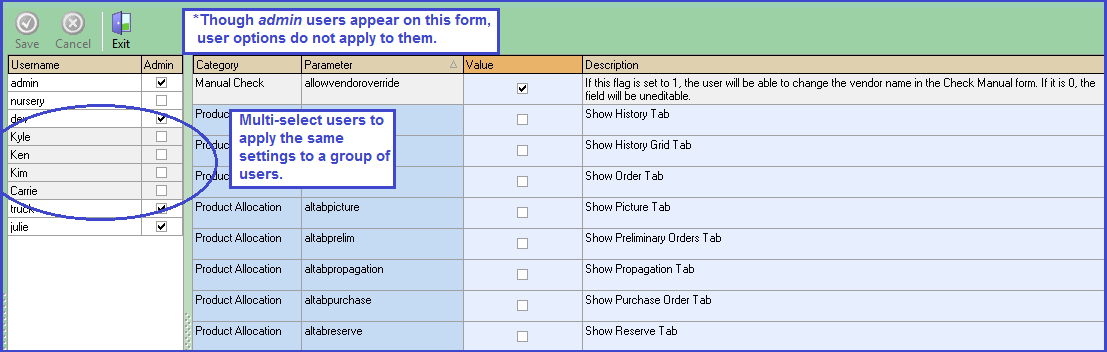
3. Save User Options
Admin users can further manage user permissions and preferences with user options. User options either grant users certain privileges, such as the ability to change a customer's payment terms or default discount percentage; or, they control which tabs display on a form. You may wish to deny non-admin users access to sensitive customer information, or to remove tabs that are not relevant to the employee's responsibilities.
Peruse the description for each option and choose the setting you want. Find more information about user options on the Administration help page.
III. Organize the General Ledger
This stage of the setup process is critical. With each step, you'll want to double-check your work, as the accuracy of your financial statements depends on it.
This process includes the following steps:
- Determine your starting financial period.
- Choose a Format for GL Accounts
- Construct a chart of accounts in a spreadsheet.
- Import GL accounts.
- Enter trial balance.
1. Determine Starting Financial Period
Decide which financial period CompuPlants will begin its accounting records. Then, go to Setup > Financials > Close Dates, where you'll find pre-loaded financial periods. The objective is to close all periods prior to the period that precedes the starting financial period. For instance, if you're making the transition to CompuPlants in January 2015, you would leave January 2015 and December 2014 open and close all previous periods. To find the desired financial period more quickly, sort the table by year, then by period: after clicking the "Year" column, hold down the Shift key and click the "Period" column header.
By default, CompuPlants' financial periods follow the calendar year. If your financial periods follow a different pattern, you'll first need to update the closing date for each corresponding period. The table below shows the modified closing dates for a nursery whose fiscal year begins in September.
| Year | Period | Default Close Date | New Close Date |
| 2015 | 1 | 1/31/2015 | 9/30/2015 |
| 2015 | 2 | 2/28/2015 | 10/31/2015 |
| 2015 | 3 | 3/31/2015 | 11/30/2015 |
| 2015 | 4 | 4/20/2015 | 12/31/2015 |
| 2015 | 5 | 5/31/2015 | 1/31/2016 |
| 2015 | 6 | 6/30/2015 | 2/28/2016 |
| 2015 | 7 | 7/31/2015 | 3/31/2016 |
| 2015 | 8 | 8/31/2015 | 4/30/2016 |
| 2015 | 9 | 9/30/2015 | 5/31/2016 |
| 2015 | 10 | 10/31/2015 | 6/30/2016 |
| 2015 | 11 | 11/30/2015 | 7/31/2016 |
| 2015 | 12 | 12/31/2015 | 8/31/2016 |
2. Choose a Format for GL Account Numbers
Organizing your chart of accounts is the first step to ensuring accurate financial records. While there isn't a prescribed format, you should exercise logic and consistency when creating GL account numbers. Smaller nurseries may prefer to use only the chart number, while larger nurseries will benefit from using division and/or department numbers. After choosing a format, stick with it and double-check your account numbers!
- The final GL account number cannot exceed 15 characters.
- If you're using division and/or department as part of your chart of accounts, you'll also need to set those up in Setup > Financials.
GL Account Guidelines
| Format | Examples |
| chart number (we recommend at least 3 characters) | 009 |
| chart number & division number |
chart 009, division 1: |
| chart number & department number |
chart 009, dept 10: |
| chart number & department number & division number |
chart 009, department 10, division 1: |
3. Construct the Chart of Accounts in a Spreadsheet
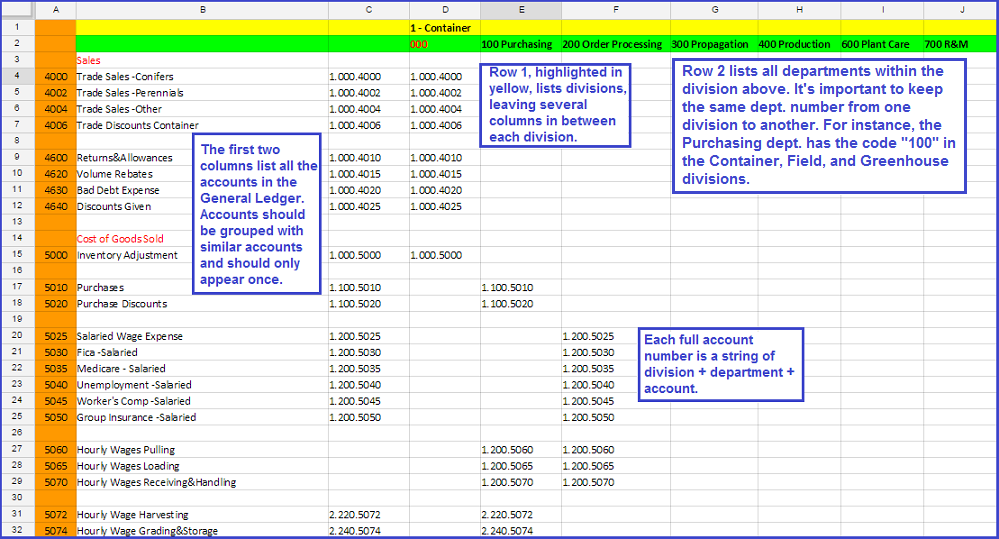
As you're constructing your chart of accounts, it might help to format your spreadsheet after the example provided below. This spreadsheet depicts the chart of accounts for a multi-division nursery. Division 1 is for container inventory, Division 2 for field, and Division 3 for greenhouse. Each account is listed vertically, while divisions and departments are listed horizontally, allowing you to easily cross-reference the account number with division and department numbers. While this format is useful for plotting your chart of accounts, it does not match the format required for uploading data, so you will need to re-format the spreadsheet or create a new one before importing.
4. Import GL Accounts
- Format your spreadsheet according to the header row provided on the import form:

-
a. If you're not using division or department, insert a "0" in each of these columns.
b. The column labeled "Account Type" refers to the balance sheet, so enter "yes" if the account appears on the balance sheet, and enter "no" if the account appears on the income statement.
-
*Tip: You may import more than one spreadsheet, which is common for users who separate balance sheet accounts and income statement accounts into different spreadsheets.
- Once the spreadsheet is properly formatted, navigate to the Conversion module.
- Select CP Imports > "Clear Financials." This removes all existing financial data.
- Select "Clear Accounts" to delete any existing demo GL accounts.
- Select "Accounts", where we'll upload and import the spreadsheet.
-
a. Click "Open." Windows Explorer will appear so that you can navigate to the appropriate file and open it.
b. Delete the first row: click in any cell in row 1, then click the minus button ( - ) in the bottom left corner.
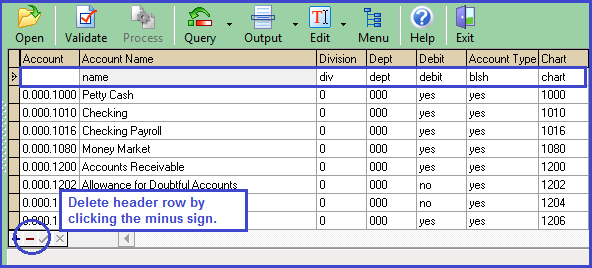
c. Select "Validate."
d. Select "Process." If the program finds any errors, such as duplicate records, it imports all records except those with errors.
5. Enter a Trial Balance
Your trial balance will be recorded a bit differently depending on the time of year you're transitioning to CompuPlants. If beginning with Period 1, you'll record a journal entry for the ending period of the previous year. If your starting period is after Period 1, record a journal entry for the preceding financial period, taking into account your YTD income and expenses.
- Go to Financials > Entry Forms > General Journal Entries.
- Click "Insert."
- Enter a journal entry number. This can be a 15-character, alpha-numeric code.
- Enter the last day of the previous financial period.
- (Optional) Enter a longer description for the journal entry.
- Click "Save," or go to directly to the detail page and the record will save automatically.
- On the detail page, click "Insert."
- Check "Debit" if applicable.
- Select a GL account.
- Enter the balance.
- Click "Save."
- Repeat steps 7-11 to insert another detail.
- When you have entered all details, click "Verify." The debit and credit amounts much balance each other out. If they do not, the program will display a message at the bottom of the screen. If necessary, amend the journal entry and verify again.
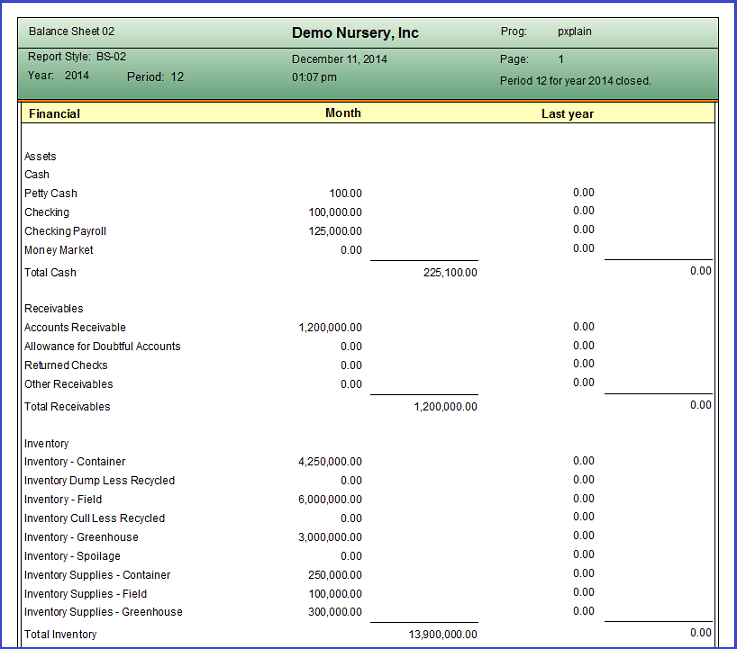
IV. Format Financial Statements
With CompuPlants' financial outliner program, you can design custom balance sheets and income statements, which is what we're going to do in this step. The formats you create will be used to generate those reports found under Financials Formatted in the Financials module. We'll first close the two financial periods that are currently open, so that balances appear when we preview the balance sheet.
Steps in this process:
- Close the previous and current financial periods.
- Format a balance sheet.
- Format an income statement.
- (Optional) After formatting your financial statements, you may wish to associate individual users with an outline style. For more information, refer to Assign Users to Outline Styles.
1. Close Previous and Current Financial Periods
In the previous section, we used the form under Setup > Financials > Close Dates to close all financial periods prior to our starting month and the preceding month. From now on, we cannot use this form to close financial periods as it is for setup only. Instead, we'll navigate to the Financials module, where regular closing occurs.
- Go to Financials > Closing > Monthly Close(Final).
- Enter the accounting year and period for the previous month.
- Enter the closing account number (i.e. net profit/loss account).
- Click "Execute." The program runs a series of processes and returns the outcome to you. If an error occurs, a red X will appear in the return script.
- Repeat steps 1-4 to close the current financial period.
2. Format a Balance Sheet
Formatting your financial statements requires a fair amount of organizational skills. The balance sheet—similar to the income statement—is constructed line-by-line. Each title, account, and subtotal is assigned its own line number. The program arranges the lines in sequential order, so it's important that you plan the numbers ahead of time and stay in sequence as you insert each line.
A financial statement consists of a series of sequences. A sequence can either contain a group of lines, or it can be a single line, in the case of titles and subtotals. We suggest formatting the title, account, and subtotal lines, then moving accounts from the right-hand grid ("Details to Place") into their respective sequences on the left-hand grid ("Report Outline").
1. Navigate to Financials > Entry Forms > Balance Sheet Outliner.
2. Save a new balance sheet style:
-
a. Click "Insert."
b. Enter a style code, which should be a unique identifier. It may be a 15-character, alpha-numeric code.
c. (Optional) Enter a more detailed description of the balance sheet.
d. (Optional) Add pertinent notes in the Notes field.
e. Click "Save," or click "Detail" and the program automatically saves the record.
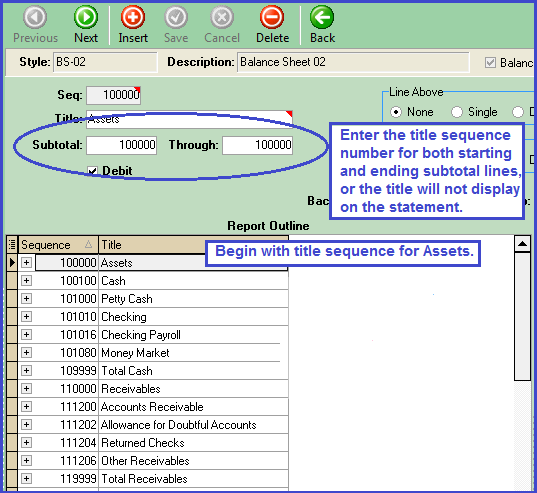
3. On the detail page, create a sequence for the title line, "Assets":
-
a. Click "Insert."
c. In the "Sequence" field, assign the line a number (see note below).
d. Enter the title ("Assets").
e. Copy the sequence number to both the starting and ending subtotal fields. The program will then recognize this as a title line and display it properly.
f. Check the Debit flag.
g. Click "Save."
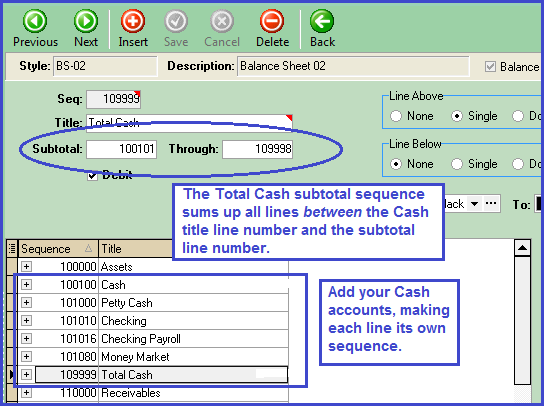
4. On the detail page, add the Cash group of accounts, which includes a title sequence, a sequence for each account, and a subtotal sequence:
-
a. Create a title sequence called "Cash", following the same steps above.
b. Create a sequence for each account, leaving the subtotal lines blank.
-
* Accounts can be grouped into the title sequence but, if done this way, the accounts do not appear on the balance sheet (or income statement) and the program shows only the sum of all account balances rather than individual balances (which could be acceptable for an informal statement). Creating a sequence for each account ensures that all accounts are listed with their respective balances.
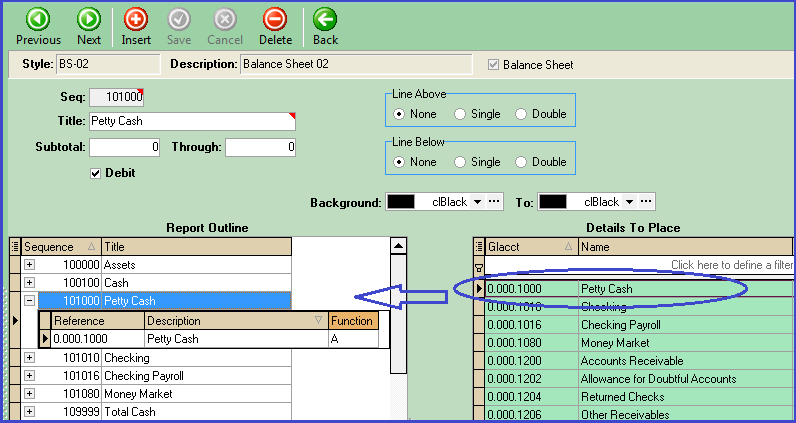
5. From the Details to Place grid, move each related account to its respective sequence. The background turns to green, indicating that the record has been moved.
-
* You may find it more efficient to move accounts after you've created all sequences for the balance sheet.
6. Continue adding title sequences, account sequences, and subtotal sequences until all assets have been accounted for. After the last subtotal line, insert a "Total Assets" subtotal sequence and place a double line above it.
7. Construct the Liabilities & Equity section of the balance sheet in the same manner that you constructed the first half.
8. When you're finished, go to Reports > Financials Formatted > Balance Sheet, and generate a report using the style you just created. You may choose to print sequence numbers on the statement, or to omit them. Note any formatting errors or inconsistencies, and return to the Outliner to correct them if necessary.
3. Format an Income Statement
Formatting the income statement is just like formatting the balance sheet, except that there is only one grand total rather than two. Also, many nurseries develop two income statement styles: a formal style that lists every income and expense account along with its balance, and a less formal style that groups accounts into the title sequence, thereby displaying only the sum of the accounts included in the group.
1. Save an income statement style:
-
a. From Financials > Entry Forms > Income Statement Outliner, click "Insert."
b. Supply a Style code, which should be a unique identifier. It may be a 15-character, alpha-numeric code.
c. Enter a more detailed description of the income statement.
d. (Optional) Add pertinent notes in the Notes field.
e. Click "Save."
f. Click "Detail."
2. Create a title sequence:
-
a. Click "Insert."
b. In the "Sequence" field, enter the starting sequence number. It helps to start with a high rounded number, such as 100 or 1000. You may display or hide sequence numbers when printing financial statements. If you choose to print them, consider matching the line number to the account number (note: this method does not work well with consecutive account numbers).
d. Enter the title for the account group.
e. Copy the sequence number (from step b) to both subtotal lines. This triggers the program to display this line as a title.
f. Check the debit flag if applicable.
g. Click "Save."
h. (Optional) If grouping accounts together, thereby viewing only the group summary, move all related accounts from the "Details to Place" grid to the "Report Outline" grid. Make sure the desired sequence is highlighted. If listing all accounts, skip this step and continue to step 3.
3. Create an account sequence (if listing all accounts on separate lines; if not, proceed to step 4):
-
a. Click "Insert."
b. Enter the sequence number, using a sequentially higher number than the previous sequence.
c. Enter the account name as the title.
d. Leave the subtotal lines blank.
e. Check the Debit flag if applicable.
f. Click "Save."
g. Move the related account from the "Details to Place" grid to the "Report Outline" grid.
h. Repeat these steps to create another account sequence within the same group.
4. Create a subtotal sequence:
-
a. Click "Insert."
b. Enter the sequence number, staying in sequence with the last number used. Leave a cushion so that you can include more accounts in this subtotal in the future if necessary (at least 10-20 lines).
c. In the subtotal lines, set the beginning line to the line following the Title sequence number and set the ending line to the line preceding the subtotal sequence number.
d. Insert a single dividing line above the subtotal. Make sure the subtotal line is highlighted.
e. (Optional) Add background color(s) to the subtotal amounts. Color is applied on a gradient, beginning with the first and ending with the second.
f. Click "Save."
5. Create as many title, subtotal, and/or account sequences as necessary until all of your active accounts are included in the income statement.
6. When adding the last subtotal line, it is common to insert a double dividing line below the subtotal, separating it from the grand totals row.
V. Set Up Accounts Payable
Steps in this process:
- Set up payment terms.
- Format vendor spreadsheet.
- Import spreadsheet.
- Edit AP, Bank, and Terms Discount Accounts for vendors.
- Pay outstanding vendor invoices.
1. Set Up Payment Terms
Payment Terms is a required column on the vendor spreadsheet. If the program cannot match the payment terms on the spreadsheet to payment terms stored in the database, the records will not import.
- Go to Setup > Receivables > Payment Terms.
- There may be some default terms stored in the database, so click "Find" to see which terms already exist.
- Edit or delete existing terms, if applicable, or insert new terms and save.
2. Format Vendor Spreadsheet
The vendor spreadsheet should be formatted according to the spreadsheet in the screen shot below.

3. Import Vendor Spreadsheet
- Go to Conversion > Imports CP > Clear Vendors and execute the process of clearing any existing demo data.
- Under Imports CP, open the "Import Vendors" form.
- Click "Open" to trigger Windows Explorer and navigate to and select the appropriate file.
- Once the selected file opens, delete row 1 by clicking into a cell within the row then clicking the minus ( - ) sign in the bottom left corner.
- Select "Validate." The program will catch any errors and highlight them. If necessary, make corrections to the spreadsheet, then re-upload and validate again.
- Select "Process."
4. Edit AP, Bank, and Terms Discount Accounts
After importing vendors, we now need to navigate to the vendor records and update these fields, along with any optional information you wish to add for each vendor (e.g. usual expense account or 1099 code).
- Go to Payables > Entry Forms > Enter Vendors.
- Click "Find."
- Highlight all records on the bottom grid (Ctrl - A).
- Right-click the AP Account column header. The quick-change pop-up menu appears.
- Click "Quick-Change." A dialog appears.
- Enter the correct GL account and click "OK."
- Repeat steps 4-6 to edit the Bank and Terms Discount accounts for all vendors.
5. Pay Outstanding Vendor Invoices
Paying outstanding invoices requires re-opening closed financial periods, so it's a good idea to pay as many as you can now to avoid having to re-open and close financial periods moving forward. If your outstanding invoices skip a month, you must re-open all sequential periods from the current to the earliest.
Important: Re-opening Financial Periods
After formally closing a financial period, it can only be re-opened using the Reopen tool housed in the Financials module. Since we have only formally closed two financial periods at this stage—the current and immediately preceding periods—we must re-open any periods prior to these last two using the tool housed in the Setup module (Setup > Financials > Close Dates). Simply uncheck the boxes where applicable and click "Save." When you're ready to close the periods again, navigate back to the Financials module to do so.
Pay Outstanding Vendor Invoices:
- If you haven't already, reopen financial periods following the guidelines above.
- Navigate to Payables > Entry Forms > Payables Vouchers and enter a voucher:
-
a. Click "Insert."
b. Enter all required information: the date of entry, vendor ID, bank account, pay date, and total amount.
-
* The date entered in the "Date" field corresponds with the financial period. In the interest of best accounting practices, this date should fall on or after the vendor's invoice date.
* If you provide the vendor's invoice date, CompuPlants will automatically calculate the pay date based on the payment terms.
* CompuPlants prevents users from creating multiple vouchers for the same invoice. Where the vendor ID AND vendor invoice number match an existing record, the user cannot save a new voucher.
-
* Tip: For vendors sending statements rather than invoices, you may wish to establish your own invoice numbering sequence, such as "2015Jan", "2015Feb", and so on.
e. Enter required information: "Ledger," "Voucher/GL account," and "Amount."
-
* Tip: You can set "gl" as the default value for "Ledger" by right-clicking the field and choosing "Set Insert Default." Learn more about form defaults here.
g. Click "Save."
h. If the payment will be applied to more than one expense account, add another detail page.
i. Return to the voucher header form.
j. Assure that all information is correct and click "Verify."
VI. Set Up Accounts Receivable
Steps in this process:
- Format spreadsheets.
- Import spreadsheets.
- Update required, default, and optional settings in the customer file.
- Create AR product accounts.
1. Format Customer Spreadsheets
Sold-to, ship-to, and bill-to customers are imported separately, so you must first create three spreadsheets that are organized accordingly. Format the spreadsheet columns according to the sample header row below:

Notes on Column Headers
- "Code" refers to the two-digit customer code:
- SS for single sold-to
- SO for a sold-to customer with multiple ship-to locations
- SH for ship-to customers
- "Customer" refers to the customer ID. This may be up to 5 characters (letters or numbers).
- "Sold-to" is used for ship-to customers only—enter the corresponding sold-to customer ID.
2. Import Customer Spreadsheets
- Go to Conversion > Imports CP > Clear Customers and execute the process of clearing any existing demo data.
- Under Imports CP, open the "Import Customers" form.
- Select the type of customer you'll be importing:
- SS (Single Customer Code)
- SO (Customer Sold-to)
- SH (Customer - Multiple Ship-to's)
- Click "Open" to trigger Windows Explorer, then navigate to and select the appropriate file.
- Once the selected file opens, delete row 1 by clicking into a cell within the row then clicking the minus ( - ) sign in the bottom left corner.
- Select "Validate." The program will catch any errors and highlight them. If necessary, make corrections to the spreadsheet, then re-upload and validate again.
- Select "Process."
- Repeat steps 3-7 to import the remaining customer spreadsheets.
3. Update Required, Default, and Optional Settings in the Customer File
The spreadsheet we imported in the previous step contains most of the information required for each customer; however, we do need to provide a little more information, including AR Account and Freight Method. Now is also a good time to change any of CompuPlants' default settings and/or save optional settings.
The Quick-Change Customer Master makes it easy to modify multiple customer records at the same time. Find the quick-change grid in Receivables > Entry Forms. Note that this grid lists only SS and SO customers, not ship-to stores.
Required Settings
- AR Account: To update all customer records using the quick-change grid: Highlight all rows, then right-click the column labeled "AR Account." Select "Quick-change," then type the AR account number and click "OK."
- Freight Method: CompuPlants offers four methods for calculating freight charges: a combination of ShipVia, Zone, and Units; Freight Percent; Freight Zone; or Manual (where the user enters a flat rate). You can store default freight methods by customer or by carrier.
- If storing default freight methods by customer, change the admin option oefreightfromshipvia to "0". Then, associate a freight method with each customer (if using the Customer Master quick-change grid, enter a number 1-4).
- If storing default freight methods by carrier, leave oefreightfromshipvia at the default setting. Go to Setup > Freight > Carriers and set up carriers, associating a freight method with each. If desired, associate a default carrier in the customer file ("ShipVia" field).
CompuPlants' Default Settings
- Credit Status set to "approved" ("pending" and "hold" are alternative settings).
- Page Style set to "GN" (you may edit this page style and/or create new page styles in Setup > Orders > Page Styles.
- Price Style set to "DF" (you may edit this price style and/or create new price styles in Setup > Receivables > Customer Price Styles.
- How Pay set to "O".
Optional Customer Settings
- Interest Percent for calculating service charges (labeled "Late Charge" on Customer Master Quick-change grid)
- Locality tax rate
- Purchase Order Required
- Credit Limit
- Print Statement
- Discount Account
4. Create AR Product Accounts
These accounts facilitate posting sales to the general ledger, so you should have a matching AR Product Account for each GL sales account (read more about methods for posting sales to the general ledger here). Navigate to Receivables > Entry Forms > AR Products. When creating AR product accounts, be sure to link each account to its respective GL sales account.
If posting sales by plant:
You may wish to group all plant sales together in reports by assigning each AR Product Account the same category. After importing products, navigate to the product catalog quick-change grid, where you'll need to link each product to the appropriate AR Product Account.
If posting sales by product type:
When configuring product types, you'll need to link each product type to the appropriate AR product account, then assign a product type to each product in the catalog.
VII. Set Up Inventory
Steps in this process:
- Read our product setup guidelines and determine which codes will make up your product ID number.
- Clear inventory data.
- Import plants.
- Import sizes, types, and/or grades, depending on your product ID convention.
- Import products.
- Check duplicate products and references.
- Import locations.
- Save availability and royalty settings.
- Import catalog prices.
- Import beginning inventory.
1. Product Setup Guidelines
Exercising logic and consistency when establishing product ID conventions will ensure that your product catalog is well organized, contains no duplicates, and can accommodate enough unique product IDs for a large, diverse inventory.
Each unique product ID is a string containing the plant code plus at least one secondary code:
-
size, which refers to the size of the container in which the plant is grown, or the bottom size, and may contain 2 characters
type, which refers to the form in which the plant is sold, such as grafted or espaliered, and may contain 2 characters
grade, which refers to the height (top size) at which you plan to sell a plant (as opposed to the height of a plant at its maturity), and may contain 4 characters
As an example, the product ID for Berberis thunbergii "Crimson Pygmy", 114725, can be broken down into the following:
- plant code 1147
- size code 25
Which Codes to Use?
Usually, the breadth and depth of your inventory determines which codes to use and in which order to use them:
- Nurseries with few product sizes may find that a combination of plant and size is sufficient.
- Nurseries with several sizes may find that a combination of plant and grade is sufficient. In this case, "grade" could refer to the bottom or top size.
- Nurseries with numerous sizes would benefit from using plant plus all three secondary codes. To create the greatest number of permutations, re-sequence of the codes so that grade comes before type. Our Technical Support team may do this for you upon request.
Tip: When entering codes, use the same number of characters for every code to allow data to sort properly on grids and spreadsheets. For instance, when sorting a grid by ascending size, "3" (for 3 feet) will appear below "10" (for 10 feet). A consistent, double-digit format ("03", "10") allows data to sort in the right order.
2. Clear Inventory Data
Navigate to Conversion > Imports CP, where you'll clear any demo data contained in the inventory module, including plants; products; sizes , types, and grades; and locations.
3. Import Plants
- Format a spreadsheet according to the sample header row provided on the Import Plants form.

-
a. Plant (Required): Enter a unique plant code (alpha-numeric). We recommend a 4- or 5-character code, though it may contain up to 7 characters.
b. Plant Name (Suggested): 30-character limit.
c. Long Name (Optional): Enter the full botanical name (generally used by those nurseries exporting their product catalog to a website). 100-character limit.
d. Common Name (Optional): 50-character limit.
e. Genus (Optional): 50-character limit.
f. Species (Optional): 50-character limit.
g. Cultivar (Optional): 50-character limit.
h. Plant Traits (Optional)—Plant Type, Hardiness, Color/Color Description, Soil, Spread, Height, Blooms/Bloom Dates, Sun-Shade: These values should correspond with plant traits that you've saved in Inventory > Plant Traits. For more information about plant trait code requirements, refer to Save Plant Traits.
i. Patented (Optional): If yes, enter "true."
j. Patent # (Optional): 15-character limit.
- Navigate to Conversion > CP Imports > Import Plants.
- Click "Open."
- Browse for the appropriate file and select "Ok."
- Delete row 1 by clicking in any cell within the row, then clicking the minus ( - ) sign in the bottom left corner.
- Select "Validate." The program will catch any errors and highlight them. If necessary, make corrections to the spreadsheet, then re-upload and validate again.
- Select "Process."
*Tip: If you omitted plant traits and/or other optional values from the import, you may add this information to the Plants entry form in the future. You may also save plant notes, link a single image file to a plant using the Plants form, and/or link multiple image files to a plant using the Plant Pictures form.
4. Import Sizes, Types, and/or Grades
Import Sizes
"Size" refers to the size of the container in which the plant is grown, or the bottom size. The code may be 2 characters and contain letters, numbers, and/or special characters, such as a decimal. We recommend using a 2-character code for all size categories, using 0 as a placeholder where necessary (the code for a 1 gallon container size, for example, would be "01").
- Format a spreadsheet according to the sample header row provided on the Import Sizes form:

-
a. Size (Required): Enter a unique 2-character code for the size.
b. Size Name (Suggested): Provide a longer name (up to 7 characters).
c. Alternate Description (Optional): Enter a more detailed description of the size (up to 15 characters)
d. Tag Color (Optional): A reference for pull reports and tags/labels (up to 10 characters)
e. Net Contents (Optional): For weights and measures, prints on customer label (up to 35 characters)
- Navigate to Conversion > CP Imports > Import Sizes.
- Click "Open."
- Browse for the appropriate file and select "Ok."
- Delete row 1 by clicking in any cell within the row, then clicking the minus ( - ) sign in the bottom left corner.
- Select "Validate." The program will catch any errors and highlight them. If necessary, make corrections to the spreadsheet, then re-upload and validate again.
- Select "Process."
Import Types
Type refers to the form in which the plant is sold, such as grafted or espaliered. Like size, it may contain 2 characters with letters, numbers, and/or special characters.
- Format a spreadsheet according to the sample header row provided on the Import Types form:

-
a. Type (Required): Enter a unique 2-character code for the type.
b. Type Name (Suggested): Provide a longer name (up to 7 characters).
- Navigate to Conversion > CP Imports > Import Types.
- Click "Open."
- Browse for the appropriate file and select "Ok."
- Delete row 1 by clicking in any cell within the row, then clicking the minus ( - ) sign in the bottom left corner.
- Select "Validate." The program will catch any errors and highlight them. If necessary, make corrections to the spreadsheet, then re-upload and validate again.
- Select "Process."
Import Grades
Grade typically refers to the height (top size) at which you plan to sell a plant (as opposed to the height of a plant at its maturity). This code can be 4 characters and use a combination of numbers, letters, and special characters. We recommend that you use minimally a consistent 3-character code with zeros as placeholders where necessary. For example, the code for "2-3 feet" would be "023". If using a 4-character code, it would be "0023". This not only allows data to sort correctly, but also gives you the greatest possible permutations for product IDs.
- Format a spreadsheet according to the sample header row provided on the Import Grades form:

-
a. Grade (Required): Enter a unique 4-character code for the grade.
b. Grade Name (Suggested): Provide a longer name (up to 7 characters).
- Navigate to Conversion > CP Imports > Import Grades.
- Click "Open."
- Browse for the appropriate file and select "Ok."
- Delete row 1 by clicking in any cell within the row, then clicking the minus ( - ) sign in the bottom left corner.
- Select "Validate." The program will catch any errors and highlight them. If necessary, make corrections to the spreadsheet, then re-upload and validate again.
- Select "Process."
5. Import Products
- Format a spreadsheet according to the sample header row provided on the Import Products form. The following columns are required:
-
a. Product: Rather than manually entering the product ID, use Excel's concatenate function to string together plant code with size, type, and/or grade code. The columns must be in the correct sequence in order for the product ID to compile properly. If you are omitting one or more of the secondary codes, leave the column in the required position, but make sure that all cells are blank to prevent errors.
b. Plant: Enter an existing plant code.
c. Size, Type, or Grade: Enter the existing code for each component of your product ID (leave any unused columns blank).
d. Optional columns: Refer to the table below for a brief description of each.
- Navigate to Conversion > CP Imports > Import Products.
- Click "Open."
- Browse for the appropriate file and select "Ok."
- Delete row 1 by clicking in any cell within the row, then clicking the minus ( - ) sign in the bottom left corner.
- Select "Validate." The program will catch any errors and highlight them. If necessary, make corrections to the spreadsheet, then re-upload and validate again.
- Select "Process."
Import Products: Optional Columns
| Column Value | Description |
| Plant Name | Enter the plant name that matches the plant code. |
| Size Name | Enter the size name that matches the size code, if applicable. |
| Type Name | Enter the type name that matches the type code, if applicable. |
| Grade Name | Enter the grade name that matches the grade code, if applicable. |
| Plant Flag | As your inventory may consist of items other than plants, you can designate products as plants or non-plants. Enter a "1" for plants and "0" for non-plants. |
| Active | Typically, only active products may be placed on orders. Enter "true" or "false." |
| Truck Units (aka Shipping Units) | Shipping Units are used to calculate truck load capacity and may be based on weight or volume. The product shipping unit should be based on the number you entered in Setup > Trucks > Shipping Units. |
| Catalog Price | The product price, excluding or including royalties. Note: if the price excludes royalty, be sure to complete step 8 of the inventory setup process. |
| Discountable | Default setting that determines whether or not a product may be discounted in order entry. |
| Future Price | Next year's price. If entered, set an end date for the current price with the admin option "oestopcatprice". |
| Taxable | Default setting that determines whether or not a product may be taxed. |
| Date Price | Usually for promotional pricing; enter a price then apply a date range in the next two columns. |
| Discount Price 1, 2 | In Discount Price 1, enter the date on which the special date price goes into effect; enter the end date in Discount Price 2. |
| Royalty Amount | The amount to be paid to the licensing organization. |
| Royalty Included | "True" or "False". |
| Picture Tag Cost | Enter a default price for the customer label. |
| Volume | If the product qualifies for volume pricing, enter "1". If not, enter "0". |
| Volume Quantity (1-6) | If the product qualifies for volume pricing, enter each quantity at which the price reduces (e.g. 100, 500, 1000, etc.) * If using CompuPlants' price increase by amount tool, we recommend extending volume pricing to the first three brackets only. After implementing a price increase, the application displays historical prices in volume brackets 4, 5, and 6 on the product catalog form. |
| Volume Price (1-6) | If the product qualifies for volume pricing, enter the price that corresponds with each volume bracket. |
| Product Type | This column refers to the order product type, which we haven't yet configured. The order product type is a general order code that plays an integral role in linking the product catalog with order discounts, restricting orders to products, posting sales to the general ledger, and more. This column is not required for the import, and product type configuration can be somewhat complicated, so you may return to it at a later time. |
| UPC | The program automatically assigns this number to a product using the information provided in Setup > Inventory > UPC #s. |
6. Check for Duplicate Products and References
Execute this process to ensure that no duplicate product IDs exist, and that each product ID references an existing plant code and size/type/grade code(s). If an error occurs, determine where it occurred. If you're missing a required code, such as a plant code, you may manually enter it in the Inventory module, rather than clearing data and re-importing. If product file contained errors, execute Imports CP (Clear Products) and re-import the revised spreadsheet.
7. Import Locations
Each full location ID is a combination of division and section. Division, a required field on the import form, is equivalent to a farm or ranch. We'll need to set up divisions before importing locations (even if your nursery has a single production division).
An optional value on the import form is "area," which groups locations that grow the same type of plant, but aren't necessarily found in the same division. It also facilitates two popular pull reports: Mass Pull by Order and Mass Pull by Product.
- Create divisions:
-
a. Navigate to Inventory > Inventory Locations > Divisions and double-click the menu item.
b. Click "Insert."
c. Enter a 1- or 2-character code for the division (alpha-numeric).
d. (Optional) Type the name of the division (35-character limit).
e. (Optional) Enter the corresponding general ledger division, if applicable.
f. Pull division...
g. Click "Save."
h. Repeat this process to create additional divisions. - (Optional) Create areas:
-
a. Under the same menu branch in the Inventory module, double-click "Areas."
b. Click "Insert."
c. Enter a 1- or 2-character code for the area.
-
*Note: Do not use the single-letter code "p", as CompuPlants reserves this for an internal process.
e. Click "Save."
f. Repeat this process to create additional areas.
- Format a spreadsheet according to the sample header row provided on the Import Locations form:

-
a. Full Location (Required): The full location is a combination of division and section. For example, division 2, section 300 becomes location "2300".
b. Division (Required): Enter the corresponding division code.
c. Section (Required): 6-character limit (alpa-numeric).
d. Area (Optional): Enter the applicable area code.
e. Section Name (Optional): Enter the section name that matches the section code.
f. In order for this data to import, the spreadsheet must include a row for location "AJLOC", as shown in the screen shot above. Enter information exactly as it appears.
- Navigate to Conversion > CP Imports > Import Locations.
- Click "Open."
- Browse for the appropriate file and select "Ok."
- Delete row 1 by clicking in any cell within the row, then clicking the minus ( - ) sign in the bottom left corner.
- Select "Validate." The program will catch any errors and highlight them. If necessary, make corrections to the spreadsheet, then re-upload and validate again.
- Select "Process."
8. Configure Availability & Royalty Settings
Navigate to Setup > Inventory > Inventory Setup Options to save availability and royalty settings.
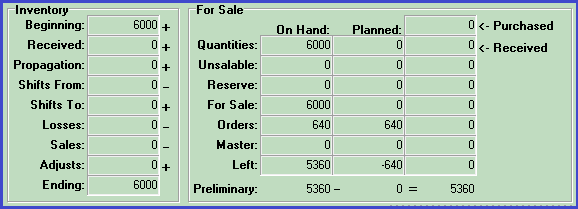
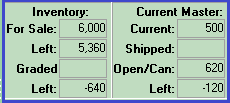
Availability
CompuPlants offers two availability grids that are constantly updated, one in Inventory > Allocations and the other in Orders > Shipping Orders (see screenshots below). The "For Sale" and "Left" quantities on these grids will reflect all shipping/master orders with a want date equal to or less than the end date. Next year's inventory (if you have already entered it) will be excluded.
You may set a date range for graded inventory ("Shipped Dates") and another date range for salable inventory ("Product & Order Dates"). We recommend leaving the begin date empty unless you want the application to omit orders that were placed before the begin date.
Inventory > Allocations:
Orders > Shipping Orders:
Royalty
Check "Royalty Excluded" to indicate that your catalog prices do not reflect added royalties. The application uses this setting when applying discounts and calculating freight.
9. Import Catalog Prices
The Import Catalog Prices form can be found in the Inventory module, which is where you perform all of your regular inventory-related procedures.
- Navigate to Inventory > Imports > Import Catalog Prices and double-click to open the form.
- Format a spreadsheet according to the sample header row, and then enter product numbers and prices. If you wish to enter information in the optional columns, refer to Import Products: Optional Columns for a description of the fields. If you have already entered the optional information elsewhere, you do not need to enter it again here.
- When you are ready, return to the Import Catalog Prices form and click "Open".
- Browse for the appropriate file and select "Ok."
- Delete row 1 by clicking in any cell within the row, then clicking the minus ( - ) sign in the bottom left corner.
- Select "Validate." The program will catch any errors and highlight them. If necessary, make corrections to the spreadsheet, then re-upload and validate again.
- Select "Process."
- If you are using future prices, set the last effective date for the current year's prices as follows:
-
a. Navigate to Administration > Prefs & Options.
b. For Param Name, type oestopcatprice and then click Find.
c. For Value, change the date to the last effective date for this year's prices.
d. Click Save.
When you need to increase prices in the future, you can import them again using the same import form. You can use the Price & Product Quick-Change grid under Inventory > Product Setup.
10. Import Beginning Inventory
Follow the import procedure that best matches your nursery type.
To import beginning inventory for container/greenhouse nurseries:
- Format a spreadsheet according to the header row shown on the Import Begin Inventory import form:

- Product: (Required) Enter the unique product ID.
- Quantity: (Required) Enter the on-hand quantity.
- Unsalable: Enter as a percentage.
- Reserve: Enter as a percentage.
- Location: (Required) Enter the location ID.
- Area: An area is a way to group locations that typically grow the same kind of plant.
- Row: Enter the row number.
- Location Seg: Use location segments to break down locations into lots (or another term that your nursery uses).
- Category: This user-defined attribute serves as another way to qualify a location, such as how close the plants are to one another ("can tight" v. "spaced").
- Pick Order: When you have the same product grown in multiple locations, you may enter a pick order number here and the program will refer to it when creating pull reports and pick lists. Note that it excludes all records where pick order equals "9".
- Planted: Enter the date planted.
- Sell Date: (Required) Enter the projected sell date.
- notes: Enter any plant/product notes. Refer to Internal & External Notes for more information on how CompuPlants facilitates notes.
- Navigate to Inventory > Imports > Import Begin Inventory and then double-click to open the form.
- Click "Open," and then browse for the required spreadsheet and select "Ok."
- Choose a Begin Date.
- Delete row 1 by clicking in any cell within the row, then clicking the minus ( - ) sign in the bottom left corner.
- Select "Validate." The program will catch any errors and highlight them. If necessary, make corrections to the spreadsheet, then re-upload the spreadsheet and validate again.
- Select "Process."
To import beginning inventory for field nurseries:
- Navigate to Inventory > Imports > Import Field Inventory and double-click to open the form.
- Format a spreadsheet according to the sample header row provided on the import form.
Note:
- Leave the Field ID column blank
- Label the production type as "field"
- When you're ready to import the spreadsheet, click "Open," and then browse for the required spreadsheet and select "Ok."
- Choose a Field Count Date.
- Delete row 1 by clicking in any cell within the row, then clicking the minus ( - ) sign in the bottom left corner.
- Select "Validate." The program will catch any errors and highlight them. If necessary, make corrections to the spreadsheet, then re-upload the spreadsheet and validate again.
- Select "Process."
Inventory: Where to Go Next
After you have finished the inventory set up and are ready to conduct ongoing inventory procedures, such as inventory control transactions or estimates, refer to the Inventory module help page for assistance.
In addition, the Platinum Workflows help page provides high-level workflows for annual inventory procedures based on nursery type. Refer to these workflows to ensure that you are completing all of the necessary software-related tasks throughout the year.
Container Inventory Workflow Field Inventory Workflow
VIII. Set Up Orders
Steps in this process:
- Choose a method for posting orders and inventory.
- Set up freight (carriers, zones, and rates).
- Format order documents.
- Configure product type codes for order entry.
- If using the Commissions module, set up Sales Types, Sales Reps, and commission rates. See the Commissions help page for more information.
1. Choose a Method for Posting Orders and Inventory
You may choose to post orders by order or by truck, but not by both. Set the admin option postordersby to either "orders" or "trucks" to indicate your preference.
Likewise, you must choose a method for posting inventory by adjusting the admin option makepickby. Possible values are "order", "truck" or "masspull". If posting orders by order, you should also post inventory by order. If posting orders by truck, however, you have the option to post inventory by truck or mass pull.
2. Set Up Freight
First, learn which freight methods CompuPlants supports, then navigate to Setup > Freight to save carriers, zones, and freight rates. Refer to the Freight Setup table for descriptions of each menu item.
Freight Methods
| Method | Description |
|---|---|
| I. Ship Via - Zone - Units | Pulls a rate from the Freight Detail table based on the ship via / zone / shipping unit combination on the order. You must have assigned each product a shipping unit(s) or freight group in the product catalog. |
| II. Freight % | The percentage you specify will automatically be applied to the order total; you may add a drop charge and/or fuel percent (see also amtfrgpct). |
| III. Freight Zone | Select a freight zone to apply a pre-established freight rate, drop charge, and fuel percent to the order (see also amtfrgpct). |
| IV. Manual | Manually enter freight amount, drop charge, and/or fuel percent to determine the freight total. |
| Custom | If methods I - IV do not meet your business needs, we may be able to create a custom method. Please contact us for more information. |
amtfrgpct
The admin option amtfrgpct comes into play when using freight methods II or III; it determines which amount to apply the freight rate to.
- "0" applies the freight rate to the pre-discount amount.
- "1" applies the freight rate to the post-discount amount.
- "2" applies the freight rate to the full catalog amount.
- "3" implements a freight rate by line: it combines the product size with the freight zone and applies a pre-determined rate (set up in Setup > Receivables > Freight Sizes).
Freight Setup Table
Refer to this table when setting up carriers, zones, and rates in Setup > Freight.
| Setting | Description |
|---|---|
| Carriers | Enter an abbreviated name and full name for each carrier, a.k.a. ShipVia, you use; select a default freight method and weight type (optional). |
| Freight Zones | Enter each freight zone, as determined by the carrier, with associated freight percent, fuel percent, and drop charge. This table works in conjunction with freight method III (Freight Zones). |
| Freight Master | No longer used; reference-only. |
| Freight Detail | The program refers to this table when the freight method is Ship Via - Zone - Units. Using pre-set carriers and zones, create a graduated volume table where the freight amount decreases as the number of units increases. 10 units, for instance, might cost $2.00 to ship; 50 units may cost $1.50 (amount is cumulative, not per unit). In order for this method to work, each product must have a shipping unit or freight group assigned to it in the product catalog. Also, the shipping units on an order must be equal to or less than the amount set on the table. |
| Freight Groups | Organize freight groups by product size, identify number of shipping units for the size, then associate each product with the desired freight group. This reduces future maintenance by requiring you to edit only the freight group rather than shipping units for each product. |
| Freight Sizes | The program uses this table when the freight method is set to III (freight zones) and "amtfrgpct" is set to "3". Establish ship zone / product size combinations, then determine a rate. |
-
set to "0" to use the customer default
set to "1" to use the shipvia default
3. Format Order Documents
Navigate to Setup > Orders to format order documents, such as invoices, confirmations, quotes, bills of lading, etc. Enter a two- or three-digit code in the "Document" field and a description. Then, identify each party receiving a copy of the document (customer, office, sales rep, etc.). Selecting a page style here overrides the customer default, so only enter one if that's what you intend to do. To use the default report design, type "goldorders5.6" in Report Design Name. Eventually, you may wish to customize report designs, in which case you'd enter the name of the modified file. Learn more about copying designs here.
4. Configure Product Type Codes for Order Entry
Product Type, a required field in order entry, is a general order code that plays an integral role in implementing a particular discount method, restricting orders to products, posting sales to the general ledger, and more. Product type configuration can be somewhat complex, and understanding all of its uses may be easier after you've had some time to use the application.
For now, we'll create a basic product type code that applies an order-level discount and does not restrict orders to particular products. You'll apply this product type to all orders until you can configure more complex product types with confidence.
- Go to Setup > Inventory > Product Types.
- Click "Insert."
- Enter the product type code, such as "01" (may contain up to 15 characters).
- Provide a description of the code, such as "Unrestricted" (may contain up to 20 characters).
- Link the product type code to an AR Product account, such as SALES-PLANTS.
- Leave the "Restrict Product/Orders" flag un-checked.
- In the "Discount By" panel, select "Order." This applies a discount percent to the entire order (as opposed to applying a discount rate by product).
- In the "Discount" panel, select "Default Discount." This tells the program where to find the discount rate. "Default Discount" refers to the default discount saved in the customer file.
- Ignore Volume Type, Order Entry Sell Date Options, Assortment Method, and Period Types.
- Click "Save."
IX. Start Sequence Numbers
Select a starting point for any record identified by a number, such as orders and cash receipts. Pick up where you left off with your previous system, or start with a new convention. There are many records you can start a sequence for, but these are commonly started upon installation:
- shipping orders (orders)
- invoices (invoicem)
- truck numbers (truckm)
- cash receipts (paymentm)
- paychecks (checkm)
- vouchers (voucherm)
- * master orders: You may designate an order number for master orders, but the process works a bit differently. See User-Defined Master Order Number for more information.
Start a Sequence Number
- Go to Setup > General > Sequence Numbers.
- Click "Find." A list of editable keys appears.
- Highlight the desired key.
- In the header, change the "Format" field to the first number in the sequence. The code may contain letters and numbers, up to 8 characters.
- "CP-1000," for example, could begin CompuPlants' preferred truck naming sequence.
- "Alt Format" applies only to invoices (invoicem) and vouchers (voucherm):
- The alternate format for invoices applies to credit memos.
- The alternate format for vouchers applies to debit memos.
- "Integer Seq." and "Max Seq." are used only where you've checked "Auto Generate Purchase Orders" in the customer file (Pricing tab). Commonly used for mass merchants, it can also work with other customer types. "Key" must match the sold-to/bill-to customer code. Leave Format and Alt Format blank.
* These fields cannot contain letters or special characters. - (Optional) Record the date and time that the sequence number was last changed.
- Click "Save."
X. Set Select Admin Options
Admin options and preferences allow you to customize program functions, set default values, and grant users privileges and permissions beyond those that are found in the User Options table. While many options exist and not all may be pertinent, we suggest reviewing at least these options early on and setting those that are applicable.
| Option | Category | Description |
| postglsales | Financials | Determines which method to employ when posting sales to the general ledger: "0" posts all sales to a single account (default setting) "1" posts sales by product "2" posts sales by product type |
| pvfillby | Availability | For a multiple-date availability system: break down availability into "weeks" or "months" for generating reports/scripts. |
| picksource | Pick List | Set to "picklist" to prompt the application to use pre-selected locations when generating pull reports, or "prdtl2" to let the application suggest locations for you. Learn more about sequencing pull reports and pick lists here. * When the picksource value is "prdtl2", you can choose to have the program show only one location by setting the admin option "pickone" to "1". |
| oestopcatprice | Future Pricing | Designate an end date for current prices in the product catalog (the day before future pricing goes into effect). |
| oeshipdatedefault | Order Ship Date | This flag defines the default value of the "Ship Date" field in new orders: "-1" = do not set a default "0" = copy the want date to the ship date "1"= subtract one day from the want date to determine the ship date "2" = subtract two days from the want date to determine the ship date (the same is true for "3", "4", etc). |
| oesubalwaysreprices | Substitutions | By default, when the discount flag is NOT set, the price stays the same when the confirmed product is substituted for another. If you prefer that the price always changes when making a substitution—regardless of the discount flag—set this option to "1" (note: relevant only where volume pricing is not in effect). |
| termsdiscount | Order Discounts | This option determines how order discounts are treated on the invoice: "1" = The invoice balance shows the pre-discount amount; order and volume discounts are applied when the invoice is paid. "0" = The invoice balance shows the post-discount amount; order and volume discounts are applied when the order is posted. |
| cuautosequence | Customer ID | Set to "1" to have the application automatically generate codes when entering new customer records, or leave at the default setting ("0") to enable user-defined customer codes. |
Setup Complete: Next Steps
You're now ready to perform regular business practices: enter master orders and shipping orders, create vouchers, pay vendors, etc. As you become more familiar with CompuPlants, please consult the CP Platinum help files for assistance.
Knowledge Base Articles
These articles elaborate on some important features and concepts to help new users better understand the way the program works.
Post Sales to the General Ledger
CompuPlants supports three methods for posting sales to the general ledger:
- post all sales to a single account
- post sales to multiple accounts based on product (e.g. azalea, maple, 5-gallon containers, etc.)
- post sales to multiple accounts based on the order product type, a required field in order entry
Below, find detailed instructions for implementing the method of your choice. You must complete a series of sequential setup steps regardless of the method you use:
- postglsales: This admin option tells the program which method to apply: "0" posts all sales to a single account (default setting), "1" posts sales by product, and "2" posts sales by the order product type.
- GL accounts (Financials > Entry Forms > GL Accounts)
- AR Product Accounts (Receivables > Entry Forms > AR Products)
- Product Types (Setup > Inventory > Product Types)
I. Post All Sales to a Single Account
- Ensure that "postglsales" is set to "0".
- Enter your GL accounts, adding a generic "Plant Sales" account.
- By default, CompuPlants has a pre-set AR product account called "PLANTS." Link it to your GL account for plant sales.
- Follow instructions for configuring product type, assigning the AR product account PLANTS to each product type.
II. Post Sales by Product
- Ensure that "postglsales" is set to "1".
- When entering your GL accounts, create individual accounts based on the products you wish to be able to post separately. Since this occurs at the product level (not the plant level), you could organize AR products by plant or by size. For instance:
- 100300: Azalea Sales
- 100301: Maple Sales
- 100302: 1-gallon containers
- Create matching AR product accounts and assign the appropriate GL account to each.
- If you haven't already done so, build or import your product catalog, then assign an AR product account to all relevant products.
-
* (Optional): Enter a category for grouping AR product account sales together in reports. Categories must match exactly in order for the program to properly organize information, so double-check spelling and be consistent in your use of lower case and upper case letters.
III. Post Sales by Product Type
- Ensure that postglsales is set to "2".
- Enter a GL account for each product type, for instance:
- 100300: Container Sales
- 100301: Tree Sales
- 100302: Shrub Sales
- Create matching AR product accounts and assign a GL account to each:
- Configure product types and assign the appropriate AR product account to each.
-
* (Optional): Enter a category for grouping AR Products together in reports. Categories must match exactly in order for the program to properly organize information, so double-check spelling and be consistent in your use of lower case and upper case letters.
Manage Single-date and Multiple-date Product Availability
The guidelines below will help you maintain accurate, dependable availability data, whether you use a single cut-off date or a multiple-date system.
Single Sell Date:
- Set an availability cut-off date in Setup > Inventory > Inventory Setup Options.
- Choose which order stages to include in availability data in Setup > Orders > Order Document Stages. For instance, you may wish to exclude pre-orders.
- Preliminary orders, for those who have purchased the Sales Express module, never count against availability.
- Include or exclude purchase orders from availability with the admin option incpoforsale.
- Set up your product catalog.
- Enter and post beginning inventory with sell dates.
- Enter a product or order sell date during SO/SM entry. This date is matched to product sell dates when the application compiles pull reports and pick lists, adhering to first in, first out methodology.
- Promptly record inventory changes:
- Record inventory transactions by plant or location.
- Inventory Edit: Quickly change some information, such as reserve quantity, unsalable quantity, sell date and location.
- Visit Product Allocations for an in-depth plant analysis, including past transactions, balances on open shipping orders, open master orders and preliminary orders, estimate and grading details.
- Run reports in Inventory > Reports > Product Single-date.
Multiple Sell Dates:
- Determine if you'd like reports to display availability by weeks or by months by setting the admin option "pvfillby" to either "weeks" or "months".
- Choose which order stages to include in availability data in Setup > Orders > Order Document Stages. For instance, you may wish to exclude pre-orders.
- Preliminary orders, for those who have purchased the Sales Express module, never count against availability.
- Include or exclude purchase orders from availability with the admin option incpoforsale.
- Set up your product catalog.
- Enter and post beginning inventory with sell dates.
- Important: In order for the application to match the order/product sell date to the correct inventory sell date, the former date must fall within an existing inventory sell date range. For example, if the order sell date is 8/12/16, and the latest existing inventory sell date is 8/1/16, the application will not allocate the order quantity. If the latest existing sell date is 9/1/16, the application can distribute products to the correct inventory group. Be sure to regularly update your beginning inventory in order to avoid this scenario.
- Enter a product or order sell date during SO/SM entry. This date is matched to product sell dates when the application compiles pull reports and pick lists, adhering to first in, first out methodology.
- Promptly record inventory changes:
- Record inventory transactions by plant or location.
- Inventory Edit: Quickly change some information, such as reserve quantity, unsalable quantity, sell date and location.
- Visit Product Allocations for an in-depth plant analysis, including past transactions, balances on open shipping orders, open master orders and preliminary orders, estimate and grading details.
- Run the Available by Sell Date report in Inventory > Reports > Product Multiple-date Availability.
Internal & External Notes
CompuPlants accommodates both internal notes (viewable only in the application) and external notes (printed on order documents) in several places throughout the program:
Customer Notes (Receivables > Entry Forms > SS/SO):
- Enter internal notes on the notes tab:
- The longer note field copies to order entry header (also under the Notes tab).
- The shorter note field also copies to the order entry header, below the sold-to's contact information (view-only fields).
- You may also save shipping-related notes, which copy over to order entry, under the Shipping tab.
Plant/Product Notes (Inventory > Entry Forms > Products):
- In plant setup, click the Notes icon to activate a rich-text editor, where may can add detailed notes and photos. These notes are not stored in a searchable format, but they are saved by username and could prove very useful for logging important plant information, such as propagation history.
- In the product catalog, type a note in the "Comments" column on the grid (not available in the entry form). These notes appear on the toolbar "Notes" form in order entry detail (see below).
Order Header Notes (Orders > Entry Forms > Shipping Order):
- In addition to the default internal notes that carry over from the customer file, you may add external notes under the Notes tab.
Order Line Item Notes:
- Enter a note in the "Notes" field (below the want/confirmed product fields), and it will print below the line item on order documents if the selected page style is set up accordingly.
- You can also select a canned note with the keyboard command "Ctrl-Alt-N." A popup window appears.
- The toolbar icon, Notes, offers options for internal notes. A separate window appears when you click the icon. The first note field corresponds with the line item note field (described above): what you type here will be displayed there, and vice versa. "Label," "Care," and "Internal" notes are informational and do not print on order documents. Allocation and product notes, also internal, carry over from the Inventory module; the former from Allocations > Products > Orders tab ("Alloc. Notes" column) and the latter from the "Comment" column on the product catalog grid.
Copy a Report Design
The CompuPlants package includes several Fast Report templates, providing you with professional, laser-quality reports and documents. You may use the templates as-is, or customize them by inserting your company logo, changing color schemes, adding and deleting components, and rearranging the layout.
Default report designs exist for Orders 5.6 and for every report form. When making modifications, we recommend copying the default design and saving a new design, rather than altering the template.
- Navigate to a form that requires you to select a report design, such as Inventory > Reports > Product Catalog > Product Catalog Information.
- Select a report design from the drop down menu.

- (Optional) If you wish to see the template before making changes, click "Design" in the toolbar—click in the main area, avoiding the arrow to the right. This brings up the original file in Fast Report. Do not make changes here.
* To see the print view, rather than the edit view, highlight an item on the grid below and click "Preview." - When you're ready to copy the design, click the small down arrow to the right of the Design button. The button expands into a list.
- Select "Copy Design."

- Enter a design ID, description, and file name.
-
* The application automatically suggests an ID by increasing the previous ID by one. The design ID is unique to the file name but not to the entire program. As a result, multiple report forms may list the same design ID though each design is different.
* The file name should be unique. You can add a sequence at the end to indicate it's a copy of the original: "catlist2", "catlist3", and so on.
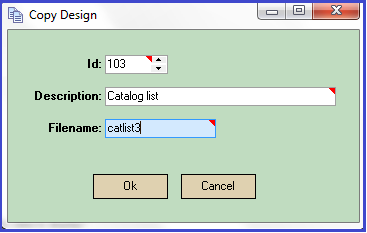
- Click "OK." The newly saved file will open in Fast Report.
* You can verify the file name by looking in the upper left-hand corner.
- Modify the design as desired, save changes, and exit Fast Report.
-
* Do not exit Fast Report without saving. Even if you made no changes to the design, you must save it before exiting if you want to be able to access the duplicate design in the future.
- (Optional) Generate a report using the new design.
- Upon exiting the form, you'll receive a dialog asking if you want to upload the new file.
- Click "OK" and the file will be saved in Administration > General > Report and Label Designs.
- Click "No" and the system will discard the file.
If at any time you'd like to delete a modified design, you can do so in Administration > General > Report and Label Designs. Be careful not to delete the default design!