Plant & Product Entry
You may use the forms in this module to enter new products and update existing products. If you are just starting out with CompuPlants and doing an initial setup, please refer to Set Up Inventory in the New User Guide for a step-by-step guide to setting up your product catalog.
Product Setup Guidelines
The Products section contains all the components you need for building your product catalog. Exercising logic and consistency when establishing product ID conventions will ensure that your product catalog is well organized, contains no duplicates, and can accommodate enough unique product IDs for a large, diverse inventory.
Each unique product ID is a string containing the plant code plus at least one secondary code: size, type, grade.
Usually, the breadth and depth of your inventory determines which codes to use and in which order to use them:
-
Nurseries with few product sizes may find that a combination of plant and size codes is sufficient.
-
Nurseries with several sizes may find that a combination of plant and grade codes is sufficient. In this case, "grade" would refer to the bottom and/or top size.
-
Nurseries with numerous sizes would benefit from using plant plus all three secondary codes. To create the greatest number of permutations, switch the order of the codes on the product catalog entry form so that "grade" comes before type. Our Technical Support team may do this for you upon request.
Tip: When entering codes, use the same number of characters by code to allow data to sort properly on grids and spreadsheets. For instance, when sorting a grid by ascending size, "3" (for 3 feet) will appear below "10" (for 10 feet). Using a consistent format ("03") allows data to sort in the right order.
Save Plant Traits
Create a database of common plant traits that you can use to describe plants when building the product catalog. Associate each trait with an alpha-numeric code.
| Trait | Description and/or Code Requirements |
|---|---|
| Colors | 8 characters |
| Bloom Times | 6 characters |
| Plant Types | used for characterizing plants; examples can be trees, deciduous trees, flowering shrubs, etc. (16 characters) |
| Zones | 2 characters |
| Sun-Shade | single character |
| Spread | the plant's width at maturity; 5 characters |
| Height | the plant's height at maturity; 5 characters |
| Soil Type | 5 characters |
| Search Group | Create groups according to your sales analysis approach. The Plant Summary tab in the allocations program organizes sales data into three levels: product sales, plant sales, and search group sales. A search group could encompass all trees, for instance, or only specialty maples. After creating them, go to Product Setup > Plants and assign plants to a search group (you may save only one search group per plant). |
Enter Plants
In this section, assign plant codes by botanical taxonomy. We recommend a 4-character code for every plant, though the application permits up to 7 characters. You may let the application automatically assign plant codes, or you may initialize a sequence number for the key "plantracklog."
After entering a code and plant name, modify plant traits as desired, along with other optional fields. See the table below for an explanation of less obvious fields.
| Field | Description |
|---|---|
| Class 1 | "Class 1" and "Class 2" fields give you added flexibility for grouping products under user-selected categories; often used for product reports. |
| Class 2 | See above; also, this field is required in order to perform a price increase by amount. |
| Host Plant | Reference for truck certificates program, which supports compliance with state regulations regarding the shipment of plant crops. If the plant is a host for a plant disease, enter one of the following values: |
| Picture | Indicates that a picture is on file and interacts with the labels program. |
| Photo Name | If you're linking a photo to this plant, enter the file name here. All plant photos should be stored in *Note: This form allows you to save only a single file per plant. If you would like to save multiple images per plant, use the Plant Pictures form. |
Plant & Product Notes
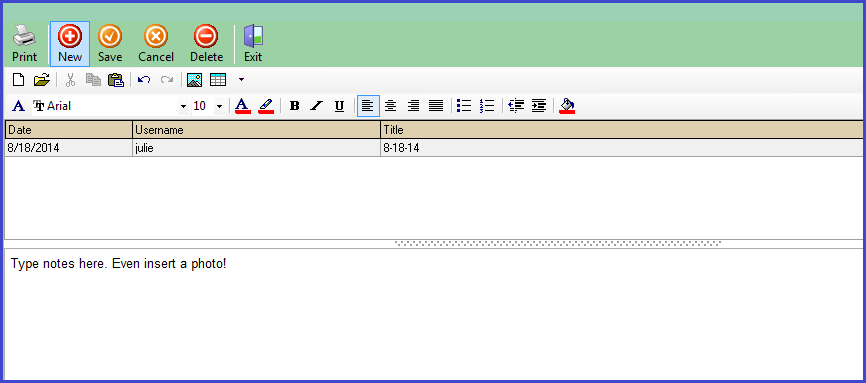
The Notes icon activates a rich-text editor where you can add detailed plant notes and photos. These notes are not stored in a searchable format, but they are saved by username and could prove very useful for logging important plant information, such as propagation history.
If you'd like to add product-specific notes, you may do so in the "Comments" column on the product catalog grid. These notes appear on the "Notes" form on the order entry detail page (see Enter a Shipping Order, Part II, Step 4).
Save Sizes
"Size" refers to the size of the container in which the plant is grown, or the bottom size. The code may be 2 characters and contain letters, numbers, and/or special characters, such as a decimal. We recommend using a 2-character code for all size categories, using 0 as a placeholder where necessary (the code for a 1 gallon container size, for example, would be "01").
| Field | Description |
|---|---|
| Size | 2-character code. |
| Name | A description of the size (7 characters). |
| Alternate Description | A more detailed description of the size (15 characters) that replaces "Name". |
| Tag Color | Reference for pull reports and tags/labels. |
| Eqv. | Currently not used. |
| PDA | If checked, the application transmits data to your PDA device. |
| Net Contents | For weights and measures; prints on customer labels. |
Save Types
Type refers to the form in which the plant is sold, such as grafted or espaliered. Like size, it may contain 2 characters with letters, numbers, and/or special characters.
| Field | Description |
|---|---|
| Type | 2-character code. |
| Name | A description of the size (7 characters). |
| Alt Name | A more detailed description of the size (15 characters) that replaces "Name. |
| For PDA | If checked, the application transmits data to your PDA device. |
Save Grades
Grade typically refers to the height (top size) at which you plan to sell a plant (as opposed to the height of a plant at its maturity). This code can be 4 characters and use a combination of numbers, letters, and special characters. We recommend that you use minimally a consistent 3-character code with zeros as placeholders where necessary. For example, the code for "2-3 feet" would be "023". If using a 4-character code, it would be "0023". This not only allows data to sort correctly, but also gives you the greatest possible permutations for product IDs.
| Field | Description |
|---|---|
| Grade | 4-character code, e.g. "0015" |
| Name | a detailed description (20 characters), e.g. "1.5 inches" |
| Tag Color | not used |
| For PDA | If checked, the application transmits data to your PDA device. |
Build Product Catalog
With plant, size, type, and grade codes set up, you're ready to build a product catalog.
- Select a plant code (required).
- Select one or more secondary codes: Size, Type, Grade (required). See our guidelines for choosing a Product ID convention.
- Check the "Plant" box if the item is a plant (non-plant items could include flats, load locks, racks, etc.).
- Check the "Active" box if you want to be able to place this item on an order.
- (Optional) Enter additional information. See the table below for a description of each field.
- (Optional) Click the "Volume Pricing" tab to set prices by volume:
-
a. Check the "Volume" box to enable volume pricing. When entering a shipping order, the application will look at this setting before checking the catalog price. You may wish to enable backwards compatibility with the "volumetype" admin option.
b. Determine prices by quantity. As the quantity increases, the price decreases. For instance, if 100 items are added to an order, the individual price might be $2.00. If 500 items are added to an order, the price drops to $1.50 each.
-
* We recommend extending volume pricing to only three brackets. After effecting a price increase by amount, the application displays historical prices in brackets 4, 5, and 6.
- Click "Save." The application will assign the product a unique ID based on the plant, size, type, and/or grade codes.
Tip: After saving a product, you may add product-specific notes to the "Comments" column on the product catalog grid. These notes appear on the "Notes" form on the order entry detail page.
| Field | Description |
|---|---|
| Shipping Unit / Weight / Freight Group | Used for calculating freight charges ; see freight setup. |
| Catalog Price | The product price, excluding or including royalties. If price excludes the royalty, check "Exclude Royalty" under Setup > Inventory > Inventory Setup Options to ensure accurate totals on invoices. |
| Future Price | Next year's price. If entered, set an end date for the current price with the admin option "oestopcatprice". |
| Date Price | Usually for promotional pricing; enter a price then apply a date range. The shipping order will automatically use this price for any orders with a "want date" in the specified range. |
| Royalty Amount | The amount to be paid to the licensing organization. |
| Discountable | Default setting that determines whether or not a product may be discounted in order entry. |
| Taxable | Default setting that determines whether or not a product may be taxed. |
| Assessable | Informational only. |
| Patent | Informational only. |
| Picture Label | Informational only. |
| Tag Cost | Enter a default price for the customer label. |
| Commissionable | Set to "1" if you want to include this product in commissions calculations (for those who have purchased the Commissions module. |
| Commission rate per plant | Enter a percentage; this rate overrides all other commission rates (for those customers who have purchased the Commissions module). |
| UPC | The program automatically assigns this number to a product using the information provided in Setup > Inventory > UPC #s. |
| Alternate UPC | If you wish to have an alternate UPC, you may provide one here. Also, with a programming tweak, we can link this UPC to your customer labels. Contact us for more information. |
| Assortment | Associate the product with an assortment; for substituting and assorting products in Inventory > Allocations. Create assortment labels in Setup > Inventory > Assortments. |
| AR Product Account | If posting plant sales to multiple GL accounts based on product, select the appropriate AR Product. Learn more in Setup > Financials > Post Sales to the General Ledger. |
| Items | If the product is an accessory—holiday decoration, vase, etc—you must associate it with the proper item from Setup > Inventory > Items. Products associated with an item appear on the Decorations tab in order entry. Like regular products, those associated with items can be broken down by size, color, type, and/or grade; they can be included in the cost of the plant or have a separate charge. |
| Product Type | Associate this product with a product type for discounting an order by product type. Set up product types in Setup > Inventory > Product Types. Also, designate a discount rate for PT Discount 1, 2, and/or 3 in the customer file. |
| Price Group | Refers to price groups created in Inventory > Products > Price Group |
| Sub Group | Type the name of a sub group associated with the Price Group Table (see Price Group); up to 15 characters |
| Plan Group | Applicable only to customers with the NRP module. |
| Retail | The retail price often prints on customer labels. It carries over to the order detail page. |
| Measure | For determining how many racks or pallets the product will occupy on a truck; from Setup > Inventory > Measures. |
Create Price Groups
Many times, customers wish to mix and match various cultivars in bulk quantities, but the volume discount setting only applies to large quantities of the same product. Fortunately, CompuPlants offers another discount tool to accommodate this need: Price Groups. Price groups may be as vast or as focused as you wish. For example, you could set up a price group for all one-gallon container plants or for just a single promotional product with a few different sizes.
You must link the price group to a Discount Type. Its code may contain up to 15 characters. Check the box labeled "Add up quantites" if you wish to lump all cultivars together when determining the volume bracket. Leave unchecked if you want to separate cultivars into their own brackets.
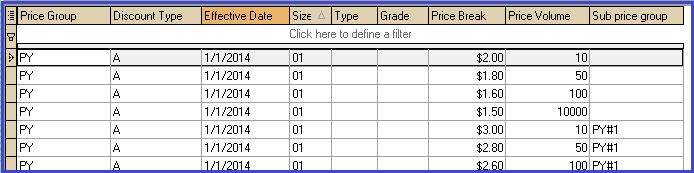
After establishing a price group, go to the Price Group Table in Inventory > Entry Forms > Products. Delineate volume brackets ("Break Quantity") and prices for each level ("Break Price"). If you wish, you may identify a subgroup for special products within the price group, and assign a separate pricing program for it (see an example of a price group table below). Lastly, designate a price group for each applicable product in the product catalog.
Before entering an order, enable the Price by Group icon in the toolbar by setting the "oepricebygroup" admin option to "1". On the order header form, select the discount type associated with the Price Group. After adding products to the order, click the Group icon in the toolbar. Those products associated with the discount type will display an adjusted price.
Notes:
* The product must be marked as "discountable" in order for the price group discount to apply.
* The "Want Date" on the order must be equal to or greater than the "Effective" date on the price group table.
* The subgroup always overrides the price group, even if the effective date on the subgroup is older than that of the price group.
Link Pictures to Plants
The Plant Pictures form allows you to link an unlimited number of images to the same plant, making it possible to vary images by size, color, customer, and so on. FastReport supports file types .jpg, .gif, and .bmp for printing labels. Additional file types may be supported by NiceLabel. Vector graphics are NOT supported. Images should be stored in the following directory:
u/compuplants/graphics/plants
-
* If you organize photos into subfolders, the subfolder must precede the file name. For example: /begonia/1242.jpg.
At any given time, only one image may print on a tag/label. If you have multiple images linked to a single plant, the program looks at the image file name to determine which image to print. The file name must exactly match the plant number. For instance, plant number 1000, abelia grandiflora, has three images linked to it: 1000.jpg, 1000a.jpg, and 1000b.jpg. The program will print the first image, 1000.jpg, because it matches the plant number. When you want to change the printed picture, you would first need to rename the appropriate file.
Inventory Locations
This section of the menu pertains primarily to your location setup, but includes some related concepts such as transaction types, reason codes, production types and methods. CompuPlants offers several descriptors to distinguish levels of locations: division, section, area, location segment, and inventory category. The first two, division and section, combine to form a specific location ID and are required set up components. The rest, however, are optional. They factor into a product's unique track ID when entering your beginning inventory.
| Menu Item | Description |
|---|---|
| Transaction Types | These are pre-defined transactions for recording inventory changes by plant and by location. |
| Divisions (Required) | A division is equivalent to a farm or ranch. It represents a large, usually separate, geographical location with its own manager. If your nursery operates on a single farm or ranch, you would have a single division. Assign a one- or two-character code. |
| Sections (Required) | Divisions can be broken down into sections. The section code can contain up to six characters. CompuPlants combines this with the division code to form a unique location ID. "Land Type" and "Square Feet" apply only to those customers with the NRP module. Though not required, you may associate the location with a larger area, which then allows you to run the Mass Pull by Order and Mass Pull by Product reports. The "active" flag is informational only; CompuPlants does not support inactive locations at this time. |
| Location Segments (Optional) | Use location segments to break down locations into lots (or another term that your nursery uses). |
| Reason Codes | Supply reasons for transaction types. You may save multiple reason codes per transaction type. This form can also be found in Setup > Inventory > Reason Codes. |
| Areas (Optional) | An area is a way to group locations that typically grow the same kind of plant. Though not required, it does factor into two popular pull reports: Orders > Documents > Mass Pull by Order and Trucks > Mass Pull Reports > Mass Pull by Product. Enter a one- or two-character code. Note: CompuPlants has an internal area code, "p", that's used in order entry for offsetting purchase orders. |
| Inventory Categories (Optional) | This user-defined attribute serves as another way to qualify a location, such as how close the plants are to one another ("can tight" v. "spaced"). |
| Production Types | Applicable only to field inventory/NRP module: Identify all sizes/forms applicable to your nursery's production: 3" pot, 8-pack, 128-cell, etc. "Unit type" may be bedfeet, trays, or plants. |
| Production Methods | Applicable only to field inventory/NRP module: Refers to the method used to propagate the plant: seed, graft, bud, etc. |
Allocations: Overview
With CompuPlants' Allocations program, you can quickly assess product availability and edit several orders at once, minimizing the time you spend processing orders. It includes not one, but two allocation tools with slightly different designs, providing our users with the flexibility they need.
| Products | Assortments |
|---|---|
|
|
Product Analysis
The Products form offers detailed information to support product analysis and allocation. The interface is divided into three main sections: the product grid (top), availability panels (middle), and product information tabs (bottom). The following topics are designed to familiarize you with each component of the Products form so that you can comfortably and confidently analyze product data before allocating quantities.
Product Grid: Two Views
Availability Panels
Tabs: Product Information and Analysis
See also related Admin Options and User Options.
Product Grid: Two Views
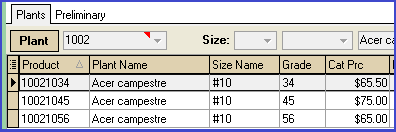
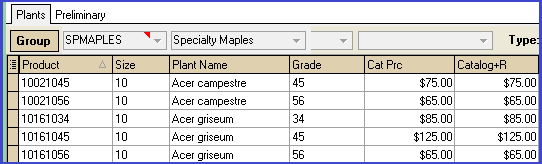
The product grid offers two views: Plant and Search Group. With plant view, query a plant number and the product grid below shows all products associated with the plant. Or, toggle "Group" to see all products associated with the search group.
Plant View:
Search Group View:
Availability Panels
As you highlight rows on the product grid, the panels below respond with current availability data. The Inventory panel sums up quantities for each transaction type, while the For Sale panel shows all current order activity for the selected product. The right-most column tallies open purchase order quantities along with any open shipping/master order quantities set against those purchase orders. The "Received" field denotes how many items have been marked as received on purchase receipts. As receipts are posted to inventory, this quantity transfers to the Inventory panel's "Received" field.
FAQ: How does CompuPlants calculate availability?
CompuPlants maintains accurate, up-to-date availability data by first calculating the on hand quantity, then the salable quantity (for sale), and finally availability (left), as the following equations illustrate:
On hand quantity:
on hand quantity = beginning inventory +/- transactions* When an order closes, the posted inventory decreases the beginning inventory amount.
Salable quantity:
salable quantity = on hand quantity - unsalable - reserve
Availability:
availability = salable quantity - open order quantities (SO and SM) - master order quantities
-
* Master order quantities can break down further into the following:
Confirmed quantity - shipped quantity - open order quantity - canceled quantity = master order quantitySome notes on shipping and master orders as they relate to availability:
- The application includes shipping orders in availability based on the product or order sell date specified in order entry (if no sell date is entered, the application uses the want date):
- For single-date users, the sell date specified on the order must fall within the date range you've entered in Setup > Inventory > Inventory Setup Options. If you have omitted the begin date, then all orders with sell dates equal to or less than the end date are included.
- For multiple-date users, the application allocates the order to the inventory group with a sell date equal to or less than the order sell date. There is no availability cutoff date in this system.
- As products are transferred from a master order to a shipping order (SM), the master order quantity decreases while the shipping order quantity increases.
- Occasionally, master order quantities are oversold. In order entry, the application displays a negative master order quantity so that you can see how much the current customer has ordered. The Allocations program, however, shows you the whole picture, so it does not allow a negative master order quantity. Once the master order quantity reaches zero (0), excess quantities are counted with shipping orders.
Tabs: Product Information and Analysis
| Tab | Description |
|---|---|
| Inventory Tab | Draws data from the Inventory Edit table, summing up the number of products available by location. |
| Purchase Orders Tab | Lists any purchase orders associated with the selected product, including "Received" and "Left" quantities for partially shipped orders. |
| Orders Tab |
Content Customization Totals Grid |
| Preliminary Orders Tab | Shows any preliminary orders with this item (remember: preliminary orders do not count against availability). |
| History Tab |
The "Current Year" and "Last Year" panels allow you to quickly compare this year's sales to last year's sales (based on calendar year only). Open order quantities are based on the Want Date while closed order quantities are based on the Shipped Date. The "Aged" panel uses the "Plant Date" from the Inventory Edit table and today's date to determine the age of each product you have on hand. Where no plant date has been provided, the program sums up these quantities in the oldest bracket, (144 weeks). Where the plant date matches today's date or falls on a future date, the program sums up these quantities in the youngest bracket (0-12 weeks). |
| History Grid Tab | This grid compares the current YTD sales to last year's YTD sales (based on calendar year only), and highlights the current month in either green or red. Green indicates that you've sold more of the product in the current YTD than you sold during last year's equivalent YTD period. Red indicates that last year's YTD sales are greater than the current year's sales. |
| Plant Pictures Tab | View all pictures you have linked to this plant. Note that this data comes from the Plant Pictures form, not the plant setup form in the Inventory module (Entry Forms > Products > Plants). |
| Estimates Tab | Sources data from Field Inventory > Estimates form (Sales tab). |
| Final Grades Tab | Sources data from Field Inventory > Grade by Field ID/Estimate ID. |
| View All Orders Tab | This grid shows all shipping orders (SO/SM) and preliminary orders for this product and has no date restrictions. It includes orders where substitutions were made (confirmed product does not match the product selected on the product grid). |
| Plant Summary Tab |
Compare the selected product's sales to sales data for all sizes associated with the plant number and for all products associated with the search group (if one exists). In the Current Plant area, the "Product" field shows an orange background if the product is oversold. In the "Orders" column, a red background in the current field indicates that unnecessary substitutions have been made; there is sufficient supply to meet all customers' demands. A blue background indicates that there is not enough of the product to fill all orders, but there is enough of the plant number and substitutions can be made. The graphs provide additional sales and availability data:
|
Allocate by Substitution
Examine the information under the product tabs, particularly the Orders tab, and assess demand for a product. Where a product is oversold, decide how you will make substitutions and/or modify quantities. All changes are made from the Orders tab. You may edit quantities in the "Cur Qty" column but, more than likely, you'll need to make substitutions as well. This procedure varies according to which source you want to use—the product catalog or an assortment, and whether you wish to make a full or partial substitution.
I. Substitute from the product catalog:
- Full Substitution: Use the "Edit Order" icon. Double-click the row on the Orders grid that you wish to modify; or, highlight then click "Edit Order." The order detail page appears, where you can choose a different confirmed product, change quantities and/or line item notes. All changes saved here will be saved in the Orders module.
- Partial Substitution: Add a new line to the order so that you can split the want quantity among two or more confirmed products. Click "Insert" and a blank order detail page appears. After saving a new product, return to the Orders grid to update the quantity on the original product line.
II. Substitute from an assortment:
- "Substitution" (Full): This method leads you to a form where you may choose from other products belonging to the same assortment. The want product is highlighted in green.
- "New Substitution" (Partial): Use this method when dividing the quantity among two or more confirmed products. This leads you to the same form as the previous option, but adds another line to the order. The want product is inherited from the original line. Select the quantity for the confirmed product, save changes, then return to the Orders grid and update the quantity on the original line.
- Sub All: If you wish to substitute all of a product for another—affecting each row with the same want product—then use this method. Select a row on the Orders grid, then choose "Sub All." The same assortment form appears, but without a quantity field. Select a product and return to the Orders tab. All rows with the same want product are now updated (except for those orders in the RI phase).
Allocation Notes and Status:
After allocating products, you may wish to save notes and/or update the status. You can do both of these on the Orders grid. Save notes in "Alloc. Notes," which translates to the Notes form on the order detail page (accessible via the toolbar icon). Update the status in "Alloc. Status" with a user-selected term (e.g. "estimate", "initial", "final") and/or check "Allocated" to indicate that this line has been completed.Repricing
Repricing works from the Edit Order detail page or the Reprice button.
Allocate by Assortment
This tool allows users to quickly distribute a product's want quantity across several orders at once. The product must belong to an assortment group, which usually consists of similar plants that vary in color and size.
Prior to Using Assortments—Important Information:
- Admin Option: The Assortment tool can retrieve remaining quantities from two places: a master order or the inventory edit grid. Set the admin option avsource to either "master" or "prdtl2" to indicate which source suits your needs. When a master order is the source, you must select a master order number on the order header to prevent a system error. While most users operate using only a single source, you may alternate between the two.
- Setup: Create assortment IDs in Setup > Inventory > Assortments.
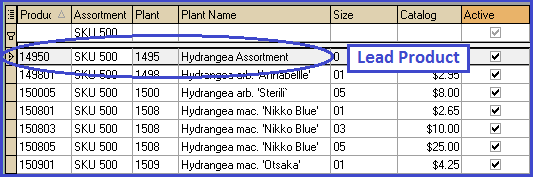
- Product Catalog: Assign assortment IDs to products in the product catalog. This step requires a bit of strategy. One product serves as the assortment lead product, which is the product that must be added to the shipping order (or the tool won't work!). When the grid is filtered by assortment, then sorted by product number in ascending order, CompuPlants designates the product that appears first as the lead product. Creating a generic product with the lowest sequential product number, such as "14950 Hydrangea Assortment" in the first screenshot below, may help to ensure that users always add the lead product to shipping orders.
- Allocation Method: Determine how the application will distribute the want quantity, a parameter associated with product type. There are two options: by fixed increments (choose "Template") or by percentage. You may create a product type for each method, just be sure to select the intended product type when entering an order.
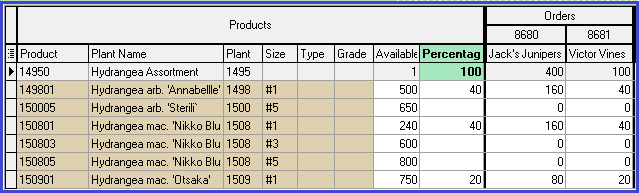
- Shipping Order: Enter a shipping order as usual; however, insert only the assortment lead product along with the ordered quantity. Leave confirmed quantity blank. You will distribute the ordered quantity using the Assortments grid (see second screenshot).
- Editing: This is currently intended to be a one-time editing tool. If you save changes, exit the assortments window, then return to make additional changes, the previously saved changes may not remain in tact. Therefore, we strongly encourage you to complete the process in a single exchange.
Screenshots
1. Product Catalog
Sort the assortment group in ascending order. The first product in the group always serves as the lead assortment product. Adding a different product from the assortment will result in an error when using the Assortments grid.
2. Assortment Grid:
The top row always contains the lead assortment product, and quantities must be allocated from this row.
Create an Assortment Batch
An assortment batch makes the orders available to you in the Assortments program. Complete this process after entering several orders, but before executing a pick list. If avsource is set to "master", you must create a separate assortment batch for each master order. If the option is set to "prdtl2", you may create a single batch for all orders with the same allocation method (percentage v. template). If multiple assortments are included in a batch, then you can toggle between them in the Assortments tool. You cannot compile a batch of orders distributed by both percentage and template.
- Go to Orders > Duplicate, Cancel and Back Orders > Select Orders to Assort (#7).
- Click Find.
- Highlight all orders you wish to allocate.
- Click "Set Series."
- The application groups all orders in the same assortment batch, or "series", and they are now available to you in Inventory > Allocations > Assortments.
- For your convenience, it also generates and displays a report of all the order numbers within the series.
- (Optional) You may add a description for the series in Administration > General > Assortment Batches.
Distribute Quantities by Percentages
- If you haven't already done so, create an assortment batch.
- Go to Inventory > Allocations > Assortments.
- Choose a series from the drop down list and click "Find."
- To the right of the series description field, enter a "minimum quantity," such as 5 or 10. This creates more tidy bundles. The calculated total will be a multiple of this number, and any remainders will be tallied at the bottom of the screen.
- If more than one assortment is represented in the series, toggle to the desired assortment.
- Compare the ordered quantities to what you have available and determine how you wish to proceed:
- If you have sufficient quantities then you can allocate 100% of the ordered quantity.
- If the product is oversold, you may allocate only a portion of the ordered quantity. When the sum of the percentages is less than 100, a dialog will ask you to confirm the total percentage.
- In the Percentage column, enter a percentage on each line where you wish to distribute the ordered quantity.
- Click "Apply Template."
- The top cell, highlighted in green, sums up all the percentages in the column.
- The Orders columns display total quantities.
- The Remaining and Sold columns provide up-to-date availability.
- At the bottom of the screen, the summary fields tally both the total distributed and undistributed quantities (if some products remain to be allocated, those fields will be highlighted in red).
- If any unallocated quantities remain, you can manually add them to orders as you see fit.
- Once you are satisfied with the allocation, check the "Done" flag.
- Click "Save."
- (Optional) Toggle to another assortment and repeat the process.
Distribute Quantities Incrementally
- If you haven't already done so, create an assortment batch.
- Go to Inventory > Allocations > Assortments.
- Choose a series from the drop down list and click "Find."
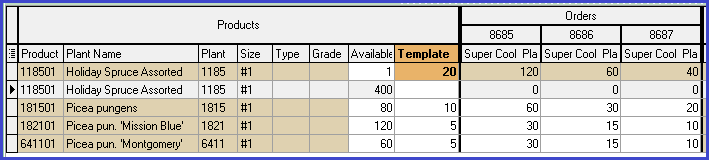
- In the column labeled "Template," below the header row, enter the fixed increment. This value may be based on the amount a box, shelf, or rack can accommodate.
- Determine which product(s) will comprise the increment and assign a quantity. When selecting more than one product, make sure that the sum of their quantities equal the value in the top row.
- Click "Apply Template."
- The Orders columns display total quantities. When an increment is composed of multiple products, the program first calculates the percentage of composition, then multiplies this by the order want quantity for each product included. The screenshot below illustrates this concept.
- The Remaining and Sold columns provide up-to-date availability.
- If any quantities remain to be allocated, the summary field(s) at the bottom of the screen are highlighted in red.
- Manually allocate any remaining quantities to the orders as you see fit.
- Once you are satisfied with the allocation, check the "Done" flag.
- Click "Save."
- (Optional) Toggle to another assortment and repeat the process.
- *See note above about returning to a saved assortment and editing.
Inventory Control
CompuPlants allows you to easily update your records after a loss, adjustment, shift, or other transaction type. You can record changes by plant or by location.
Transaction Types
See the table below for a brief description of each transaction type.
| Transaction Type | Description |
|---|---|
| Loss | always a reduction to inventory, must enter a reason code |
| Adjustment | can be an addition or reduction (entered as negative number); must enter a reason code |
| Move | a transfer of some of a plant product from one location to another (*note that a move automatically updates both the "to" and "from" locations) |
| Move All | a transfer of a plant's total quantity from one location to another (again, the system automatically updates both the "from" and "to" locations) |
| Shift | a change in the grade (or size) designation of a plant |
| New Inventory | propagated or acquired inventory(not through a purchase order) |
| Release to Sales | a transfer of growing inventory to salable inventory |
Enter Beginning Inventory
Complete this procedure during the setup stage or any time you're adding new products.
- Go to Inventory > Inventory Control Transactions > Enter Beginning Inventory.
- Click "Insert."
- Enter required information: Plant number, Date, Size, Location.
- (Optional) Enter additional information (see entry form key below).
- Click "Save."
- The application combines the plant number, size, location and schedule information to create a unique identifier known as the Tracking #. This is useful for inventory reports as well as for selecting product locations in order entry.
- Repeat steps 2 through 5 for each plant.
- Post the beginning inventory to make it live after all plants have been added:
-
a. Go to Inventory Control Transactions > Post Beginning Inventory.
b. Click "Find." A list of all recently added products will appear.
c. Check the box labeled "Post Transactions" (or leave un-checked to run a trial post).
d. Click "Post Inventory."
*Alternatively, you may import your beginning inventory.
Beginning Inventory Entry Form: Key
While most values are self-explanatory, some may be ambiguous. Those values are clarified below.
Import Inventory Spreadsheets
Before uploading a spreadsheet, make sure it is formatted in the same manner as the model header row displayed on the import page, or the import will fail.
- Enter a date, if required.
- Click "Open" and select the correct Excel file.
- Select "Validate." The system will return any errors found in the spreadsheet.
- Correct any returned errors; or, if you prefer, delete the entire row.
-
a. Use the -/+ symbols in the bottom left corner to remove/add rows.
b. If you included a header row, the system will return this as an error. You must delete it before continuing. - After reconciling all errors, click "Process" to post changes to the product catalog.
Record Inventory Changes by Plant
- Go to Inventory Control Transactions > Inventory Changes by Plant.
- Select the desired plant from the drop down grid.
- Click "Find." A detailed report appears (upper grid). Rows with a blue background indicate that those plants have reached maturity, while rows with a green background indicate that those plants are still considered growing inventory.
- Select the appropriate transaction type tab in the middle portion of the screen.
- Enter required information and any additional information.
-
Click "Commit." A record of the transaction will appear under "Pending Transactions."
- Use the minus sign (-) in the bottom left corner to delete a committed transaction.
-
Post transactions to inventory. You may do this in two ways:
-
To post individual transactions:
- Highlight the transaction record under "Pending."
- Click "Post" in the toolbar.
-
To execute a batch post:
- Let transactions accumulate under "Pending Transactions.
- When ready, go to Post Inventory Changes by Plant and click "Find." All unposted changes will be displayed here, even changes by location that are pending.
- Use Control-A to highlight all pending transactions.
- Check the box labeled "Post Transactions."
- (Optional) Check the box labeled "Check to use Shift-To quantity to reduce Shift-From reserve."
- Click "Post Inventory." A posting report will automatically display for quick printing.
-
To post individual transactions:
- (Optional) Look up a detailed history of transactions by product with the Inquire by Transactions Grid.
- Click here for a refresher on manipulating entry form grids.
Note: If a transaction contains errors, you cannot delete it after posting. Instead, execute another transaction to rectify the issue.
Record Inventory Changes by Location
Use this feature for recording additions and reductions by location (you may also find the Location Count Sheet to be a helpful tool at this time). The steps are the same as those for recording changes by plant, with one exception:
- From Inventory Control Transactions > Inventory Changes by Plant, click the "Plant" button in the top left. The button changes to "Loc."
- Proceed as you would for recording inventory changes by plant.
Import Recount Inventory
Alternatively, any time you count inventory, you can import those changes under Imports > Import Recount Inventory form. When a quantity is updated via an import, the application records an inventory adjustment. Use the Inventory Edit Quick-Change grid to expedite this process:
- Go to Inventory Control Transactions > Inventory Edit.
- Arrange the first four columns of the spreadsheet according to the header row provided on the Import Recount Inventory (Track ID, Quantity, Unsalable, Reserve).
- (Optional) Re-arrange subsequent columns as you wish and/or delete unnecessary columns.
- Export the Inventory Edit Quick-Change Grid to Excel.
- Edit the spreadsheet and save changes.
- Follow the steps under Import Inventory Spreadsheet.
Inventory Edit Quick-Change Grid
This grid stores all of your most current salable inventory information. Located under Inventory > ICT, you may use it for:
- mass updates to inventory including: sell date, location, pick order and more
- exporting to Excel for periodic analysis
Consolidate Locations
More information to come.
Enter Receipts for Inventory Purchases
- Go to Purchases > Entry Forms > Purchase Receipts.
- Click "Insert."
- Enter required information, as well as any additional information.
- Click "Save."
- Add product information by clicking "Detail," then "Insert."
-
a. Enter required information, as well as any additional information.
b. Select "Save."
c. (Optional) Repeat above steps for each product received. - Post the receipt to inventory by going to Purchases > Processes > Post Receipts to Inventory.
-
a. Click "Find."
b. Highlight applicable rows.
c. Check the box labeled "Post Transactions."
d. Select Preview and/or Print, and the inventory will post at this time.
Field Inventory
Enter Field Inventory
Users typically import field inventory, but have the option to enter products manually, as the instructions below explain. CompuPlants will automatically assign a field ID but, if you prefer, you may start a sequence number that the program will adopt.
- Go to Inventory > Entry Forms > Field Inventory.
- Click "Insert."
- Enter required information and any additional information. See the table below for an explanation of units.
- (Optional): Check the box labeled "Active" for the product to be included in the application's inventory calculations.
- (Optional): Check the box labeled "Graded Final" if applicable.
-
* If you are entering this inventory before or during the grading process, leave this field blank until grading is completed.
- Click "Save."
Note: If you modify quantity on a field inventory entry form, you must enter a reason code. After clicking "Save," a dialog window will appear with a drop down list of reason codes to select from.
Units
The Unit Type is used to calculate a product's total quantity. Plants is set as the default unit, but you may set bedfeet or trays as the default unit with the "estdefaultunittype" admin option.
- Plants are measured by total quantity; therefore, "base unit" and "quantity per base" are always equal to "1."
- Bedfeet represents a large area with numerous plants, such as rows in a field. A base unit (or sample size) is a fraction of the entire bed size. Multiply the number of plants per base unit by the total number of base units to arrive at the total number of plants.
- A tray is a unit of measurement primarily used in greenhouses. Like bedfeet, the total number of plants is calculated by multiplying the number of plants per base unit by the number of base units.
| Unit Type | Plants | Ex. | Bedfeet | Ex. | Trays | Ex. |
|---|---|---|---|---|---|---|
| units | N/A | N/A | length of bed | 600 feet | # trays | 80 |
| base | N/A | N/A | length of sample size | 20 feet | # trays per unit | 5 |
| qty/base | N/A | N/A | # plants per base | 400 | # plants per unit | 100 |
| quantity | # of plants | 120 | qty/base x # bases | 400 x 30 = 12,000 | qty/base x # bases | 100 x 16 = 1600 |
Import Field Inventory
Use the model row provided under Imports > Import Field Inventory to correctly align your columns. Make sure that you:
- Leave the Field ID column blank
- Label the production type as "field"
Then, follow the remaining instructions for importing inventory spreadsheets.
Enter Field Estimates
Use this feature to project future availability based on current inventory. You may associate a single Field ID (or row) or multiple Field IDs with each estimate. Additionally, to accommodate multiple estimating periods, you may enter up to three separate estimates for the same group of Field IDs. The process varies slightly by unit type.
- Go to Entry Forms > Field Inventory > Estimates.
- Click "Insert." The application returns a form with Estimate ID, Date and (crop) Period filled in. You may substitute the Period year with any 4-character code (e.g. SP14).
-
(Optional) Fill in the following fields:
- Select a plant number. The Field IDs grid in the bottom right-hand corner will display only those products. You cannot associate more than one plant code with a single Estimate ID.
- Enter a description of the estimate.
- Enter a Field % to indicate the amount to be harvested. This number is usually 100%, but sometimes growers divide an area into two or more grading periods, in which case the percentage is less than 100.
- Enter a Field Cull % to estimate amount lost. This applies to the entire estimate. If you want to set separate cull percentages by product size, you may do so under the Estimates tab (step 10).
- Select a projected sell date.
- Mark the estimate as "Final Graded" when you want the graded quantity to be the for sale quantity (you may complete this step at a later time if you are doing multiple rounds of estimates). The program requires the "Sell date", located just above the "Final graded" checkbox, to be entered; otherwise, the sales availability will show as zero. Learn more about availability in Allocations > Products.
- Click "Save."
- This step determines if the estimate is for a single row or multiple rows:
-
a. For a single row estimate, shift a single Field ID to the Fields in Group table, then proceed to the following steps.
b. For a multiple-row estimate, shift multiple Field IDs to the Fields in Group table. - Click the "Estimates" tab. All products associated with the FieldIDs appear in the Catalog grid.
- Shift each applicable product size from the Catalog to the Estimates table. Rows that have been selected appear with a green background in the Catalog grid.
Follow step 9 for plant units, or proceed to Step 10 for bedfeet or tray units. - Enter estimates for plant units:
-
a. Check "Estimate is Percent" to apply percentages to the "Estimate" column. Or, leave the box unchecked to enter quantities by amount. The application automatically converts percentages to amounts in the "Calculate Quantity" column. This quantity is equal to the sum of all field ID quantities less the field estimate percent and cull percent.
b. (Optional) Check "Lock Cull %" to apply same cull % to all Field IDs; or, uncheck if you wish to customize cull percentages by product (custom values will override Field Cull % on the estimate header).
c. Enter estimate amounts or percentages in the "Estimate 1" column. - Enter estimates for bedfeet or tray units:
-
a. Leave "Estimate is Percent" box unchecked; estimates for these units must be entered by amount.
b. (Optional) Check "Lock Cull %" to apply same cull % to all Field IDs; or, uncheck if you wish to customize cull percentages by product (custom values will override Field Cull % on the estimate header).
c. Enter estimate amounts in the "Partial Est. Amount", or base-unit measurement, and "Partial Amt", or quantity per base unit, columns. The application calculates the total number of plants by multiplying the quantity per base unit by the number of base units. -
Click the "Sales" tab to post the information to inventory. The application displays data by product. Highlight a different product on the grid to view the calculations above.
- Quantities higher than 5 are rounded down to the nearest multiple of 5 (e.g. 268 rounds to 265). Quantities that are already multiples of 5 remain unchanged.
Update Field Estimates
During the harvesting season, you may need to modify an estimate, especially if you perform a series of estimates for a row or group of rows. CompuPlants accommodates subsequent estimates by offering additional estimate columns on the Estimate grid. Enter as many as three estimates for a single Estimate ID (see instructions below). Or, for less involved estimating practices, simply update the amounts or percentages for the original estimate, then click the Sales tab to post the information to inventory.
To enter subsequent estimates:
- Query the estimate in Entry Forms > Field Inventory > Estimates.
- On the Estimates grid, display the Grid Column Selector.
- Select "Estimate 2" and/or "Estimate 3" for plant units; or, for bedfeet and tray-based units, select the appropriate pair(s) of columns, for example, "Partial Amt Est 2/Partial Amt 2".
- Enter estimates in the new column(s).
- Click the "Sales" tab to post the information to inventory. The Sales tab displays data for the most recent estimate.
Enter Graded Inventory
In this feature, record actual quantities harvested by size. When you do, the Sales tab in the Estimate entry form reflects this data, providing you with an accurate view of your available inventory. You may enter graded inventory in phases. When you're finished, be sure to check "Final Graded Inventory" on the Estimate entry form.
There are two options for recording your final graded inventory. Grade by Field ID suits those growers estimating one row at a time, while Grade by Estimate ID suits those growers estimating many rows at once.
Grade by Field ID
- Go to Entry Forms > Field Inventory > Grade by Field ID and click "Insert."
- Select a harvest date and Field ID. The application auto-fills the remaining values under "Field Inventory."
- Under "Final Grade," select a Destination (location), Product (size), and (final) Count.
- (Optional) Check "Proofed" if the information has been verified by the inventory manager.
- Check "Final" to indicate that this is the final grade. This checkbox is meant only for organizational purposes; it has no impact on your inventory data.
- (Optional) Record any other pertinent information in the Notes section.
- Click "Save."
- Return to Field Inventory > Estimates and query the respective Estimate ID.
- (Optional) Update the Field % and Field Cull % to reflect actual percentages and "Save."
- Check the "Final Graded" box if all rows in the Estimate ID have been graded and click "Save." If grading is not complete, leave the box unchecked until the appropriate time.
- Click the Sales tab to view updated product info. If only a portion of the Estimate ID was graded, the application subtracts the "Field Graded Quantity" from the "Field Quantity", then re-calculates estimates for remaining quantities.
Note: Under Entry Forms > Field Inventory, you will find a separate destination for posting graded inventory: Estimated & Graded to Sales. This tool was used at one time, but since posting has been integrated in the Estimates procedure, this option is no longer utilized.
Grade by Estimate ID
Access this feature under Entry Forms > Field Inventory > Grade by Estimate ID. After doing so, this process mirrors that for entering grades by Field ID, but requires a separate entry for each size associated with the EstimateID.
For instance, if one Estimate ID includes 20 Field IDs for tilia cordata, and size ranges consist of both 2-3' and 4-5", you'll need to enter a final grade for those plants sized at 2-3 feet, and another final grade for those plants measured at 4-5 feet. Be sure to correctly enter quantities for each size.
Reports & Grids
Most grids provide all the information you may be searching for, with the added advantage of being able to sort data and manipulate columns according to your needs. Nevertheless, you may prefer to run a report in some cases. This section familiarizes you with several reports and points you to a grid that may be used instead of a report where applicable.
Field-Specific Reports
- Estimate & Grade Report: presents the same information found in Field Inventory > Estimates (Sales tab)
- Field Changes: offers a history of transactions from the Field Inventory table; each transaction is formatted as a pair of lines with "before" and "after" quantities.
Product Catalog Reports
- Product Catalog Information: provides catalog price and volume pricing
- Product Catalog More Information: summarizes almost the entire product catalog entry form
Product General Reports
- Current Product Balances: sums up transactions by type (the same information provided on the Inventory panel in Allocations > Products); alternatively, use Product Balances Grid
- Product by Item Category: gathers all orders where an item category is assigned to a product
Product Single-date Reports
These reports display a single quantity for each product over the specified date range. The end date does not need to coincide with the end date in Setup > Inventory > Inventory Setup Options.
- Product Inventory - Landscape / Product Availability - Portrait: These reports search your product sell dates, shipping/master order sell dates, and/or purchase orders (see admin option "incpoforsale"). Enter a begin date (optional) and end date (required). If you wish, narrow the search results by size, type, and/or grade. Set the minimum to "1" to exclude products where on hand equals zero. Lastly, choose how you wish to filter the report: On Hand, Available for Sale (salable), Left to Sell, Oversold, Production Reserve, or Unsalable. You may also use the Single Date Availability Grid for up-to-date availability data.
-
*Learn more about on hand, salable, and availability calculations here.
- Product Committed: Quickly find out how many plants are committed to open orders. Amounts are cumulative. To view product commitments by customer, run the Item by Customer Committed report in the Orders module.
- Product Inventory (Drill Down): This report provides the same information as the first two, but presents it in a "drill-down" format. Click on a plant name to expand information, and again to collapse. Or, right-click anywhere on the report and select "Expand All" or "Collapse All."
- Product Location / Location Product: These reports organize product availability by location; the first displays all locations/quantities for a particular product while the second displays all products/quantities in a particular location.
Product Multiple-date Availability
- Available by Sell Date: breaks down availability according to the unit of time set in the admin option "pvfillby". Or, use Multiple-Date Availability Grid.
Product Reports
The product catalog grid offers all of the information you can find in these reports; nevertheless, the reports are available to you should you prefer them to the grid in some cases.
Inventory Control Reports
Alternative grids: Inquire Location/Product Grid and Inquire by Transactions Grid.
- Beginning by Product / by Location: gathers all beginning inventory transactions
- Recount/Cycle Count by Product / by Location: "Quantity" in this report indicates the difference between beginning and ending quantities
- Transactions by Product / by Location: lists all transactions for a given plant or location
Crosstabs
These reports display plant size, type, and grade information horizontally rather than vertically, and may be more commonly used among bare root growers.
Inquire by Transactions Grid
Review every transaction over a specified date range. Narrow the results by plant number, product number, or tracking ID. "Transaction Type," in the left-most column, is an internal code that is stored each time the user records a standard inventory transaction (loss, shift, adjustment, etc.), edits a pick list (PK), or posts an order to receivables (SA). Note that this grid does not provide transactions recorded on the field inventory table; use the Field Changes report to obtain this information.
Physical Inventory Procedures
Step-by-Step Guide: Annual Physical Inventory Count
This procedure typically occurs once a season, either at the beginning or end. Steps should be completed in sequential order, with the first 5 steps leading you through necessary preparation. All steps take place within the Inventory module unless otherwise noted.
Note: The following process includes more steps than those numbered 1-6 under Physical Inventory Procedures; as a result, those steps are assigned different numbers below. Please do not let this confuse you.
All procedures take place in Inventory > Physical Inventory unless otherwise noted.
| Step-by-Step Procedures |
|---|
| 1. Back up your current inventory data under Reset and Save the Beginning Count. |
| 2. Identify locations for counting. |
| 3. Run a report of the "before" counts for comparison. |
| 4. Create a Physical Count File (used for updating physical count). |
| 5. Print a Location Count Sheet and send to the field for counting (in Inventory > Documents). |
| 6. Update Physical Count with totals from the field. |
| 7. Print Estimate Sheet and return to field for sell date estimates (in Inventory > Documents). |
| 8. Update Physical Count once again to include sell date estimates. |
| 9. Print physical inventory reports to compare field totals against database totals. |
| 10. If necessary, adjust physical count once more. |
| 11. Move New Count to Sales Inventory to make live. |
| 12. Clear Zero Counts to delete locations for any product where quantity is zero. |
| 13. (Optional) Update product prices in Inventory > Products > Price & Product Quick-Change grid. |
Documents for Counting
| Document Type | Description |
|---|---|
| Location Count Sheet | This document prints the selected location at the top and a grid for writing plant names, plant date, length and width of rows, plus/minus inclusions, and first extension. Before previewing and printing, highlight a row, or press Control-A to highlight all rows. |
| Estimate Sheet | This document prints a count for each product in the selected location, followed by multiple columns for splitting quantities by projected sell dates. |
| Variety/Date/Count | This document supports a physical count for a single product with multiple locations. |
Prior Physical Inventory Yearly
Before updating your physical inventory, execute this command to back up your current inventory data. Select the appropriate year, check the box labeled "Run Process," then select "Execute." Should you make a mistake while updating inventory, contact us and we will restore your previous year's inventory.
For an added safety measure, you could also export the Inventory Edit grid, which stores all of your most current inventory data, into an Excel file. Right-click on the grid to access the grid popup menu.
1. Pick Counts
Use this grid to mark each product/location you want to include in the next count (in the column labeled "Count"). The system uses the selections you make here to create files, forms, and reports for the subsequent Physical Inventory procedures.
We recommend you count all locations at the same time, as products could be moved from one location to another and inadvertently be excluded from the count or counted twice.
To mark multiple rows at once:
- Highlight the rows you wish to mark:
-
a. for the entire grid. press control-A
b. for consecutive rows, click the first consecutive row, hold down Shift, then click the last consecutive row c. for non-consecutive rows, hold down the Control key as you select multiple rows - Right-click the column header to access the popup menu.
- Click "Quick Change."
- In the dialog box, check the box labeled "Count" and click "OK."
2. Picked Counts Control Totals
This step creates a report of the "before counts" for each of your count selections.
3. Create Physical Count File
This step generates and stores a table that the system uses for recording changes in Step 4 Physical Count.
- Click "Find."
- Check the box labeled "Update Entries" (this clears the count selections); or, leave unchecked to keep the selections for later use.
- Highlight all rows (or individual/groups of rows, if you prefer).
- Select "Create File."
4. Physical Count
After the count sheets and estimate sheets are returned, enter those updates here. Select a location at the top of the screen, or click "Find" to display all count selections.
We recommend updating counts first, then returning at a later time to update estimates (the document used for estimates displays current product totals by location to ensure that you have the most accurate data for your estimate).
To update counts, simply change relevant fields in the "Counts" section.
To update product grade and sell-by dates, modify fields in the Product Information and Schedule Information sections.
*If you have estimated multiple grades or sell dates for a product in a single location:
- Highlight the product and select "Copy" to produce an identical row.
- Adjust quantities in both the original and copied rows.
- Modify the Size and/or Sell fields as necessary.
5. Move New to Sales Inventory
After updating your physical inventory and running related reports to verify the new counts, use this command to activate the updated inventory data. Check the box labeled "Post Process" and post one location at a time.
6. Clear Zero Accounts
For any product/location where the count is negligible, this command clears those records and removes them from the system. This command does not affect other products in the same location or other locations with the same product.
Physical Inventory Reports
The following reports allow you to compare your new physical inventory count with existing database records. Run these reports before posting the updated numbers so that you can check for any major disparities and conduct another count if necessary.
| Report Name | Description |
|---|---|
| Physical by Product | This report lists all locations associated with a selected product, along with before count, new count, and variances for each location. |
| Physical by Location | This report lists all products associated with a selected location, along with before count, new count, and variances for each product. |
| Physical by Size with Detail | This report offers an option for cross-tab formatting, which is helpful for organizing product data by size, type, and/or grade. |
Price Increasing
CompuPlants offers several methods for updating the prices for multiple products at once.
FAQ: How does the application determine the correct product price?
Increase Price By Percent
If you'd like to increase the price of either a range of products or your whole inventory, use this method.- Leave the upper fields blank to apply a price increase to your entire inventory. Or, narrow the command to a particular range of plants, sizes, or types.
- Select a Price Type, Round Type, and percentage.
- (Optional) Check the box labeled "Dry Run" to review new prices by product before executing the command.
- Click "Execute."
Increase Price By Product
If you'd like to update prices for individual products, then use this method.- Click "Find" to generate a complete inventory list.
- Highlight the product(s) to receive a price increase.
- Select Price Type, Round Type, and Percent Increase.
- Check the box labeled "Dry Run" to review changes before applying them.
- Click "Preview." A report will display, listing the products you selected along with their respective price increases.
- Un-check "Dry Run" and click "Preview" to make the new prices effective.
Increase Price By Amount
This method permits you to increase the price of selected plants by a fixed amount that you specify. Updating prices here affects "volume pricing" data in the product catalog. Prices previously listed under Volume 1, 2, and 3 will be shifted to 4, 5, and 6, giving you a record of historical prices. The default setting allows one fixed amount price increase per year.- Enter the Plant Class 2 (required).
- (Optional): Narrow your selection by entering a plant range.
- Check the box labeled "Dry Run" to review changes before applying them.
- Select related sizes and enter a fixed increase amount for each size.
- Click "Execute." The application returns a list of all products affected by the update, along with current and new prices.
- Un-check "Dry Run" and click "Execute" to make the new prices effective.
Price & Product Quick-Change Grid
This grid can be found under the Products section. Apply price changes directly to the grid and save. Or, export the grid to Excel and save to your computer. Apply changes and save, then re-import under Imports > Product Catalog.
Inventory Year Procedures
Reset Sales Beginning Inventory
This command sets your ending inventory for the previous year to the beginning inventory for the upcoming year, and clears all transactions for a fresh start (you may retrieve them in the future if necessary). Enter the year (four digits) that the records should be saved under.
Clear Sales Inventory
Warning: This command erases all current inventory data (Inventory Edit grid) and should not be used.
Reset Field Beginning Inventory
Run this command when you are transitioning to a new year and wish to make the previous year's ending inventory the upcoming year's beginning quantity.
Clear Field Inventory
If you prefer to clear all previous year's inventory data, run this command.
Clear Final Grades
Clears all final grade estimates (by field ID and estimate ID) for the upcoming year.