Setup Formats Sales Reports
Create various date sets that will be used to generate select Customer and Product reports.
- Enter an alpha-numeric code for "Set #." We recommend a two- or three-character code.
- Enter a description of the reporting period in the adjacent field, for example "2013".
-
Select a low date (or start date), high date (or end date), and type a short title, which appears as the column header.
- You may enter multiple reporting periods for comparing year to year, month to month, week to week, and so on.
- Arrange reporting periods in chronological or reverse chronological order.
- The lo and high dates may be the same for single-date reports.
- Due to lack of printable space, you may add only four columns to reports you plan to print. The fifth column can only be viewed on applicable grids.
- Check the record(s) you wish to include in the reporting period.
Reports
Customer Reports
These reports gather and organize data from invoices and the customer file, presenting a detailed overview of your company sales performance. See a description of each report below.
With each report, you have the option to include invoice (or payment) terms discounts and/or order discounts, and to specify which records/dates to use for the report.
Note: If a default sales rep is saved to the customer file, but a different sales rep is identified on a shipping order, these reports will not provide that information. Instead, use a sales rep report to see all the orders tied to a particular sales rep.
Report Descriptions
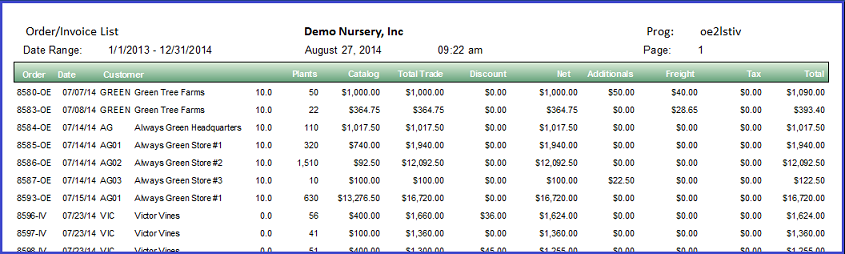
- Order/Invoice List: Lists all orders/invoices for a specified date range; narrow by sales rep, region, product type, and/or sales type.
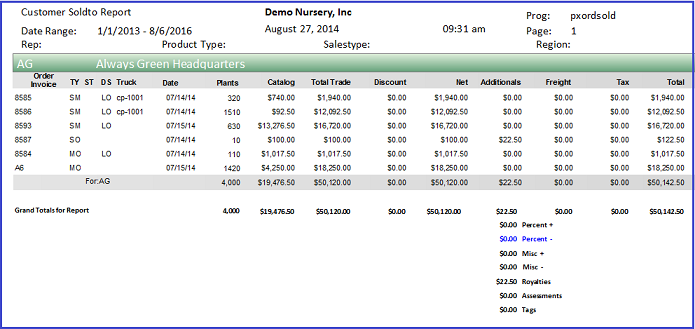
- Customer Sold-to Report: Organizes order information by customer for a specified time period; narrow by sales rep, region, product type, and/or sales type.
- Customer Ship-to Report: Same as above, but select a ship-to customer from the grid.
- Ship-to Analysis: Using a date set that you created in Setup Formats Sales Reports, this report breaks down orders into individual products, quantities, and average cost per product.

- Sold-to Analysis: Same as above, but select a sold-to customer from the grid.
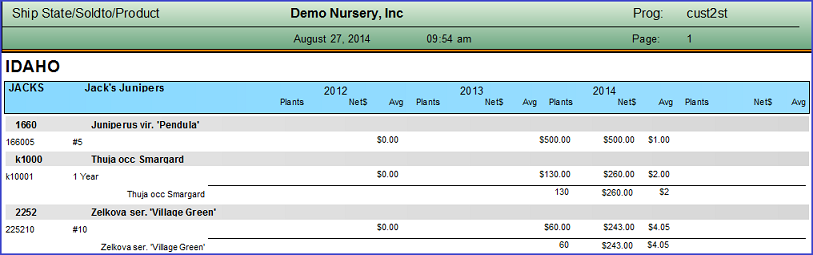
- Ship State/Sold-to/Product: This report presents the same information in the Ship-to and Sold-to Analysis reports, but organizes customers by state.
- Sold-to Summary 5 Periods: This report displays cumulative order totals by customer for up to five custom date ranges. Highlight multiple customers to represent all on a single report.
- Sold-to Summary: This report allows you to compare this year's sales data to last year's across two different date ranges: a current, shorter date range (e.g. August 1 - August 27), and a year-to-date range using a calendar, fiscal, or custom start date (e.g. Jan. 1 - August 27). The report automatically gathers data from the same date ranges of the previous year.

- Ship-to Summary: Same as above, but select a ship-to customer from the grid.
Product Reports
- Product by Order: Conduct a query and select the desired plant from the grid; the resulting report lists all related orders and organizes information by date range and order number.
- Product Analysis: Similar to the Product by Order report, but summarizes quantities sold (does not organize info by order number).
- Product by Ship-to: Again, similar to the first two reports, but information is organized by ship-to customer.
Sales Rep Reports
On these reports, the sales rep derives from the shipping order, not the customer file.
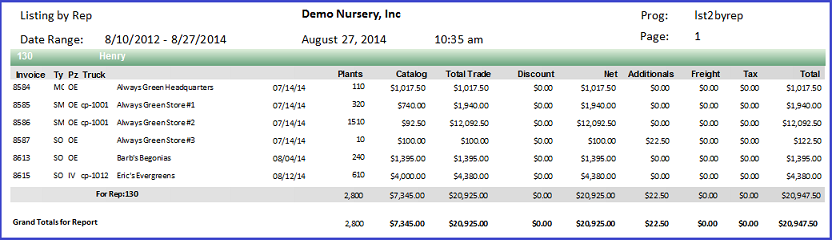
- Listing by Rep: Lists all order/invoice summaries for a specified date range and organizes the information by sales rep; limit results to a single sales rep, region, product type, and/or sales type.
- Listing by Rep/State: Same as above, but further breaks down information by state.
- Listing by Rep/Sold-to: Displays order summaries for a specific sold-to customer and date range, organizing information by sales rep (those orders with no sales rep show up as "rep not found").
- Listing by Rep/Ship-to: Same as above, but select a ship-to customer from the grid.
- Listing by Rep by Region: Similar to Listing by Rep report, but further organizes order summaries by region.
Invoices and Purchases
More information to come.
Turbo Tally Sales
The Turbo Tally Sales program enables you to compare plant sales year to year in a convenient, side-by-side format. Add/remove as many columns and rows as you'd like by dragging and dropping them into place.
Create Date Sets
Create date sets, which allow you to analyze sales data based on yearly, quarterly, monthly, and/or weekly blocks of time, before running the Turbo Tally Sales program.
- Go to Create Sets.
-
Enter the tally set code (Y, Q, M, or W).
- These codes are pre-set.
- Select a starting year.
- Specify the duration of the date set in number of years.
-
Identify the first date of the year and starting day of the week.
- Years may be calendar or fiscal.
-
Choose the increment of time by which you plan to compare data: year, month, quarter, or week.
- The application can generate date sets for only one time increment at once. If you wish to create date sets for multiple increments of time, repeat this process for each increment.
- Click "Execute." Now, when using the Turbo Tally Sales program, the application can organize sales data by the blocks of time you've created.
- (Optional) Go to Tally Set Date Ranges (menu item #3) and click "Find" to view the date sets that you just created.
This is the expedited method for creating date sets. You may, if you wish, manually create date sets using the Tally Set Date Ranges tool.
Tip: Aim for date sets that represent longer periods of time—several years long, in fact. This prevents you from having to edit your date sets or create new date sets frequently.
Run Turbo Tally Sales
- Go to Turbo Tally Sales (menu tree item #5).
-
Select a date range.
- This date range should fall within an existing date set.
- Select the time blocks that you want to use to compare data. Be sure that a coinciding date set exists.
- Determine the invoice terms discounts, order discounts, records and/or dates you wish to include in the report.
- Click "Find."
-
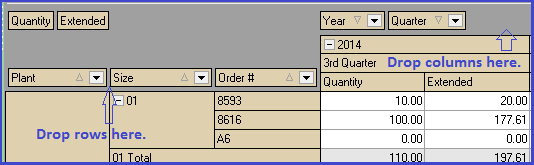
(Optional) Insert new columns and/or rows by dragging headers from above the white line and dropping them into place. Green arrows will appear once you've moved the header to an area where you may drop it.
- Drop column headers along the top of the grid ("Drop Column Fields Here").
- Drop row headers along the side of the grid (see image below).
- You may layer columns and rows to organize data in more specific ways. Rather than having a single column for "Year," for instance, insert a second layer for "Quarter."
- A third area, the upper left-hand corner of the grid section, is reserved for calculations you want the application to make, particularly, "Quantity" and "[Line] Extended." Dropping unsuitable headers in this area results in empty columns.
- (Optional) Remove a column/row from the grid by clicking the header, dragging and dropping it above the white line.
Once you become familiar with the functionality of the Turbo Tally program, take advantage of its ability to garner all kinds of information and organize it in ways that best suit your needs.
Reorders
Quickly and easily produce reorder letters for your sold-to and ship-to customers. Amounts for each item are cumulative; products are based on the customer's want, not shipped, products.
- Create a sold-to or ship-to recap, or a temporary date table, that the system will use when calculating ordered amounts.
-
a. Check the records you wish to include (open orders and/or posted orders).
b. Enter a corresponding date range. Note that, for open orders, the application uses the Want Date and, for posted orders, the application uses the Ship Date.
c. Click "Execute." - Generate a standard reorder letter by going to Reorder Sold-to or Reorder Ship-to:
-
a. Select a report design, sorting criteria, and/or product type from the product catalog.
b. Click "Find."
c. Select the desired customer from the grid.
d. Preview and/or print the letter.