Inventory Setup
Product Setup Guidelines
The Products section contains all the components you need for building your product catalog. Exercising logic and consistency when establishing product ID conventions will ensure that your product catalog is well organized, contains no duplicates, and can accommodate enough unique product IDs for a large, diverse inventory.
Each unique product ID is a string containing the plant code plus at least one secondary code: size, type, grade.
Usually, the breadth and depth of your inventory determines which codes to use and in which order to use them:
-
Nurseries with few product sizes may find that a combination of plant and size codes is sufficient.
-
Nurseries with several sizes may find that a combination of plant and grade codes is sufficient. In this case, "grade" would refer to the bottom and/or top size.
-
Nurseries with numerous sizes would benefit from using plant plus all three secondary codes. To create the greatest number of permutations, switch the order of the codes on the product catalog entry form so that "grade" comes before type. Our Technical Support team may do this for you upon request.
Tip: When entering codes, use the same number of characters by code to allow data to sort properly on grids and spreadsheets. For instance, when sorting a grid by ascending size, "3" (for 3 feet) will appear below "10" (for 10 feet). Using a consistent format ("03") allows data to sort in the right order.
Plant Traits
Create a database of common plant traits that you can use to describe plants when building the product catalog. Associate each trait with an alpha-numeric code.
| Trait | Description and/or Code Requirements |
|---|---|
| Colors | 8 characters |
| Bloom Times | 6 characters |
| Plant Types | used for characterizing plants; examples can be trees, deciduous trees, flowering shrubs, etc. (16 characters) |
| Zones | 2 characters |
| Sun-Shade | single character |
| Spread | the plant's width at maturity; 5 characters |
| Height | the plant's height at maturity; 5 characters |
| Soil Type | 5 characters |
Product Setup
Plants
In this section, assign plant codes by botanical taxonomy. We recommend a 4-character code for every plant, though the application permits up to 7 characters.
After entering a code and plant name, modify plant traits as desired, along with other optional fields. See the table below for an explanation of less obvious fields.
| Field | Description |
|---|---|
| Class 1 | "Class 1" and "Class 2" fields give you added flexibility for grouping products under user-selected categories; often used for product reports. |
| Class 2 | See above. |
| Picture | Indicates that a picture is on file. |
| Photo Name | If you're linking a photo to this plant, enter the file name here. |
Plant & Product Notes
The Notes icon activates a rich-text editor where you can add detailed plant notes and photos. These notes are not stored in a searchable format, but they are saved by username and could prove very useful for logging important plant information, such as propagation history.
If you'd like to add product-specific notes, you may do so in the "Comments" column on the product catalog grid.
Sizes
"Size" refers to the size of the container in which the plant is grown, or the bottom size. The code may be 2 characters and contain letters, numbers, and/or special characters, such as a decimal. We recommend using a 2-character code for all size categories, using 0 as a placeholder where necessary (the code for a 1 gallon container size, for example, would be "01").
| Field | Description |
|---|---|
| Size | 2-character code. |
| Name | A description of the size (7 characters). |
| Net Contents | For weights and measures; prints on customer labels. |
Types
Type refers to the form in which the plant is sold, such as grafted or espaliered. Like size, it may contain 2 characters with letters, numbers, and/or special characters.
| Field | Description |
|---|---|
| Type | 2-character code. |
| Name | A description of the size (7 characters). |
Grades
Grade typically refers to the height (top size) at which you plan to sell a plant (as opposed to the height of a plant at its maturity). This code can be 4 characters and use a combination of numbers, letters, and special characters. We recommend that you use minimally a consistent 3-character code with zeros as placeholders where necessary. For example, the code for "2-3 feet" would be "023". If using a 4-character code, it would be "0023". This not only allows data to sort correctly, but also gives you the greatest possible permutations for product IDs.
Product Catalog
With plant, size, type, and grade codes set up, you're ready to build a product catalog.
- Select a plant code (required).
- Select one or more secondary codes: Size, Type, Grade (required). See our guidelines for choosing a Product ID convention.
- Check the "Plant" flag if the item is a plant (non-plant items could include flats, load locks, racks, etc.).
- Check the "Active" flag if you want to be able to place this item on an order.
- (Optional) Enter additional information. See the table below for a description of each field.
- Click "Save." The application will assign the product a unique ID based on the plant, size, type, and/or grade codes.
Tip: After saving a product, you may add product-specific notes to the "Comments" column on the product catalog grid.
Product Catalog Fields
| Field | Description |
|---|---|
| Shipping Unit | Used for calculating freight volume; should be based on the number provided in Setup > Orders > Shipping Units. |
| Catalog Price | The product price, excluding or including royalties. If price excludes the royalty, check "Exclude Royalty" under Setup > Inventory > Inventory Setup Options to ensure accurate totals on invoices. Tip: Use the Price & Product Quick-change Grid to update prices for many products at once. |
| Future Price | Next year's price. If entered, set an end date for the current price with the admin option "oestopcatprice". |
| Date Price | Usually for promotional pricing; enter a price then apply a date range. The shipping order will automatically use this price for any orders with a "want date" in the specified range. |
| Royalty Amount | The amount to be paid to the licensing organization. |
| Discountable | Default setting that determines whether or not a product may be discounted in order entry. |
| Taxable | Default setting that determines whether or not a product may be taxed. |
| Assessable | Informational only. |
| UPC | The program automatically assigns this number to a product using the information provided in Setup > Inventory > UPC #s. |
| AR Product Account | Associate the product with an AR product for sales reporting. |
Price & Product Quick-change Grid
This grid can be found under the Products section. Apply price changes directly to the grid and save. Or, export the grid to Excel and save to your computer. Apply and save changes, then re-import under Imports > Import Begin Inventory.
Location Setup
Inventory Transactions
Record Inventory Changes by Plant
- Within the Gold Menu, go to Inventory > Inventory > Inventory Changes by Plant.
- Select the desired plant from the drop down grid.
- Click "Find." A detailed report appears (upper grid).
- In the middle portion of the screen, select the appropriate transaction type tab:
- Loss: always a reduction to inventory (must enter a reason code)
- Adjustment: can be an addition or reduction, in which case the user would enter a negative number (must enter a reason code)
- Move: a transfer of some of a plant product from one location to another (*note that a move automatically updates both the "to" and "from" locations)
- Move All: a transfer of a plant's total quantity from one location to another (again, the system automatically updates both the "from" and "to" locations)
- Shift: a change in the grade (or size) designation of a plant
- New Inventory: propagated or acquired inventory
- Enter required information and any additional information.
- Click "Commit." A record of the transaction will appear at the bottom of the form, under "Pending Transactions."
-
* Use the minus sign (-) in the bottom left corner to delete a committed transaction.
- Post transactions to inventory:
-
a. Highlight the transaction record under "Pending."
b. Click "Post" in the toolbar.
- (Optional) Look up a detailed history of transactions by product with the Inventory History grid.
Note: If a transaction contains errors, you cannot delete it after posting. Instead, execute another transaction to rectify the issue.
Inventory Edit Grid
The Inventory Edit grid provides real-time on hand, reserve, and unsalable quantities, which you can also edit directly on the grid, along with sell-date, location, pick order, and more. Easily export to Excel (right-click anywhere on the grid, then select "Export to Excel") for periodic analysis.
Pick Order
When you have the same product grown in multiple locations, you may assign each location a pick order number and the program will organize locations on pull reports accordingly. It excludes all records where pick order equals "9".
Imports
Import Catalog Prices
- Double-click the import form to open it.
- In Excel, format a spreadsheet according to the sample header row that is provided for you on the import form.
-
* Make sure the file is saved as .xls.
- On the import form, click "Open."
- Select the appropriate file.
- Delete row 1 by clicking in any cell within the row, then click the minus ( - ) sign in the bottom left corner. Confirm that you wish to delete the row.
- Click "Validate." The program will scan the data for any errors, such as duplicate records.
- If necessary, fix errors. If the only errors are duplicate records, you can simply delete those rows from the import form. If other errors exist, you may need to open the spreadsheet, save changes, then re-upload the spreadsheet to the import form.
- Once all data is correct, click "Process." The data will import.
- (Optional) Navigate to the Price & Product Quick-change Grid, to view and/or update records.
Import Beginning Inventory
You can import beginning inventory at any time; the import will not clear your existing data. However, if you are a new user importing inventory for the first time, you must first navigate to the Setup module and delete any demo data (Setup > Deletes).
- Double-click the import form to open it.
- In Excel, format a spreadsheet according to the sample header row that is provided for you on the import form.
-
* Make sure the file is saved as .xls.
* Pick order refers to the order in which you want to pick from multiple locations containing the same product (where sell dates are also equal). The program will NOT pick from any location with a pick order of "9". - On the import form, click "Open."
- Select the appropriate file.
- Delete row 1 by clicking in any cell within the row, then click the minus ( - ) sign in the bottom left corner. Confirm that you wish to delete the row.
- Click "Validate." The program will scan the data for any errors, such as duplicate records.
- If necessary, fix errors. If the only errors are duplicate records, you can simply delete those rows from the import form. If other errors exist, you may need to open the spreadsheet, save changes, then re-upload the spreadsheet to the import form.
- Once all data is correct, click "Process." The data will import.
- (Optional) Navigate to the Inventory Edit Grid or Price & Product Quick-change Grid to view and/or update records.
Reports & Grids
Product Catalog Information
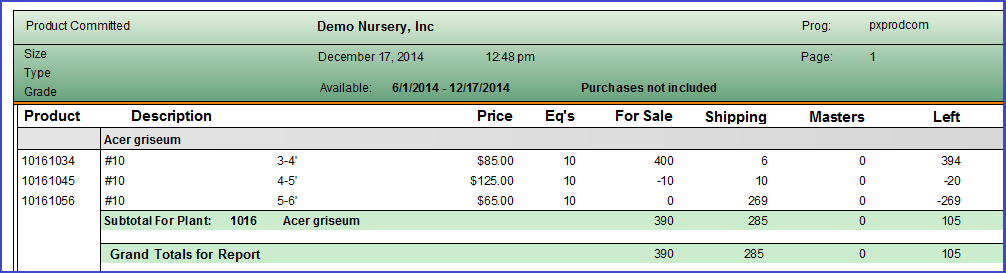
Product Committed
Quickly find out how many plants are committed to open orders. Amounts are cumulative. To view product commitments by customer, run the Product Committed by Customer report.
Single-date Availability
Product Inventory - Landscape / Product Availability - Portrait: These reports search your product sell dates and shipping order sell dates. Enter a begin date (optional) and end date (required). If you wish, narrow the search results by size, type, and/or grade. Set the minimum to "1" to exclude products where on hand equals zero. Lastly, choose how you wish to filter the report: On Hand, Available for Sale (salable), Left to Sell, Oversold, Production Reserve, or Unsalable. You may also use the Available by Product for up-to-date availability data.
Multiple-date Availability
Breaks down availability by the product sell date:
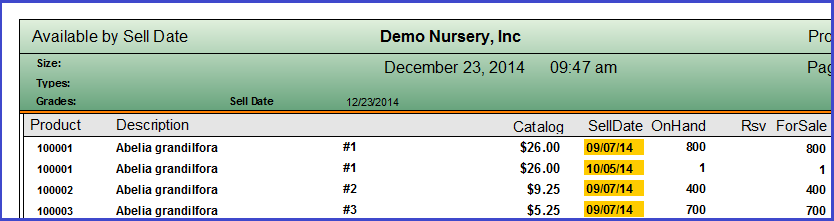
Available by Product Grid
Similar to the Single-date Availability Reports, but available in grid form so that you can delete columns and sort information according to your needs.
Inventory History Grid
This grid displays details about each transaction that occurred after the specified date, including transaction type (beginning inventory, adjustment, loss, move from/to, and sales), transaction ID#, transaction date, and product ID and quantities.