Getting Started
Before You Begin
Before getting started with CP Orders, you must have CP Platinum installed and configured on a desktop PC.
Note on CP Orders Documentation:
On the side menu, procedures are organized by the application they're performed in. All tasks that are performed in the desktop application are organized under CP Platinum, and all tasks that are performed in the mobile application are organized under CP Orders.
Also, procedures that are marked with an asterisk (*) pertain only to those customers who are hosting CP Platinum and CP Orders on different servers. Where a procedure applies to both hosting arrangements, be sure to note where individual steps may differ according to the hosting arrangement.
CP Orders Workflow
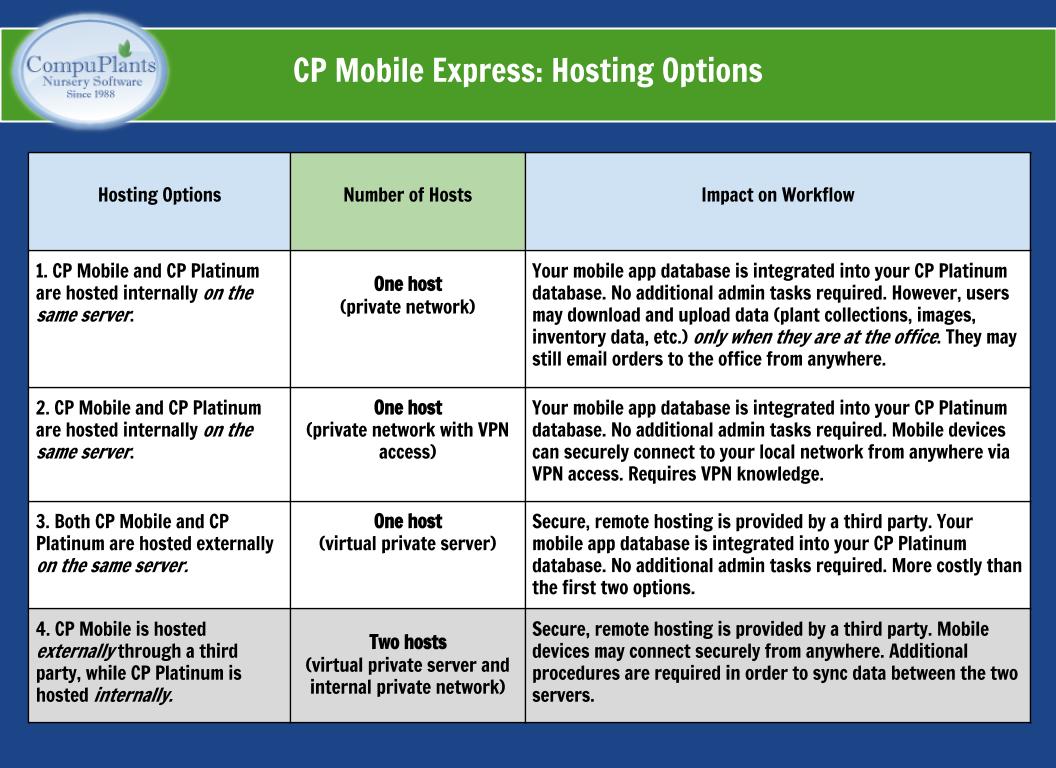
Because all of your nursery's plant and inventory data is maintained in the CP Platinum database, CP Orders must be able to communicate with your CP Platinum database. If CP Orders and CP Platinum are hosted on the same server (either internal or external), this communication happens automatically. If, however, CP Orders and CP Platinum are hosted on different servers, then additional administrative procedures are required in order for data to be shared between the two servers.
Administrators will handle most of the desktop-related tasks from the CP Mobile Express module. When the mobile and desktop apps are hosted on the same server, you may access the CP Mobile Express module through your main CP Platinum IP address. When the mobile and desktop apps are hosted on different servers, admins access CP Mobile Express by selecting the IP address of the mobile server when logging into CP Platinum. An abridged version of the desktop program lives on the mobile server and includes only three modules: Administration, CP Mobile Express, and Setup.
Data must be sent from the main CP Platinum host to the mobile host, and vice versa. Admins can manually send data between the two servers, or CompuPlants can automate this process at a specified time each day.
The following figure shows the most common hosting arrangements and their impact on a user's workflow.
Workflow Overview: One Host
This table provides an overview of the steps involved in using CP Orders when it is hosted on the same server that hosts CP Platinum. From initial setup to importing mobile orders, this overview will serve as a helpful reference as you're getting started with the mobile app.
| Ordered Steps | Application |
|---|---|
| 1. Choose a method for configuring your product availability. | CP Platinum |
| 2. Match Mobile Order IDs to Customer IDs. | CP Platinum |
| 3. (Optional) Upload plant images. | FTP to your CP Platinum Server |
| 4. (Optional) Link photos to plants. | CP Platinum |
| 5. Build plant collections. | CP Platinum |
| 6. Download and install the mobile app. | CP Orders |
| 7. Configure mobile app settings and test connection. | CP Orders |
| 8. Authorize mobile devices. | CP Platinum |
| 9. Sync collections to mobile device. | CP Orders |
| 10. Create a mobile order and upload to the server. | CP Orders |
| 11. (Optional) Preview mobile orders by generating a report. | CP Platinum |
| 12. Import mobile orders. | CP Platinum |
| 13. Complete order processing in the Orders module. | CP Platinum |
Workflow Overview: Two Hosts
This table provides an overview of the steps involved in using CP Orders when it is hosted on a different server from that which hosts CP Platinum. Each CP Platinum task includes a note indicating which location you must be logged into in order to perform the task: your main CP Platinum host IP address ("Main"), or your mobile CP Platinum host IP address ("Mobile").
| Ordered Steps | Application |
|---|---|
| 1. Save the host server IP address in the admin option hostmobileip. | CP Platinum (Main) |
| 2. Create a connection to CP Platinum on the mobile host and log into the new location. | CP Platinum (login screen) |
| 3. Choose a method for configuring your product availability, and save your setting in the admin option availableby on the mobile host. | CP Platinum (Mobile) |
| 4. Match Mobile Order IDs to Customer IDs. | CP Platinum (Main) |
| 5. (Optional) Upload plant images. | FTP to the Mobile server |
| 6. (Optional) Link photos to plants. | CP Platinum (Mobile) |
| 7. Build plant collections. | CP Platinum (Main) |
| 8. Send data to mobile host. | CP Platinum (Main) |
| 9. Download and install the mobile app. | CP Orders |
| 10. Configure mobile app settings and test connection. | CP Orders |
| 11. Authorize mobile devices. | CP Platinum (Mobile) |
| 12. Sync collections to mobile device. | CP Orders |
| 13. Create a new mobile order and upload to the server. | CP Orders |
| 14. (Optional) Preview mobile orders by generating a report. | CP Platinum (Main) |
| 15. Import mobile orders. | CP Platinum (Main) |
| 16. Complete order processing in the Orders module. | CP Platinum (Main) |
CP Platinum Procedures
This section provides instructions for all the procedures that integrate CP Orders with your main desktop application, CP Platinum. Some procedures require an admin user, while others may be performed by Orders and Inventory personnel.
Configure CP Orders Admin Options
Host Server IP Address
If CP Orders is hosted on a separate server, you must save the IP address for that server under the admin option hostmobileip. This enables the data to sync between the two servers. Those users hosting CP Platinum and CP Orders on the same server should disregard this admin option.
- Log in to CP Platinum , selecting the IP address for your main CP Platinum host.
- Navigate to Administration > General > Prefs & Options.
- Conduct a search for the parameter "hostmobileip".
- Enter the IP address in the field labeled "Value".
- Click "Save". You can now share information between the mobile host and your main CP Platinum host.
Product Availability
With the admin option availableby, you can determine which CP Platinum table you want to base availability on: the Price & Product Quick-Change Grid or the Quick-Change Master Order Grid. This setting applies to all mobile devices, though admins may change this value as often as they wish.
| Parameter Value | Details |
|---|---|
| products |
|
| masters |
|
To set a value for availableby:
- If your nursery is hosting CP Orders on a separate server, log in to CP Platinum on the mobile server. If your nursery is hosting both the mobile and desktop applications on the same server, proceed to the next step.
- Navigate to Administration > General > Prefs & Options.
- Conduct a search for the parameter "availableby".
- Enter one of the following values, based on your preference:
- products
- masters
- Click "Save".
Create a CP Platinum Connection to the Mobile Host
For nurseries that are hosting CP Platinum and CP Orders on different servers, you will manage devices and complete other administrative tasks from a secondary instance of CP Platinum. This secondary instance, which is strictly for managing your CP Mobile apps, is hosted on the same server that hosts CP Orders, and includes three modules: Administration, CP Mobile Express, and Setup.
- If you're currently logged into your main CP Platinum application, you can leave that window open.
- Open a new instance of CP Platinum by (for instance) double-clicking the desktop shortcut.
- In the login dialog, select "New". A second dialog opens.
- Save settings for the new connection:
- Location: User-defined value; you may wish to enter "mobile" to indicate that this connection is the server hosting CP Orders.
- Database: The database name (not the type of database); may be assigned by the admin user or by CP Support.
- Host/Server IP: This may be the host name or the 10-digit IP address of the mobile host. If using the IP address, it must be static.
- Port:
6312 For MySql or MariaDB hosted on Windows or Linux. Note: Other ports can be assigned. Check with your IT administrator. 6315 For C/base database hosted on Windows or Linux - Check the appropriate server settings:
Use cpNetApi This must be checked if using CP Platinum version 6.x. Note: This setting does not appear with version 7.x. Use compression Check this box for users connecting remotely. To improve performance, data is compressed on the host server before the user downloads it to his local machine, where it is uncompressed. Use SSL Ideal for remote connections and for those that want a more secure connection. Data is encrypted before being transferred between the host server and local machine. Note: Please contact CP Support if you would like to implement this feature, as the host server requires some additional configuration.
- Click OK to save the connection and close the dialog.
Log in to CP Platinum on the Mobile Host
- Open a new instance of CP Platinum.
- On the login screen, select the mobile host IP address.
- Enter the username and password associated with this location (these could be different from your main CP Platinum login credentials).
- Click "OK". You are now logged into the CP Platinum on the mobile server.
Match Mobile Order IDs to Customer IDs
Because CP Orders is a streamlined order entry app, you don't have the ability to select a customer code from a dropdown list when entering an order. Instead, the user has the freedom to enter anything in the Order ID field. To facilitate seamless transitions from mobile orders to shipping orders, CompuPlants recommends matching the mobile order ID to a customer ID. This customer ID can come from one of three tables in the CP Platinum:
- the sold-to customer email address
- the ship-to customer email address
- the "Name" field on the Customer Email and ID form, which is a user-defined field (can be name, email address, or other code)
Customer Email & ID
If you have multiple contacts for a single customer, you may use this form to save additional email addresses that can be matched to the mobile order ID when the sold-to or ship-to email address is not used. CompuPlants matches the "Order" field to the "Name" field on this form. If you enter the email address in the "Fill in Email Address" field, the program will NOT find a match.
Upload Images to the Server
Plant images need to be uploaded to the same server that's hosting CP Orders. The quickest and most secure way to connect to your server is to use a File Transfer Protocol (FTP) client such as ShareFile, Ipswitch, and FileZilla. After you've set up the server address, username, and password, the process is quite simple. Consult your FTP client documentation for more information.
The program will look for photos in the following directory:
/var/www/html/images
The main folder, "images," may contain sub-folders, but you must identify the sub-folder when providing file pathways in the Plants with Photos form (see step 4, above).
Link Images to Plants
The Plants w/ Photos form is a duplicate of Inventory > Products > Plants, with the added feature of an embedded Windows Explorer to facilitate browsing to your image files. Any changes made here will be reflected in the Inventory module, and vice versa. You can only link an image to the main plant number—not to the individual products associated with the plant. Also, keep in mind that smaller file sizes load more quickly.
- Make sure all plant photos are saved using a logical naming convention and stored in the same main folder called "Images". If you organize the images into sub-folders, you'll need to provide the name of the sub-folder (see step 4).
- If the plant record exists, query the record or click "Find" to list all records. If it does not exist, insert and save a new record.
- Navigate to the directory where your images are stored on your local machine using the Windows Explorer interface.
- If your images are divided into separate sub-folders within the main folder, type the name of the sub-folder in "Server Sub-Folder".
- Double-click the image file. The file name is copied to the "Photo Name" field with the sub-directory preceding it.
- Save all changes before exiting the entry form.
- Upload image files to the server (see next topic for additional information).
Use the Plants Picture List Report at any time to quickly see which plants have photos linked to them.
Build Collections
By default, CP Orders does not display your entire product inventory. Instead, it displays collections, or groups, of products that you have put together in the CP Mobile Express module. You may organize these collections in a number of ways: around a single plant with several cultivars; around a product type, such as your most popular trees or shrubs; according to your promotional programs; by master orders or frequently purchased items by customers, and so on.
Each collection has three tiers: collection > groups > plants. While collections and groups can be highly versatile, the lowest level, plants, must consist of all products belonging to that plant. A single plant, however, may belong to more than one collection, as well as more than one group within a collection. See the example below.
| Collection | Groups | Plants |
|---|---|---|
| Dahlias | Orange | 'Firepot' #1, #2 |
| 'Cheyenne' #1, #2 | ||
| 'Peaches and Dreams' #1, #2 | ||
| 'Myrtle's Folly' #1, #2 | ||
| Red | 'Firepot' #1, #2 | |
| 'Tahiti Sunrise' #1, #2 | ||
| 'Black Satin' #1, #2 |
I. Create a new collection:
- Go to CP Mobile Express > Plants & Collections > Collections.
- Click "Insert."
- Enter an alpha-numeric code for the collection.
- Enter a more detailed description that matches your organizing criteria (plant cultivar, promo event, customer or customer type, etc.).
- Mark the collection as "active," or leave the flag unchecked for inactive. Only active collections sync with devices, but you can change the active flag at any time, especially if you wish to download different collections for different reps/devices.
- (Optional) Sequence the collections using the Sort Order. The collection with a Sort Order of "1" will appear at the top of the collections page on the mobile device. This is useful when you wish to feature collections.
- Click "Save."
- Repeat steps 2 through 7 to create another collection.
II. Add groups to the collection:
- On the collections grid, highlight the desired collection and click "Detail."
- Click "Insert" to add a group to the collection. The application assigns a group ID.
- Enter the title of the group. The title should indicate the organizing attribute: cultivar or color for a plant-based collection, special pricing or discount for a promo collection, a frequently purchased shrub for a garden center collection, etc.
-
Note: Groups generally cannot be organized around a single size, since individual products cannot be added to a group. You may, however, create groups based on a size range, such as "5-gallon and smaller".
- (Optional) Provide a Sort By number. This allows you to sequence groups as they appear in the app.
- Click "Save."
- Repeat steps 2 through 5 to add another group to the collection.
III. Add plants to each group:
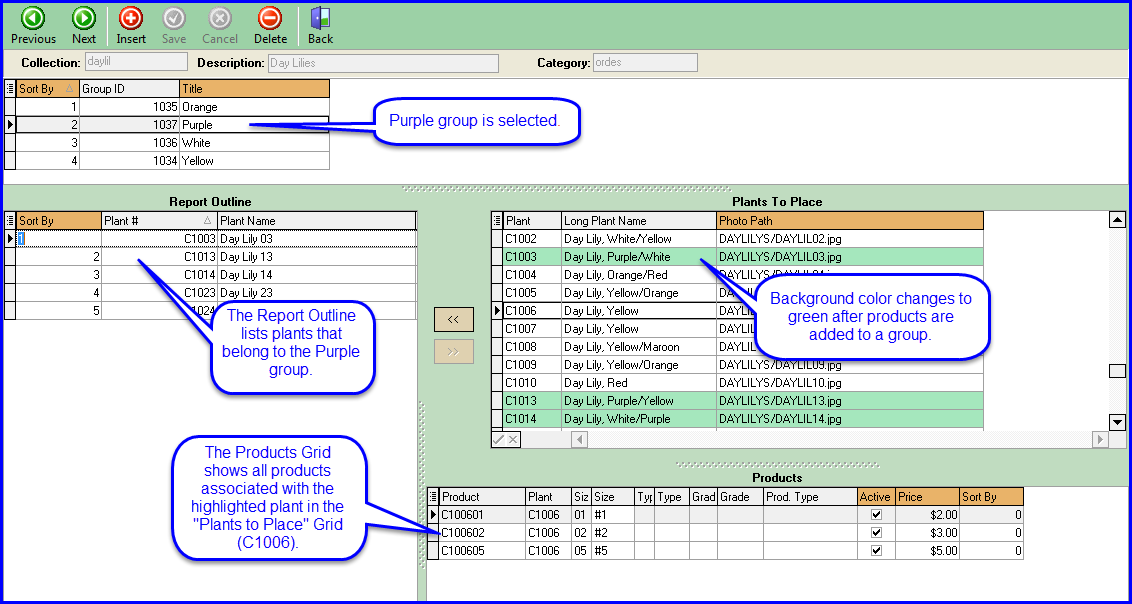
- On the upper grid, indicate which group you're going to build by highlighting the group ID line.
- On the Plants to Place grid, select a plant to add to the group. Double-click the plant line, or highlight it and click the left arrow.
- As you move plants into a group, the background color turns green and the plant ID line appears in the Report Outline.
- Though a separate grid at the bottom shows the various sizes associated with the highlighted plant, you cannot delimit a group by size. If you try to add a single product from the Products Grid, the application will add all products by default.
- Remove a plant by double-clicking the plant ID line on the Report Outline, or highlighting it and clicking the right arrow.
-
(Optional) Re-sequence plants, featuring certain plants at the top of the group, by using the "Sort By" column:
a. Type a new number that represents the desired position for each group.
b. Once you're finished, right-click on the grid—avoiding the Sort By column—and select "Re-Sequence."
The screenshot below shows details for one group in the "Day Lilies" collection.
Send Data to Mobile Host
If CP Orders is hosted on a separate server, and you manage plants, products, and collections on your CP Platinum server, then the data needs to sync to the mobile server with each set of changes that you want to go live. This process will occur automatically in the future; however, it will only occur once per day (usually overnight). If you want your changes to immediately go into effect, you must manually push the data to the mobile host. If both the desktop and mobile applications are hosted on the same server, you do not need to complete this process.
After inserting and/or editing any information pertinent to CP Orders (plant/product names, image file paths, collection details, etc.):
- Go to CP Mobile Express > Sync to Host > Make for Host.
- Click "Execute". This prepares the files to be sent to the server.
- Go to "Send to Host".
- Click "Execute". This action sends the information to the mobile host.
- (Optional) Close this instance of CP Platinum.
- Open a new instance of CP Platinum.
- On the login dialog, select the mobile host IP address, then enter the corresponding username and password to log in.
- Go to CP Mobile Express > Load Data.
- Click "Execute". This will update information on the mobile host so that it is current with your CP Platinum data.
It's a good idea to double-check your data, on both the desktop and mobile applications, to ensure that everything is correct. Also, make sure your mobile users know to to download the latest data to their mobile devices.
Plants Picture List
Click "Find" to view a list of all plants that are linked to images. This is for informational purposes only and cannot be used to add/delete photo pathways.
Picture Print
You can quickly view the images associated with plants by using this form. Click "Find" to show all records, then highlight the rows you wish to include in the report, and preview/print the report.
Authorize Devices
You will need to provide each user with your server IP address and database name. When users download the app to their phones, they'll enter this information in the application settings and connect to the server. Once the connection is made, a license request appears on the right side of the Manage Devices form. Each device will show a unique device ID.
Admins have three days to authorize the device. During that time, users have full permission to download and upload data. If the grace period expires and the device has not been authorized, however, the app will defect when the user attempts to connect to the server.
To authorize a device:
- Go to Administration > Manage Users & Devices, and click the Devices tab.
- From the License Requests grid, highlight the device you wish to authorize.
- Double-click the device ID, or click the left arrow, to move the device to the Current License grid. This authorizes the device.
Deactivate Devices
Once you reach the maximum number of licenses in use, the program will not allow you to authorize another device. However, you may deactivate a device to authorize a new license request. The number of active licenses cannot exceed the total device licenses you've purchased
Delete Devices
At this time, users are not allowed to delete devices.Mobile Orders Preview
Generates a report of all mobile orders that have been uploaded to the server. Orders are organized by the order ID, and include username, products, quantities, and plant type.
Import Mobile Orders
Before you can process a mobile order as an actual shipping order in the Orders module, you must first execute a simple process that turns a mobile order into a live shipping order.
To Import Mobile Orders:
- From the CP Mobile Express module on the desktop program, navigate to Mobile Processes > Import Mobile Order.
- If CP Platinum and CP Orders are hosted on the same server, all orders that have been uploaded to the server will appear on the grid in the middle of the form.
- If you are hosting CP Orders on a separate server, you must click the "Download" icon in the toolbar in order for the mobile orders to appear on the grid.
- In the Mobile Orders grid, highlight an order that you wish to turn into a live shipping order. Once highlighted, the bottom grid updates with the details of the highlighted order. You may not change these details on this form, but you will be able to edit the order after creating the live order.
- On the top form, add the following information:
- Customer (Required): If the mobile order ID does not match a customer ID, you must select the customer ID from the dropdown list. The default contact information will appear in the subsequent fields. For more information on matching mobile order ID to customer ID, refer to Match Mobile Order IDs to Customer IDs.
- Product Type (Required): Enter the desired product type.
- Purchase Order # (Optional): If the mobile order is associated with a purchase order, you may provide the PO number here.
- Want Date (Required)
- Sales Rep (Optional)
- To create a live shipping order, click "Create Order" in the toolbar. If the process is successful, a dialog box will appear, providing you with the shipping order number.
Now, you can navigate to the Orders module to edit the order, if desired, generate a pick list and finish processing the order.
CP Orders Procedures
This section provides instructions for all the procedures that are performed on the mobile device.
Download and Install CP Orders and Trucks
- iOS users: Go to the iTunes App Store on your mobile device to download the app.
- Android users: Download the APK installer Orders here.
- Android users: Download the APK installer Trucks here.
Configure Mobile Device Settings
After minimal setup on your mobile device, you'll be ready to enter orders. Access settings by tapping the gear wheel in the upper left-hand corner of the screen.
| Setting | Description |
|---|---|
| Server Address | Enter the IP address provided by CompuPlants. |
| Database Name | Enter the name of the database on your server, also provided by CompuPlants. |
| Test Connection | If you receive a "lost connection to server" message while using the app, run this test and your connection should be restored. |
| Username | Enter a unique user ID (it does not have to match the user's CompuPlants credentials). This information is displayed on CP Orders reports so the administrator knows which user is responsible for an order; the mobile app does not require a user login/password. |
| WiFi Only | Communicating with the server over a WiFi connection prevents the app from using your valuable data. With this switch turned on, you may still save orders and log product quantities on your device. When you establish a WiFi connection, the application will automatically push data to the server. You can choose which data to sync with or without a WiFi connection. You may opt to send emails and upload orders to the server, for instance, over your high-speed cellular connection, but to sync photos only when you have a WiFi connection. Ignore this setting if you are not using plant photos. |
| Ignore Availability | Your mobile device expends valuable battery power to retrieve up-to-date availability records, which may change by the minute. Turn this switch off to disable constant updates and conserve battery life. |
| Use Images | Leave this at the default setting if you prefer to load the product catalog as a list (no thumbnail images). This will save both data and battery life for those customers with extensive product catalogs.
|
| Default Email Addresses | Enter default email address(es) for order summaries. You'll be able to enter the customer's email address on the order entry form. |
| HTML Email | You may format emails in plain text or in HTML, which can be easier to read. Android users: If using HTML email, you have some additional settings to fill out: From Address, Password, Outgoing Mail Host, Port, and the flag "Use SSL". |
Order Entry
Sync Collections to Mobile Device
For new devices: you must first download the plants and products data by tapping the download arrow at the top of the screen. After the initial download, you should download product info as often as collections are added, deleted, or updated. This may be seasonally, weekly, or daily. You may wish to download the catalog at the office, where you have a reliable WiFi connection.
Process a Mobile Order
There are four main steps to processing a mobile order: save a new order, add products to the order, email an order receipt, and upload the order to the server. It is important to email the order receipt before uploading the order, as uploading the order results in deleting it from your mobile device.
I. Save a new order:
- (Optional) Download plant and/or photo data.
- Click "Order" (blue button) at the top of the screen. An empty order detail page appears with a blank order ID field.
- Enter a customer ID in the order ID field. What you enter here should be consistent with your company guidelines. Note that this field serves two purposes:
- When moving a mobile order to a shipping order, it links the mobile order to a customer code in your CompuPlants database by searching the sold-to address, ship-to address, then the "Name" field on the Customer Emails & ID form.
- The contents also copy to the recipient field when you send an order receipt. This field also interfaces with the "Nick Name" field in the Contacts app on your mobile device; however, to ensure seamless mobile order integration, the mobile "Nick Name" would need to be tied to the customer using the Customer Emails & ID form.
- Click "Back" to return to the Collections page.
II. Add products to the order:
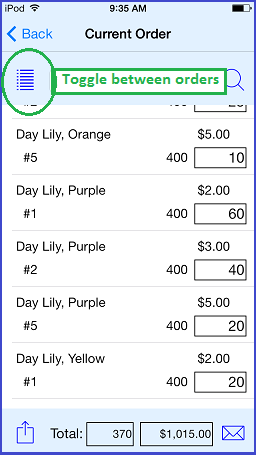
- Tap the collection name, then the desired plant. A list of products associated with that plant appears.
- Enter the quantity in the blank field below the price. Your changes are automatically saved.
- Navigate back to the Plants page.
- (Optional) Add more plants from the same group.
- Go back to the Collections page.
- (Optional) Repeat steps 1 through 5 to add products from other collections.
At this point, you may complete the order by emailing an order receipt and uploading the order to the server. Or, you may store the order and return to it at a later time, processing other orders in the meantime.
To enter a new order when a current order is selected:
- Click the orders button (which displays the current order ID). The order detail page appears.
- Clear the current order ID and type the new order ID (don't worry, the current order info won't change).
- Exit the keypad by tapping anywhere else on the screen. The orders page refreshes with a new, blank order.
-
Note: You must add a product to the new order before toggling to a saved order; otherwise, the app does not store the order.
III. Email an order receipt:
- Click the order ID button to access the order detail page.
- Click the email icon in the bottom right corner. This opens your default mail app. Any default email addresses you have saved in Settings will automatically appear in the To: field, along with the customer's email address provided in the "Order" field.
- If the To: field does not show a valid client email address or contact, enter the desired address(es).
- (Optional) Add your own note to the body of the email.
- Click "Send."
IV. Upload the order to the server:
- From the order detail page, click the upload icon in the bottom left corner. The upload order screen appears.
- Ensure that a value appears in the Customer field (a.k.a mobile order ID). Keep in mind that, in order for a mobile order to become a regular shipping order, a valid customer ID must be assigned to the order.
- (Optional) Change the Want Date. The Want Date defaults to today's date.
- (Optional) Enter a PO number associated with the order.
- (Optional) Add a note about the order.
- Select Upload. A "Success" message will confirm that the order was uploaded.
Notes:
- No dialog appears asking you to confirm—the upload happens instantaneously.
- The upload deletes the order from the app and records the order in the CP Mobile Express module (Reports > Mobile Orders Preview).
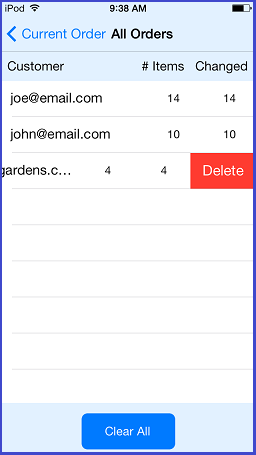
- From the main page of the app, click the "Orders" button.
- Click the list icon to the left of the order ID field (see screenshot below) to display a list of saved orders.
Follow steps 3 and 4 to edit products, or go to step 5 to delete an order. - Select the order you wish to edit.
-
Make desired changes:
- To delete a product, change the quantity to "0".
- You cannot edit the order ID; doing so only creates a new order. If the name or email address was misspelled, you'll be able to correct it before sending the email.
- To delete an entire order, swipe the order line to the left.
- Tap "Delete". A dialog appears asking you to confirm.
- Confirm the deletion.
Edit/Delete a Mobile Order
List icon:
Delete order: