User Setup
Manage Users & Devices
This form provides access to both single-user and multiple-user licensing information, though the two types of licenses are independent of one another. The "Users" tab allows you to keep track of multiple-user licenses. The "Devices" tab shows single-user licenses, or each device that has been authorized for CP Orders and CP Inventory, and keeps a running count of licenses in use near the top of the screen.
Password Permissions
Before creating new users, consider how you wish to manage passwords. By default, only the admin user has the ability to change users' login and email passwords, as this form is currently housed in the Administration module. However, you may choose to allow users to manage either or both of these passwords by changing the appropriate admin option:
- pwmode: Set to "0" to allow users to set their own CompuPlants login passwords.
- emailconfig: Set to "0" to allow users to set their own email passwords.
Create New User
CompuPlants accommodates multiple user accounts and varying levels of user permissions. Make sure you've set up sales reps in Setup > Receivables > Sales Reps before adding them as users.
- Go to Administration > User Setup > Manage Users & Devices.
- From the Users tab, click “Insert.”
- Enter a unique user name.
- Set the user status to "active." Every active user reduces the number of available licenses by one. The program will not allow you to add another user when all licenses are in use. You may, however, deactivate a user then create another user.
- Enter a password.
- If the user is a sales rep, enter the Sales Rep ID.
-
Check the applicable account type:
- "Admin" gives the user full access to all menu modules and data.
- "Full Rep Access" applies to manager-level users with permission to access all sales rep information and is pertinent to the Sales Express module.
- "Only Hourly" applies to payroll reports.
- "Lock Grids" disables the new grid layout feature.
- (Optional) Grant design privileges for CompuPlants' common development environment (CDE) tools. Learn more in Developer Tools.
- Configure the user's email. This is for sending SMTP and is predominately used in 7.0, but is also used in various programs in 6.0.
-
* As an admin user, you may allow individual users to set their email passwords, or you can reserve this privilege for yourself. Save your preference under the admin option emailconfig.
- Click “Save.”
The bottom grid updates with the latest user information. Note: This is not a quick-change grid.
Authorize Reps
If you do not want to grant a rep full rep access—just access to those sales reps who report to him—do so here. First, set up all sales rep accounts in Setup > Receivables > Sales Reps. Then, group sales reps by their managing rep here. For "User," select the less senior sales rep; for "Sales Rep," choose the managing rep. These settings pertain only to the Sales Express module.
Set User Permissions
Easily manage users' abilities to view, insert, edit, and/or delete information throughout the application. You may even require the user to enter a password when performing specific actions.
- Go to Administration > User Setup > Permissions.
- Click “New Permission.”
- In the dialog box, type the name of a new permission group. Permission groups may reflect your business departments, such as "Inventory" or "Sales." Or, for smaller companies, you may wish to use the employee's name.
- On the User table, include individual user(s) in the group by checking the box labeled "Grant."
-
Assign group permissions:
- For unrestricted access to a module, select "All."
- For full restriction to a module, select "None." The module will not appear on the user's main menu.
- For partial access, check "Partial," then expand the module by clicking the plus (+) sign. Continue expanding topics until check boxes appear under the "Partial" column. Check each menu tree item that the user may access. Further delineate permissions with the "Insert," "Update," and "Delete" parameters to the right.
- (Optional) Enable password protection for any module or menu tree item by typing the password in the last column.
- Click “Save.”
User Options
CompuPlants offers options at both the administrator and user (non-administrator) levels. User options either grant users privileges in certain areas, such as change a customer's payment terms or default discount percentage; or, they allow users to customize a form, such as the customer file, order entry, and allocations. Administrative preferences and options, on the other hand, permit administrators to set default values and determine which scripts will run for select forms. Learn more about admin options here.
Set User Options
- Highlight the username.
- In the "Value" column, check/uncheck the box or, for integer values, click in the empty cell. Up and down arrows will appear, allowing you to select the desired value.
- Save changes.
Options: Allocations/Shipping Orders
Control which tabs display in Inventory > Allocations > Products and Orders > Entry Forms > Shipping Orders.
- "0" hides the tab
- "1" displays the tab
| Parameter | Category | Corresponding Tab |
|---|---|---|
| altabhistory | Allocations | History |
| altabhistorygrid | Allocations | History Grid |
| altaborder | Allocations | Orders |
| altabpicture | Allocations | Plant Pictures |
| altabprelim | Allocations | Preliminary Orders |
| altabpropagation | Allocations | Propagation Plan |
| altabpurchase | Allocations | Purchase Orders |
| altabreserve | Allocations | Reserves |
| oetabair | Order Entry | Air Info |
| oetabcredit | Order Entry | Credit Info |
| oetabdecorations | Order Entry | Decorations |
| oetablabel | Order Entry | Labels |
| oetablocation | Order Entry | Locations |
| oetabmisc | Order Entry | Misc. |
| oetabpayment | Order Entry | Payments |
| oetabtax | Order Entry | Taxes |
Options: Customers
Control which tabs display in Receivables > Entry Forms > Customers (SS/SO).
- "0" hides the tab
- "1" displays the tab
- "2" sets the tab to the default (first) position
| Parameter | Corresponding Tab |
|---|---|
| cushowanca | ANCA Codes |
| cushowcredit | Credit |
| cushowcreditinfo | Credit Info. |
| cushowedi | EDI |
| cushowlabel | Labels/Tags |
| cushowmisc | Misc. |
| cushownotes | Notes |
| cushoworderhist | Order History |
| cushowpayhist | Payment History |
| cushowpricing | Pricing tab |
| cushowshipping | Shipping |
Options: User Permissions
In addition to the options described above, the user options table allows you to set certain permissions for each user.
| Parameter | Permission |
|---|---|
| allowvendoroverride | Set to "1" to allow the user to change the vendor name in Payables > Entry Forms > Manual Checks. |
| oedecorationsbysize | Set to "1" to display only items with the matching size (see Orders: Decorations Tab). |
| oedischange | Set to "1" to allow users to change discount rate. |
| oetermschange | Set to "1" to allow payment terms change. |
| oeinactiveoverride | If "oeallowinactive" is set to "0", you may give certain users permission to override that setting with "oeinactiveoverride" under User Options: "0" = add as zero quantity; "1" = master active allow; "2" = always add |
| oeoversell | Set to "1" to allow selling more product than is available. |
| oepricechange | Set to "1" to allow user to change product price. |
| orderduplicates | Set to "0" to prohibit duplicate products; set to "1" to allow; set to "2" to allow duplicates on an order with a Product Type of 1 (without displaying a dialog). |
Assign Users to Outline Styles
With CompuPlants Platinum, you can associate a financial statement outline style (income statement or balance sheet) with a user. When the user logs in and runs one of the reports in Financials > Financials Formatted, the default outline style will automatically be applied to the report. This can be particularly useful when you wish to restrict financial information based on the user.
Before you can assign users to outline styles, you must format financial statements in the Financials module. When selecting a Style code and description, you may wish to associate the style with a particular user or department. For example, "IS-SALES" could be the style code for an income statement that is associated with a sales rep. Refer to Build an Income Statement Style and Build a Balance Sheet Style for more information.
To assign a user to an outline style:
- Navigate to Administration > User Setup > Assign Users to Outline Styles and double-click to open the form.
- Click "Find". A list of available outline styles appears.
- Highlight the outline style you wish to associate a user with.
- Select the user name from the drop down menu.
- Click "Save".
Change Password
The Change Password form is only intended for use when the admin option pwmode and/or emailconfig is set to "0", granting users permission to change their own passwords. If only the admin user has permission to change a user's password, the admin user must do so using the Manage Users & Devices form. For more information about password permissions, refer to Password Permissions.
- Double click the menu item. A password dialog appears.
- Enter your current CompuPlants password.
- Once access is granted, you'll be able to change the following settings:
- CompuPlants Password
- Email Password
- Email Name
- Email Address
- Email Login (username)
- Email Server Address
- Email Port
- Save changes when finished.
General
Menus
This form stores the name of each module you have purchased. You may change module names by editing the "Description" field. You can even create new modules as part of our Developer Tools.
File Paths
These pre-set file paths are set up by CompuPlants and used internally for organize various files (view-only).
Admin Preferences & Options
As an administrator, you may customize your version of CompuPlants in a number of ways: set default values, show/hide entry form tabs and fields, and determine which scripts will run for select forms.
Admin options should not be confused with user options. Though the Prefs & Options grid displays user options in addition to admin options, you may not use this form or grid to set user options. Any user option value you may enter here has no bearing on the application. Lastly, you cannot transform an admin option into a user option by checking the box labeled, "User Option." This checkbox is strictly informational. Should you find that turning an admin option into a user option would benefit your business needs, however, it may be done in some cases. Please contact us for more information.
Jump to a category:
Option Value Types: Key
| Value Type | Format |
|---|---|
| Boolean | value can be either "0" for "false", or "1" for "true" |
| Date | enter an 8-digit date (e.g. 01/01/2000) |
| Integer | value must be an integer, could be negative (e.g. -1, 0, 1, 2, etc.) |
| List Drop Down | select a value from a drop down list (typically used for user options) |
| Money | not currently used |
| Real | enter a user-selected value, such as an interest rate |
| String | value is a word; choose from specific values |
| Time | not currently used |
Administration Options
| Parameter | Description |
|---|---|
| emailconfig | If set to "0", users can configure their email information in Admin > Users > Change Passwords. If set to "1", only the admin user can modify other users' email configurations (this is done in Admin > User Setup > Users). |
| pwmode | When set to "0", users may set their own CompuPlants password; when set to "1", only the admin user can set other users' passwords. |
Allocations Options
Collections Options
| Parameter | Description |
|---|---|
| photourl | Specify the pathway to image folder from the root folder. |
Commissions Options
| Parameter | Category | Description |
|---|---|---|
| cmuselinenet | Commissions | Controls which amount the commission rate is applied to: "1" makes the line net the commissionable amount (CompuPlants default); "0" makes the order total the commissionable amount ( (price x quantity) - order discount). The former method subtracts line item discounts, credits, and royalties before calculating the commission amount. |
| oesalestypereqd | Commissions | Set to "1" to require Sales Type on order header when saving a new order. |
EDI Options
| Parameter | Description |
|---|---|
| gs1prefix | Gs1 prefix See param gs1prefixsum. Walmart EDI. |
| gs1prefixsum | Each customer is specific. See param gs1prefix. |
| imp850cutoff | EDI 850 cutoff for duplicate ship-to and purchase checking. This should be changed each year. |
| oeedidates | Set to "1" to display a box of EDI dates on the Dates tab. |
| useadareas | EDI and Labels for retail, sku, and upc. |
Financials Options
| Parameter | Description |
|---|---|
| postglsales | Determines which method to employ when posting sales to the general ledger: "0" posts all sales to a single account (default setting), "1" posts sales by product, and "2" posts sales by product type. Learn more in Post Sales to the General Ledger. |
Inventory Options
Nursery Resource Planning Options
| Parameter | Description |
|---|---|
| algetplanfrom | Select where propagation plans come from... |
| alincludeplan | Set to "1" to include plan with on hand quantities in product allocations; set to "0" to maintain plan as a separate column. |
| allocplannedheading | On the availability panel in product allocations, rename the "graded" column to "planned". |
| fromplanyear | |
| nrpfloatdays | |
| nrprintcrop | |
| toplanyear |
Orders Options
| Parameter | Category | Description |
|---|---|---|
| bomethod | Back Orders | Set to "standard" to be able to transfer any product to the back order; set to "wanted" to transfer only want products to back orders. Learn more about these methods here. |
| oebackorderfrom | Back Orders | Determines which quantity to use when generating a back order: Set to "0" to use the original quantity; set to "1" to use the last confirmed quantity (displayed on order detail grid); set to "2" to use the entire original quantity (if your nursery does not make partial back orders). Applicable only when "bomethod" = "standard". |
| oehideboqty | Back Orders | Set to "1" to hide "Back Order" field on the order Detail page. |
| pricefind | Back Orders | Determines source for back order pricing: "prcchg" uses shipping order price; "catalog" uses product catalog price. |
| oesalestypereqd | Commissions | Set to "1" to require Sales Type on order header when saving a new order. |
| oearrdatedefault | Dates | This flag will define the default value of the ship date field in new orders. Values are as follows: -1, do not set a default; 0, use want date; 1, subtracts one from want date; 2, subtracts two days, etc. |
| oedetailselldatedefault | Dates | Set to "1" to copy the sell date on order header form onto the product detail page. |
| oeeditdtesch | Dates | Set to "1" to allow the user to modify the scheduled ship date. |
| oepodatedefault | Dates | Set to "1" to make the order date the default PO date; set to "0" to bypass a default date. |
| oerifreezedates | Dates | When set to "1", orders in RI state may not have ship-date, want-date or sell-date modified. |
| oeselldatedefault | Dates | This flag defines the default value of the sell date field in new orders: "-1" = do not set a default; "0" = use want date; "1" = subtract one day from want date; "2" = subtract two days, and so on. |
| oeshipdatedefault | Dates | This flag defines the default value of the ship date field in new orders: "-1" = do not set a default; "0" = use want date; "1" = subtract one day from want date; "2" = subtract two days, and so on. |
| changeshipto | Duplicate Orders | Set to "newshipto" to change the address info on a duplicate order when the ship-to changes. |
| logchanged | Duplicate/Back Orders | Set to "1" to save changes in the changed file for duplicate and back orders. |
| oeshipfromreqd | Locations | Set to "1" to require the "Ship From Division" field in the Locations tab when saving an order. |
| oeallowcancelmo | Master Orders | Set to "1" to permit users to cancel master orders. |
| oeallownonmasteritems | Master Orders | Set to "1" to allow users to add items NOT on the master order to a shipping order when a master order is required for a shipping order. |
| oeaskmasterterms | Master Orders | Set to "1" to prompt a dialog window to appear when saving a master order, asking the user if he wants to copy the Sales Rep, PO, Discount, and Terms from the master order instead of those from the customer entry form ("Require a Master" must be checked). |
| oecopyso | Master Orders | When adding master order products (from M.O. tab) to a shipping order not tied to a master on the order header, set this value to "1" to omit the master order number from the product detail row. |
| oemasterdefqty | Master Orders | There are three options for setting a default value for the "Quantity" column on the Master Order tab: "1" = load the current quantity_; "0" = load the original quantity; "-1" = load zero. |
| oeonlymoactives | Master Orders | Set to "0" to display only active products under the Master Order tab; set to "1" to display active and inactive products. |
| orderusechoice | Shipping from Master Orders | SM orders use itemcategory when looking up master order and for calculating left on the master. |
| oedtlnotesize | Notes | Limit the size of the detail notes field to this number of characters. If set to "0", the size will match the field in the database (currently 200). |
| shiplocation | Posting | Set to "1" to require a ship location on orders for posting to the general ledger. |
| trackingpost | Posting | script:pxpostiv4.0 post orders requires one tracking number |
| unpostri | Posting | Location for unposted RI orders. |
| graduated | Pricing | Activates graduated volume discount on the Summary page of the order; "1" = use incremental order discounting; "2" = use single discount. |
| oeapplylinediscount | Pricing | Set to "1" to apply the line discount to the price and reset the Discount flag. Set to "0" to store the discount amount without applying it to the price (Discount flag does not change). |
| oedocstageprice | Pricing | If set to 1, prices are not updated when docstage is SH or IV. |
| oeenablevolrebate | Pricing | Set to "1" to display the VR% field in the Claim header screen (for those customers who have purchased the Claims module). |
| oepriceoverridereason | Pricing | Set to "1" to require a reason for a price override, prompted by a dialog window. |
| oestopcatprice | Pricing | If future pricing is used, set an end date for a product's current price. |
| oesubalwaysreprices | Pricing | By default, when the discount flag is not set, the price will not change when changing the confirmed product. If set to 1, the price changes regardless of the discount flag (relevant only where volume pricing is not in effect). |
| termsdiscount | Pricing | 1 - Order&Volume&Line discounts are treated as terms discount. Order&volume discounts are taken when invoice is paid. 0 - Order&volume discounts are taken when the order is posted/shipped. |
| volumetype | Pricing | Set to "1" to use the previous volume bracket qty as the current bracket's minimum (for backwards compatibility only).If "1", the current volume bracket's quantity will be used as the max. If "2", the volume bracket minimum.??? |
| oeallowinactive | Products | Set to "1" to allow users to add inactive products to an existing master or shipping order (users must click "Insert" to add product to the order); current quantity will be set to zero. Exercise caution when using this feature. |
| oeshowfreeitems | Products | If set "1", products with no catalog price will be included in the product dropdown lists. |
| amtfrgpct | Shipping | Set to "0" to use amount before discount when calculating freight percent; "1" to use amount after discount; "2" = use full catalog price (this may or may not include royalties, depending on your settings); "3" works in tandem with Freight Method III (Freight Zones): apply freight rate by line, depending on the product size/ship zone combination. |
| oefreightfromshipvia | Shipping | You may save a default freight method in the customer file as well as in the shipvia file (Setup > Receivables > Carriers). Because of this, however, there is a chance that the customer and shipvia default freight methods may conflict in order entry. This admin option dictates which freight method the system applies: set to "0" to use the customer default, or set to "1" to use the shipvia default. |
| oemultshipnotes | Shipping | Set to "1" to use product type to set the default shipnote.??? |
| oeclaimsummary | Show/Hide | Set to "1" to display Summary button in Claims Form. |
| oecustomerhistory | Show/Hide | Set to "1" to display Customer History tab. |
| oedecorations | Show/Hide | Set to "1" to enable the decorations table to load for any user. Also, set the user option "oetabdecorations" to "1". See Orders: Decorations Tab for more information. |
| oeorderhistory | Show/Hide | Set to "1" to display Order History tab. |
| oepanelbuckets | Show/Hide | Set to "1" to show the Area panel on the Current Order tab (Yard, Heelin and Field fields). |
| oepanelcustomer | Show/Hide | Set to "1" to show retail customer panel on Current Order tab. |
| oepanellocation | Show/Hide | Set to "1" to display the location panel with tracking ID fields on the Current Order tab. |
| oeshowcataloginfo | Show/Hide | Set to "1" to display catalog pricing information in the Current Order tab (includes current price, future price, royalty, price stop date, and price group); set to "2" to display volume pricing; set to "3" to display information for both 1 and 2; "0" shows neither. |
| oeshowcreditbalances | Show/Hide | Set to "1" to display any open orders and outstanding credit balance for a sold-to customer. Where?? |
| oeshowdetailfooter | Show/Hide | Set to "1" to show a summary of prices at the bottom of an order detail page (discounts, freight, royalty, tax, total); set to "2" to show a summary of quantities (plants, ship units, feet, weight, tags, etc.); set to "3" to show both 1 and 2; "0" = no footer. |
| oespecialorder | Show/Hide | Set to "1" to display the special order check box on the order detail page. |
| oetabcusthist | Show/Hide | Set to "1" to display Customer History tab |
| oetaborderhist | Show/Hide | Set to "1" to display Order History tab |
| oediscount | Toolbar Icons | Set to "1" to enable the icon in the toolbar. |
| oepricebycase | Toolbar Icons | Set to "1" to enable the icon in the toolbar. |
| oepricebygroup | Toolbar Icons | Set to "1" to enable the icon in the toolbar. |
| oepricebyorder | Toolbar Icons | Set to "1" to enable the icon in the toolbar. |
| oeproductpricemodel | Toolbar Icons | Defines the behavior of the "Case" discount button: "0" = the total for each case type will be used, and the case count can be overridden; "1" = the total of all case types to determine the discount volume; "2" = total of all cases will be used |
| oeroyaltylabels | Royalty | It set to "0", royalty labels total prdtl1.royaltyamt; if set to "1", Royalty labels totaled plants.royaltylabels.??? |
| oegetordersby | Get orders by "shipto" or "soldto." | |
| oeclaimcopyinfo | Set to "2" to copy original order quantity and price to claim items when they are created. Set to "1" to copy only the price. Set to "0" to copy nothing. | |
| oepctsubtract | Use "discountable" or "net" | |
| oepayscanonly | If set to "1" AND the Sales Type on the order header is defined as payscan only, products added from a master order must also have the payscan_flag set. |
Purchases Options
| Parameter | Description |
|---|---|
| incpoforsale | |
| poallowduplicates | Set to "1" to allow duplicate detail lines on purchase orders. |
Receivables Options
| Parameter | Category | Description |
|---|---|---|
| cuthirdpartybilling | Billing | shipto,soldto and billto. Notes:Two cases 1. Single code billto equals shipto and soldto different 2. Multiples shipto equals store, soldto the coop and the billto is the central chain billing.?? |
| oeckcreditmo | Credit Check | When credit checking, set to "1" to include the master order. |
| crshowclaim | Credit Memo | Set to "1" to show additional claim fields (Credit Stage, Date Approved, Date Completed, etc.). |
| rcvuseclaimqty | Credit Memo | Set to "1" to display the "Claim Qty" field on the credit memo detail page. |
| cuautosequence | Customer File | Set to "0" to enable user-defined customer codes (default). Set to "1" to have the application automatically generate customer codes. |
| cufreightmethod | Customer File |
"0" disables the freight method field in the customer file, requiring you to select a freight method in order entry. "1" enables the freight method field in the customer file, allowing you to set a default freight method by customer. See also oefreightfromshipvia. |
| rcvallownegqty | Invoices | Set to "1" to allow a negative quantity to be entered on an invoice; this is intended to support partial pre-payment of an order. |
| custdisableaging | Payments | Set to "1" to disable the customer aging table that appears at the bottom of the payment entry screen. When loading data for customers with hundreds or thousands of invoices on record, this can slow down the system. This setting applies to all customers; if you disable this feature, you may easily access the same information in the Aged Receivables reports.
|
| custdisableupdate | Payments | Set to "1" to overlook the customer table... |
| paymentverifyinvcust | Receipts | Set to "1" to validate invoice customer belongs to payment customer. |
| INTERESTRATE | Statements | Determine an interest rate on statement printing (percentage per month; omit percent sign). |

Sales Express Options
Tag & Label Options
| Parameter | Description |
|---|---|
| nicelabelpath | |
| nicelabelpath64 |
Trucks Options
| Parameter | Category | Description |
|---|---|---|
| emailmethod | Certificates | Set to "0" to use the default email client UI. Set to "1" to prompt for an email address and password, and use a batch email tool with no UI. See also "emailserver." |
| emailreport | Certificates | "Manifest" will run the Manifest report and send a copy of it to each customer with an order on the truck. "Notify" will run the Notify report, and send individual reports to each customer with an order on the truck. |
| emailserver | Certificates | If "emailmethod" is set to "1", the address of your SMTP mail server is required here. |
| truckshpdef | Dates | Set to "1" to copy the scheduled ship date to the shipped date on the truck edit form; set to "0" to leave shipped date blank. |
| trucksetdate | Order Changes | 0: Do not modify the order when added/deleted from truck. 1: Order ship and scheduled dates will be set on add/update, cleared on delete. 2: Order ship and scheduled dates will be set on add/update, but the date will NOT be cleared on delete. |
| splittruck | Posting Inventory | Set to "1" to split a truck into orders when posting a pick list by truck or a mass pull. |
| truckdropuseload | Reports | Set to "1" to change "drop" to "load" on reports. |
| watchcolors | Truck Building | Set to "1" to activate Truck Watch colors on the truck building grid (see Admin > Legends for more information on Truck Watch colors). |
| nrdefaultwatchdays | Truck Watch | Enter the number of days (from the current day) that you wish to set a watch by default; or set to "0" to use the sell date. |
| truckshowenroute | Truck Watch | Set to "1" to display the Enroute tab. |
| truckshoworders | Truck Watch | Set to "1" to display the Orders tab. |
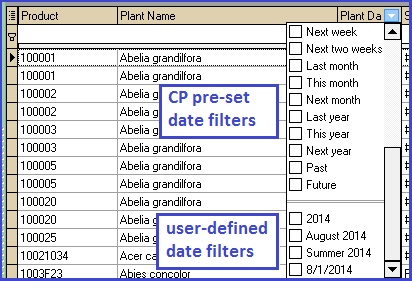
Date Filters
Create custom date ranges for filtering non-entry grids, such as Inventory > Grids > Variety Location. When clicking the filter dropdown list on a date column, you'll be able to choose from these date filters in addition to CompuPlants' pre-set date filters and existing cell values. Helpful for filtering grids by season, promotional period, or any other significant period of time.
Form Defaults
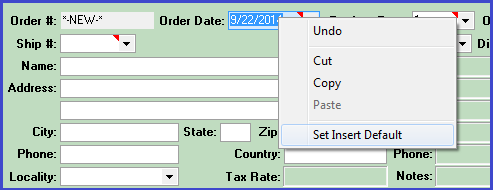
Across all entry forms, admin users are able to set default values for any given field. You must, however, set the default value from the entry form, not from here. This form stores default values that have been set elsewhere in the program. In order entry, for instance, you might wish to set a default Doc Stage. Select the doc stage from the dropdown list so that the field has a value, then right-click on the field and click "Set Insert Default."
Once you've established a default value for a given field, you may edit the value here. This is particularly useful for storing default dates. If you want the Order Date in order entry to show today's date when entering a new shipping order, set the default date as described above, then come here and find the default you just set. Change the Field Value to "today" (must be all lower case).
Menu Labels
CompuPlants is intended to be flexible, and this feature was designed with this ideal in mind. It allows you to change labels for menu tree items, entry form fields, and grid columns. We encourage you, however, to use this feature with caution. In some cases, changing the name of a menu item, field, or column header can disrupt functionality. Please contact us if you wish to relabel any items.
Legends
A valuable feature in CompuPlants is color-coded data, allowing you to glean important information at a glance. Primarily used with the Trucks, Orders, and Nursery Resource Planning modules, a different color is associated with each stage of an order or truck, or number of sales for a customer. For instance, "shipped" trucks appear in blue, "loaded" trucks appear in yellow, "delayed" trucks appear in red, and so on. CompuPlants comes with default color schemes, but you may modify them (including text color and background color). You cannot add or delete legends, or edit Legend, Legend Style, or Description fields for existing legends.
Tip: To view color-coded trucks on the truck building grid, be sure to set the admin option "watchcolors" to "1".
Report or Label Designs
Each time you save a new report or label design, the design ID is stored here. Visit this form whenever you'd like to clean up designs that you don't need anymore. Though it's possible, we recommend that you don't create new designs here, as the "List" ID is an internal code that may not be easy to find. Instead, go to the report form that you'd like to create a new design for, copy and save the design, then modify in FastReport. See our tutorial, Copy a Report Design, for more information.
Update Menu Preferences
Execute this command to restore all preferences and options to their original, default settings.
Last Run
For some reports, CompuPlants keeps a record of the last user to run the report and when he or she ran it (view-only).
Application Management
Data Storage
CompuPlants files are stored in two directories:
- the first (1) is for the application programs and custom changes made to your software
- the second (2) stores all of your company data
| Windows | Linux | |
| C/base | 1. [drive:]\compuplants 2. [drive:]\[database folder name]\[company name] |
1. /u/compuplants 2. u/[database folder name] |
| Maria DB & MySQL | 1. [drive:]\compuplants 2. [drive:]\Program Files (x86)\[database folder name] |
1. /u/compuplants 2. /var/lib/[database folder name] |