Enter a Shipping Order not from a Master (SO)
Shipping orders that are not tied to a master order generally come from landscapers and garden centers. There are two main parts to a shipping order: the order header form—any information you enter here applies to the whole order; and the detail page(s), where you insert products and add product-specific information. See also: Order Entry Options.
I. Order Header Form
- Go to Orders > Entry Forms > Shipping Orders.
- Select “Insert.”
- Fill in required header information: Order Date, Product Type, Ship-To/Sold-To, and Want Date.
- Sell date refers to the inventory sell date. Enter a single date here to apply to the whole order, or enter a custom sell date for each product on the detail page. If you do not enter a sell date in either location, the application uses the "Want Date" for calculating availability.
- (Optional) Apply an order discount using the "Disc. %" or the discount "Type" field. Learn more about the discount fields and how they relate to the product type here.
- (Optional) Fill in desired information under each of the order entry tabs (see chart below for a description of each tab).
- Click “Save.”
Tip: Save some time by eliminating step 6. Click "Detail", the first step in Part II, and the application automatically saves the order.
II. Detail Page
- From the order header, select “Detail” (on the toolbar).
- Click “Insert” to add products. CompuPlants offers several methods for accessing product inventory: Current Order, Master Order, Availability, Shipped Orders, and Decorations. See a description of each below.
- Insert the ordered, or want, product. Upon doing so, the application displays the product price, volume and/or discount settings from the product catalog, as well as the price origin and adjusted price.
-
* Learn more about price origins here.
- Enter an "ordered," quantity (a.k.a. want, requested quantity) and press Enter. The ordered quantity is copied to the "confirmed" quantity. You may change the confirmed quantity at any time.
- As you edit the Quantity field, the application automatically adjusts quantities in the inventory panel for both salable ("For Sale") and "Graded" inventory.
- (Optional) Select an applicable item category.
-
(Optional) Add item notes:
- For external notes, type a short note in the "Notes" field (below the want/confirmed product fields). This note prints below the line item on order documents if the selected page style is set up accordingly. You can also select a canned note with the keyboard command "Ctrl-Alt-N." A popup window will appear. Highlight the desired note and press Enter.
-
*If your nursery handles back orders, see also this note on back order line item notes.
- The toolbar icon, Notes, offers options for internal notes. A separate window appears when you click the icon. The first note field corresponds with the Note field described above: what you type here will be displayed there, and vice versa. "Label," "Care," and "Internal" notes are informational and do not print on order documents. Allocation and product notes, also internal, carry over from the Inventory module; the former from the Orders grid in product allocations ("Alloc. Notes" column) and the latter from the Product Catalog grid ("Comment" column). Click "OK" to save changes before closing the window.
- For external notes, type a short note in the "Notes" field (below the want/confirmed product fields). This note prints below the line item on order documents if the selected page style is set up accordingly. You can also select a canned note with the keyboard command "Ctrl-Alt-N." A popup window will appear. Highlight the desired note and press Enter.
-
(Optional) Apply a discount to the product:
- Click the Discount icon in the toolbar to enter a custom percent.
- Click the Group icon in the toolbar to apply a group price.
- (Optional) Designate a specific sell date, area*, or location. To divide a plant among multiple locations, use the tracking ID field and select a quantity for each ID.
-
* If these products are going against a purchase order, select "P" under Area.
- Click "Save."
- Repeat steps 2 through 9 to add another product to the order.
- After all products have been added, return to the order header form and click “Summary." There, view all discounts, royalties and taxes, and/or calculate freight charges.
Tip: Use the keyboard shortcut, plus sign (+), to both save details and trigger a new detail page to open.
Order Entry: Important Options
- oedischange: Grants or denies users permission to override the default discount.
- oepricechange: Grants or denies users permission to override the product price.
-
* If granting users permission to override price, you may require a reason for the price change using oepriceoverridereason.
- oetermschange: Grants or denies users permission to override the payment terms.
Methods for Adding Products to Orders
CompuPlants offers several options for adding products to shipping orders.
Add products from the Current Order tab:
Allows you to select from a drop down grid of your entire product inventory. Select a product from the grid (double-click or press Enter).Add products from the Availability tab:
Provides a drop-down grid of available inventory. Enter a quantity, then double-click the line to copy it to the current order.Add products from the Master Order tab:
References the master order(s), if any exist, for this customer. Select an order number from the drop down list and double-click it to add to the current order. Click on the grid to change quantities.Add products from the Shipped Orders tab:
Presents a list of products this customer has ordered in the past. Select an order date range, then double-click on a product to copy it to the current order. Click on the grid to change quantities. When using this method, product prices are derived from the product catalog, not past orders.Add products from the Decorations (Customize) tab:
Hidden by default, this tab shows product accessories, which usually consist of decorations—vases, ribbons, bells, colored foils— but could consist of other plant-related items more specific to your nursery. To activate this tab, set the admin option "oedecorations" to "1". Users can also turn this tab on and off with the user option "oetabdecorations" (the main switch, oedecorations, must be on).Items are set up just like regular products, but they must be associated with an "Item" in the product catalog to be listed here. The tab is labeled "Decorations" by default, but you can change its name in Administration > General > Menu Labels. Learn more about setting up items here.
Follow these steps to decorate a product:
- Add products to the order using the Current Order, Availability, Master Order, or Shipped Orders tab.
- Toggle the Decorations tab.
- On the bottom grid, highlight the product that you'll be decorating.
- Click an item on the top-left grid. The adjacent grid lists specific sizes and/or colors available for that item.
- Double-click the desired color/size to add it to the lower grid. The ordered quantity is copied from the product line.
-
* The "Max Picks" column on the items grid lets you know how many variations of that item you may add per product.
- Repeat the process to decorate another product.
Order Entry Tabs
Many of these tabs carry over default information from the customer file (Receivables > Entry Forms > Sold-to/Ship-to Customers), making it easy for you to access important customer information while entering orders. If necessary, you may override some of those default settings here. Those fields that derive from the customer file are marked with an asterisk (*). Learn how user options allow you show/hide tabs by user.
Schedule Tab
| Field | Description |
|---|---|
| Want Date | When the customer wants the order delivered. |
| Sell Date | Refers to the inventory sell date (used for pull reports and pick lists). See admin option "oearrdatedefault" to set a default value based on the want date. |
| Ship Date | Date order will ship. |
| Confirmed | Check if these dates have been confirmed (information purposes only). |
| *Master | If this shipping order is tied to a master order, select the master order number. |
| *Sales Rep | If a sales rep is to receive commission (specialty module) on the order, he/she must be entered here, along with a sales type. |
| Sales Type | Used for calculating commissions; select the appropriate sales type (from Setup > Receivables > Sales Type) |
| Doc Stage | Refers to stages you have set up in Setup > Orders > Order Document Stages. If the stage you select is excluded from availability data, then product quantities will not factor into your on-hand numbers and availability reports. |
| PO # | Enter the purchase order number provided by the customer. |
| PO Date | Date on customer Po; see admin option "oepodatedefault" to set a default date based on the order want date. |
| PO Reqd | Default setting from the customer file. |
| Dup | Default setting from the customer file. *When checking for duplicate purchase orders, the program matches the PO number with the customer code to compile a unique ID. |
| Internal PO | If the shipping order is tied to an internal purchase order (from Purchases module), provide the number here. |
| Provides UPC | Default setting from the customer file. |
| *Order Prefs | View only; info comes from customer file (Pricing tab). Compile a list of common preferences in Setup > Orders > Order Prefs. |
| Due Date | If you've made an agreement with the customer about the payment due date, you can override the due date generated by the program when the order posts to receivables. |
| Order Description | User-defined description. |
Those fields that derive from the customer file are marked with an asterisk (*).
Shipping Tab
| Field | Description |
|---|---|
| *ShipVia | If no default carrier is saved in the customer file, enter a shipvia here (from Setup > Receivables > Carriers). |
| *Zone | If no default zone is saved in the customer file, enter one here (from Setup > Receivables > Freight Zones). |
| *ShipVia Prefs | View only; customer default |
| *Freight | If no default freight method is saved in the customer file, enter one here. |
| Truck/Drop | View only; carried over from trucks module |
| Scheduled Date | View only; carried over from trucks module |
| *Closed Days | View only; customer default |
| *Backorders | This flag indicates that the customer receives back orders. |
| Date Codes: UPC | |
| Date Codes: Delivery | |
| Shipping Instructions | Enter special shipping instructions specific to the order. |
| Printed Shipping Info | External notes that you may request to have printed on order documents. |
| *Internal Shipping Notes | From the "Ship Notes" field in the customer file (shipping tab); will not print on order documents. |
Those fields that derive from the customer file are marked with an asterisk (*).
Loading Tab
All information on this tab carries over from the trucks module.
Notes Tab
Learn more about how CompuPlants facilitates customer, product, and order notes here.
| Field | Description |
|---|---|
| External Notes | Enter any notes specific to this order that you would like to print on order documents. These notes appear at the bottom of each document. |
| Internal Notes | These notes come from the customer file (Notes tab) and are NOT printed on order docs. They must be turned on using page styles. |
Contacts Tab
All of this information comes from the customer file (Sold-to tab), but changes may be saved here.
Locations Tab
If you wish, select a single location or division for all products on the order.
Payments Tab
If the customer has pre-paid for this order, optionally enter How Pay, Deposit, and Check information. Post a pre-paid order receipt in Receivables.
Credit Info Tab
This tab draws data from the customer's payment history so that you can quickly assess financial standing before placing the order. At a glance, a green check mark suggests there are no credit issues; a yellow yield sign indicates one or more issues exist; a red stop sign means a stop has been placed at the order entry stage and the user cannot save a new order for this customer. Learn more about monitoring customer credit here.
Labels Tab
All flags except for "Special Tag" on the Tag the Order panel carry over from the customer file. Enter order-specific information on the Tag Charges panel.
Misc Tab
| Field | Description |
|---|---|
| *Region | |
| Paper Order # | |
| Request Type | |
| Requested By | |
| Work Order | |
| Active | |
| Sold-to Mail | |
| Ship-to Mail |
Those fields that derive from the customer file are marked with an asterisk(*).
Air Info Tab
Not applicable to most customers.
Order History Tab
This tab displays a grid of the customer's order history and balance information.
Customer History tab
This tab displays a detailed invoice and payment history.
Dates Tab
Keep track of the fulfillment of an order by recording significant dates.
Edit a Shipping Order
Before posting an order, make changes on the order entry/detail form. If you need to edit an order after posting it, you must do so in Receivables > Edit Posted Invoice & Repost.
- Query the order.
- Once found, edit information on the order header form and/or the detail pages as necessary.
- Click “Save” (if necessary).
Cancel a Shipping Order
- Go to Orders > Duplicate, Cancel and Back Orders > Cancel an Order.
- Enter the order number in the required field.
-
Select the desired action:
- “Move Order to Cancel History” removes it from Orders while maintaining a record of it.
- “Cancel Order” deletes the record.
Quick-Change Order Details
Easily change some information pertinent to a shipping order, such as price and current quantity, using a quick-change grid. Note that the grid does not allow you to add or delete products.
Follow this path to access the grid: Orders > Entry Forms > Quick Change Order Details.
Add a Duplicate Product
When putting together large orders, it can be easy to accidentally duplicate product entries; therefore, CompuPlants has a built-in feature that prevents users from adding the same product twice. We understand, however, that duplication is intentional in some cases. For example, users often want to add the same product twice, selling a certain quantity at the standard price and the remaining quantity at a promotional price. You can follow these steps to circumvent the program's default setting.
- Add the duplicate product to a shipping order from the “Current Order” tab.
- On the confirmed line, select a "Category," located between the “Product” and “Quantity” fields. "Category" refers to item category, which is user-defined. With an item category selected, the program can now differentiate between two products that otherwise appear identical.
-
* If both the original and duplicate products are associated with an item category, make sure that the categories are different.
- Proceed with the remaining order detail fields as usual.
- Click "Save."
Apply Discounts
"Product Type" Field
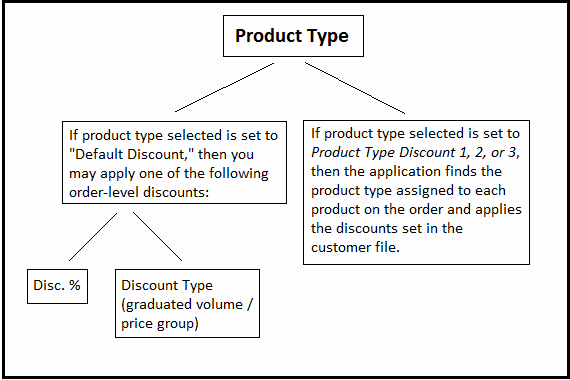
The first step to applying a discount is selecting a "Product Type" that supports the method you wish to use: an order-level or product-level discount (see the diagram below). Learn more about product type setup here.
Order-Level Discounts
"Disc. %" Field
This field works in conjunction with product types that are set to default discount. Enter a percentage in the field if no default value is saved for the customer. This discount only applies to those products marked as "discountable" in the product catalog. If a default discount percent is saved and you wish to override it, the "oedischange" user option must be set to "1". You may override a product's "Discountable" setting on the order detail page without modifying any options.
"Discount Type" Field
Discount Types are created in Setup > Receivables > Discount Types. They work in tandem with price groups and/or graduated volume discount schedules. Read more about setting up discount types here.
Notes:
* If you specify a "Discount Type" and a "Disc. %" on the order header, the discount type overrides discount percent. The application will not permit both.
* If your Discount Type is a price group, you must click the Group icon on the order detail page to invoke the discount. Also, the products must be flagged as discountable.
Product-Level Discounts
On the product level, CompuPlants offers discounts by product type (see method II), date, volume, and line item. Assign date pricing and volume pricing in the product catalog.
Line Discounts
First, enable the Discount icon by setting the "oediscount" admin option to "1". On the order detail form, highlight the desired product, then click the Discount icon. A dialog window will appear prompting you to enter a percent. Do so, then click "OK." The adjusted price will appear on the product line. The product does not need to be marked as discountable for the discount to take effect.
A secondary option pertains to line discounts: "oeapplylinediscount,". Set to "1" to effect a price change to the line; or, set to "0" to store the discount amount on the line without changing the price (default setting). In either case, the discount flag is un-set as a safeguard against additional line discounts.
Although discouraged, it is possible to combine a line discount with another discount type. If more than one discount is applied, the second discount acts upon the product catalog price, not the adjusted price.
Discounts: Customer Default Settings
You may opt to save information related to discounts in the customer file. These fields are located under the Pricing tab.
| Field | Description |
|---|---|
| Discount | Set a default discount percent for the customer. The Disc. % field in order entry will automatically load this value. |
| Starting Volume | Used for graduated discounts; designate a minimum cumulative dollar amount for the customer to receive the discount determined by the graduated discount schedule. |
| Product Type (PT) Disc. 1/2/3 | Used when the order product type is discounted by PT 1, 2, or 3 (see Product Types). |
| Discount Type | Refers to discount types created in Setup > Receivables > Discount Types. If both a default discount percent and discount type are entered, the application uses the discount type; you may not apply both. |
Master Orders
If you have customers who require contract growing and pricing or reserve products for a selling season, the master order feature expedites order processing while tracking the status of quantities shipped.
A master order is never shipped; instead, when the customer is ready for products to ship, enter a shipping order tied to the master. Master orders may vary by sold-to and ship-to, market area, and times of the year. Typically, mass merchants or customers with multiple garden centers request this service, but you can create a master order for any type of customer.
Customer Settings
Before entering a master order, modify a few default settings in the customer file. Note the variations between sold-to and ship-to customers.
Sold-to Customer Settings
Ship-to Customer Settings
| Setting | Tab | Description |
|---|---|---|
| Require a Master | Pricing | If checked, the application will not allow you to save an order that is not tied to a master or add non-master products to a SM order. |
| Ignore Master Order Prices | Pricing | If checked, shipping orders for this ship-to customer derive prices from the product catalog, not master order. |
Master Orders: Admin Options
The table below describes admin options specific to master order entry. Access all admin options under Administration > General > Prefs & Options.
| Option | Description |
|---|---|
| oeallownonmasteritems | If "Require a Master" is checked on the customer entry form, the system prohibits users from adding non-master products to a shipping order. Change the value to "1", and the system will allow you to add non-master products. Note that you cannot set this value by customer. If you wish to allow non-master products for some customers and not for other customers, set this value to "0," but choose "Require a Master" in the customer file. |
| oeaskmasterterms | If "Require a Master" is checked on the customer entry form and the value of this option is set to "1," when saving a new shipping order, a dialog will appear asking the user if he wants to copy the Sales Rep, PO, Discount, and Terms from the master order instead of those from the customer entry form. |
| oemasterdefqty | As master order quantities tend to change over time, CompuPlants offers three default loading options for the "Quantity" column on the Master Order tab. You can choose to load the current quantity (value = 1), load the original quantity (value = 0), or load zero (value = -1) by default. |
| oeonlymoactives | Display only active products under the Master Order tab by setting to "0"; display active and inactive products by setting to "1." |
| oecopyso | When adding master order products (from M.O. tab) to a shipping order not tied to a master on the order header, set this value to "1" to omit the master order number from the product detail row. |
| oeallowcancelmo | Set to "1" to permit master order cancellations. |
Enter a Master Order
CompuPlants offers two methods for entering a master order: an auto-assigned master order number and a user-defined master order number. When saving orders, by default the application does not distinguish between master orders and shipping orders. For example, if the most recent order entered into the system is a shipping order, #2345, and a master order follows, its number will be #2346. You may define a unique alpha-numeric code for master orders by following instructions for Method 2.
Method 1: Auto-Assigned Master Order Number
- Go to Orders > Entry Forms > Master Orders.
- Click “Insert.”
- Fill in required information: order date, product type, ship-to, sold-to, and want date.
- (Optional) Enter additional information.
- Click “Save.”
- Add products and quantities by selecting “Detail” then “Insert.” There are two ways to access product inventory:
-
a. The Current Order tab allows you to select from a drop down list of your entire product inventory. Select a product from the list (double-click or press "Enter"). Type quantity, then press "Enter" again.
b. The Availability tab provides a drop-down list of available inventory. Select a product from the drop down list and type quantity. Double-click to add to order. - (Optional) Un-check the boxes labeled "Vol?" and "Disc?". Generally, pricing for master orders is based on an agreement by both parties, so discounted pricing is not common.
-
(Optional) Fill in retail customer fields, as these are commonly printed on customer labels.
- If the retail customer panel is hidden, set the "oepanelcustomer" admin option to "1" to display it.
- The box labeled "Master" refers to EDI customers only and does not pertain to a master order.
- (Optional) Fill in Sell Date and/or location information for the chosen product.
- For each product ordered, repeat steps 5 through 9.
*Tip: Use the shortcut, plus sign (+), to quickly save details and open a new detail page. - (Optional) Record freight charges by line in the Master Order Quick-Change grid (for net delivered pricing styles).
Once all products have been entered, you may then enter a shipping order tied to the master order.
Method 2: User-Defined Master Order Number
- Go to Setup > Orders > User Define Master Order #.
- Click "Insert."
- Assign a Master Order Market(Ad) Area ID. This may be an 8-character ID, comprised of numbers, letters, and special characters.
- Fill in other required fields and (optional) an Order Description.
- Click "Save." This creates a new master order record.
- Go to Orders > Entry Forms > Master Orders.
- Query the order; or, click "Find" to show all master orders.
- Add products and quantities to the order, as described in steps 5 through 9 of Method 1.
Edit a Master Order
The following method is useful for changing one or a few master orders, or for adding/deleting products. If you need to change many orders, the Master Order Quick-Change Grid will save time.
- From Orders > Entry Forms > Masters Orders, query the order.
- Select the order, then modify the order header and/or details as desired.
- Click “Save” (if necessary).
Tip: If prices on a master order change, you will need to manually update prices on any pending shipping orders associated with the master. Quick-change grids offer the most efficient way to do this: First, change prices on the Master Order QC Grid, then change prices on the Order Details QC Grid.
Quick-Change Master Order
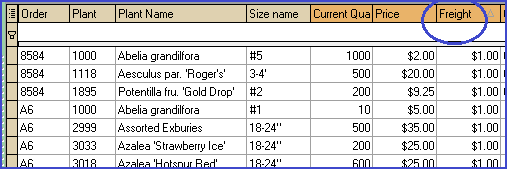
Easily change some information pertinent to a master order, such as Sku, UPC, price, and current quantity, using a quick-change grid. The grid does not allow you to add or delete products; however, you may cancel quantities on a master order.
Cancel a Master Order
In order to cancel a master order, the admin option "oeallowcancelmo" must be set to "1."
- Go to Orders > Duplicate, Cancel and Back Orders > Cancel an Order.
- Enter the order number in the required field.
-
Select the desired action:
- “Move Order to Cancel History” removes it from Orders while maintaining a record of it.
- “Cancel Order” deletes the record.
Enter a Shipping Order from a Master Order (SM)
Follow instructions for entering a shipping order not tied to a master, but note the exceptions below.
On the order header:
- To add products from a single master order, enter a master order number on the order header (Order Info panel).
- To be able to add products from multiple master orders, leave the "Master Order" field blank. The Master Order tab will then list products from all masters associated with the customer.
- This method works only for those customers that do not require a master order.
On the order detail page(s):
- Click on the Master Order tab. A grid will appear (top half), listing products and quantities associated with the master order(s).
- Double-click a product to add it to the order (bottom grid). Then, set quantities by adjusting the number in the "Ordered" column. Or, first enter quantities in the "Quantity" column on the master order grid, then double-click the row to apply changes to the bottom grid.
-
a. The four columns on the far right of the master order grid, "Shipped," "Canceled," "Open," and "Balance," provide pertinent information when entering a shipping order from a master.
b. The application does permit overselling (a negative balance will appear). - Under the Current Order tab, the application calculates live master order quantities as follows:
current (confirmed) quantity - shipped quantity - open order quantity - canceled quantity = "left"
* Click here to learn more about how master order quantities factor into overall product availability.
Tip: If prices on a master order change, you will need to manually update prices on any pending shipping orders associated with the master. Quick-change grids offer the most efficient way to do this: First, change prices on the Master Order QC Grid, then change prices on the Order Details QC Grid.
Order Documents
Orders > Documents gathers all of the order-related documents in one convenient place to save you time. It is pre-loaded with professional Fast Report designs; however, you can easily modify existing designs to create a custom look. Click here to learn more.
Orders 5.6
This feature allows you to print types of documents that you have previously created in Setup > Orders > Documents. These could include quotes, order acknowledgments, order confirmations, proof copies, invoices, load lists, packing lists, bills of lading, etc.
To print a document:
- Select a design number.
- (Optional) Narrow the search to a specific order number, date, sales rep, or ship-to.
- Select the type of record to search (you must enter at least one).
- Choose a document number.
- Select sorting criteria.
- (Optional) Instruct the application to print only those products where quantity shipped > 0.
- Click “Find.”
- (Optional) Preview the document by highlighting a single row or multiple rows, then click "Preview."
- "Print."
Repeat the process to print a different type of document. You may also prefer to print pull tags and/or customer labels at this time.
Print a Pull Report:
- Go to Orders > Documents > Order Pull Report.
- Enter a design number.
- Select sorting criteria.
- (Optional) Check the box labeled “print only where shipped greater than zero” to remove any unavailable items from the report.
- Click "Preview" and/or "Print."
Mass Pull by Order
This report increases efficiency by organizing a pull for multiple shipping orders at once, but does not require building a truck. It groups products by area, so products must be associated with an area. Customers may pick up the orders or have them delivered by a smaller truck.
- Leave the order number field blank.
- Select print and group criteria.
- Select multiple orders from the grid by holding down the Control key and highlighting individual orders.
- Preview and/or print.
Make & Edit a Pick List
The steps for creating, editing, and posting a pick list are the same regardless of how you sequence the pull report and pick list.
- Go to Orders > Order Posting > Make Order Pick Edit List.
- Type the order number and select “Execute.” The system stores the pick list.
- Go to Orders > Order Posting > Edit Pick List.
- Type the order number and click “Find.” The top grid is the actual pick list, while the bottom grid displays available locations and quantities for the highlighted product in the pick list. The locations grid accounts for other pending pick lists, providing you with real-time information.
- Change locations and quantities:
-
a. Highlight a product row in the pick list.
b. Double-click a location row from the bottom grid and changes will be applied to the pick list. The chosen location will display a green background after it is applied. - If a product was pulled from multiple locations:
-
a. “Copy” the product. This produces another row on the pick list with the same product information.
b. Change the quantities for each pull.
c. Set a location for each pull. - (Optional) Select “Verify.” This compares the sum of the “Picked” column to that of the "To Pick" column (which is based on the order). If the totals disagree, the text color in the pick list row turns red.
Notes:
* If you pre-select picking locations during order entry, you may override them during the pick list edit.
* If an order is changed after a pick list has been made, you must make another pick list and edit locations for any products that were changed. The new pick list will preserve locations for products not impacted by the order change.
Post Pick List to Inventory
- Go to Orders > Order Posting > Post Inventory.
- (Optional) Run a trial post by unchecking the box labeled “Post Inventory.” Then proceed to step 4.
- When you're ready to post, check "Post Inventory."
- Type the order number and select “Execute.”
Unpost Pick List
If products, quantities, and/or pick locations change after posting a pick list, you may un-post the pick list. Once the order has been posted to receivables, however, you may no longer do so.
Unposting a pick list prompts several reactions from the system:
- It changes the truck status from "Ready to Invoice" to "Assembled."
- It changes the order status from "Ready to Invoice" to "Assembled."
- It returns quantities to inventory (both salable and graded)
- It restores previous quantities to the master order (if the shipping order was originally tied to a master).
Follow these steps when you need to unpost a pick list:
Note: Access this tool in the Trucks module.
- Go to Trucks > Picklist & Post Inventory > Truck Picklist & Post Inventory > Unpost Pick List.
- Where you are prompted for the truck number, enter the order number instead.
- (Optional) Run a trial post by leaving the "Unpost" flag unchecked, then click "Execute." The application will inform you of any errors that may prevent the un-post.
- When you're ready to un-post, check the flag, then click "Execute."
- If necessary, return to the order and update products and/or quantities as needed, then make a new pick list.
- Edit the pick list and post again.
You may now proceed with posting the order to receivables.
Pick List History
Note: Access this tool in the Trucks module.
View a history of pick list edits, including un-post(s), by entering the pick ID (i.e. order number). You may find this useful when issuing customer credits for damaged plants, or when you have any questions related to a plant's pick location. Go to Trucks > Entry Forms > Pick List History.
FAQ: How does the program suggest locations for pull reports and pick lists?
In order to maintain accurate inventory records, a pick list confirms quantities picked by location. Typically, users make and edit a pick list after pulling products. However, if you prefer to pre-select pick locations, you may do so in one of two ways: make and edit a pick list before the pull, or enter your preferred locations during the order entry process. The program executes the following process when making a pick list:
-
It searches locations that match the following criteria and generates a temporary report:
- inventory sell date is less than or equal to order want date
- on hand quantity greater than zero
- pick order not equal to 9
- It then sorts the resulting locations by sell date (oldest to newest), pick order (first to last), and track ID.
- Finally, it allocates the order quantity in the following manner:
-
a. If the entire order quantity can be filled, then the application allocates quantities beginning with the first location found.
b. If a partial amount can be filled, then the application distributes the available amount, applying the unfilled amount to "NF" (not found).
c. If on hand quantity is zero, then the application allocates the entire order quantity to "NF".
Notes:
* If a user specifies an area, location, and/or tracking ID in the order entry form, the application prioritizes those locations, then looks to others to fill remaining quantities.
* For customers who combine inventory methods, the application searches both databases (first graded, then salable inventory).
* Pull reports are generated in a very similar fashion, but the program sorts the locations by on hand quantity in descending order.
Calculate Freight Charges
Freight charges should be added before printing the invoice or posting the order. Access detailed freight charges on the order summary page (toolbar icon).
See also:
Freight Setup
Default Customer Settings
Freight Methods
| Method | Description |
|---|---|
| I. Ship Via - Zone - Units | Pulls a rate from the Freight Detail table based on the ship via / zone / shipping unit combination. You must have assigned each product a shipping unit(s) or freight group in the product catalog. |
| II. Freight % | The percentage you specify will automatically be applied to the order total; add a drop charge and/or fuel percent (see also amtfrgpct). |
| III. Freight Zone | Select a freight zone to apply a pre-established freight rate, drop charge, and fuel percent to the order (see also amtfrgpct). |
| IV. Manual | Manually enter freight amount, drop charge, and/or fuel percent to determine the freight total. |
| Custom | If methods I - IV do not meet your business needs, we may be able to create a custom method. Please contact us for more information. |
Freight Percent
The admin option "amtfrgpct" comes into play when you're using freight methods II or III; it determines which amount to apply the freight rate to:
- "0" applies the freight rate to the pre-discount amount.
- "1" applies the freight rate to the post-discount amount.
- "2" applies the freight rate to the full catalog amount (this may include or exclude royalties, depending on your inventory settings.
- "3" implements a freight rate by line: it combines the product size with the freight zone and applies a pre-determined rate (set up in Setup > Receivables > Freight Sizes).
* Values 0, 1, and 2 work with freight methods II and III, while value 3 works only with freight method III.
* If "amtfrgpct" is set to "3," but the product/zone combination does not exist in Setup, the order summary page shows a freight total of $0, indicating that an error has occurred.
* Fuel percent is always applied to the net amount.
Default Customer Freight Settings
CompuPlants offers several default shipping settings by customer, and it is important to note how these may interact with other freight settings. If the freight method panel is not visible on the shipping tab, set the admin option, "cufreightmethod", to "1".
- "ShipVia" and "Freight [Method]": You may save a default freight method in the customer file as well as in the shipvia file (Setup > Receivables > Carriers). Because of this, however, there is a chance that the customer and shipvia default freight methods may conflict in order entry. The admin option "oefreightfromshipvia" dictates which freight method the system applies: set to "0" to use the customer default, or set to "1" to use the shipvia default.
- "Zone", "Drop Charge", "Fuel Percent": In order for the program to pull from the freight zone table, you must select freight method III in order entry. If a different method is chosen, the program carries over the customer default drop charge and fuel percent (in the event that all three are stored in the customer file and they do not match a pre-set zone).
Shipping Notes
The "Ship Notes" field carries over to order entry (to the "Internal Shipping Notes" field) while "Ship Notes 2-4" do not carry over.
Post Order to Receivables
Post an order to receivables to close it once it has shipped and no further changes will be made.
- Go to Orders > Order Posting > Post Orders.
- (Optional) Run a trial post to see if any errors exist by unchecking the box labeled “Post Order.” Check the box when the order is ready to post.
- Enter the order number and the invoice post date.
- Click “Execute.” If an error prevents the order from posting, the application will display a red X and describe the error. If there is no error, check the “Post Orders” box and click “Execute.”
If you need to change an order after it posts, this is done in Receivables > Edit Posted Invoice & Repost Invoice. Click here to learn more.
Reports
General Reports
Open Product by Product
Open Product by Size
Product by Customer (shipping orders only)
Product by Customer Single Date
Item by Customer Committed
Run this report when allocating products to customers. It shows you who has ordered the product, quantity ordered, and remaining balance (based on the availability dates you entered in Setup > Inventory Setup Options).
Lost Sale Report
Product by Customer Multiple Date
Product by Customer Committed
Master Order Reports
Master Order Summary
A master order summary report provides valuable information for following up with your customers. It lets you know how many products a customer originally reserved, how many were shipped, how many might have been cancelled, and how many remain.
Change Order Reports
Changes by Order Report
This report allows you to see changes made to an order, from inception to posting. The report shows you who added and/or deleted products along the way, pricing deviations from the product catalog, as well as when each change was made. You can also access this information in grid form under Grids > Changes by Order.
Crosstab Reports
Duplicate & Back Orders
Back Order Methods
Typically, users make a back order when an order is partially shipped. This may be due to insufficient quantities or lack of space on the truck. CompuPlants offers two primary methods for making back orders. Decide which method to use, then change the admin option "bomethod" accordingly.
I. The "standard" method transfers each line you select to the back order. You may choose to transfer quantities in part or in full, depending on your nursery practices.
Determine how the program will calculate the back order quantity with the admin option "oebackorderfrom":
- If set to "0", the application subtracts the shipped quantity from the original, or want quantity.
- If set to "1", the application subtracts the shipped quantity from the last confirmed quantity (on the order detail grid).
- If set to "2", the application transfers the entire confirmed quantity to the back order and updates the shipped quantity to "0".
II. The "wanted" method transfers only the want product to the back order. This works well when having to make substitutions or distribute the requested quantity among an assortment of plant colors/sizes. The program determines the total unshipped quantity for each want product by summing up all of its respective confirmed products, then transfers the unfilled quantity to the back order. The "oebackorderfrom" option does not apply to this method.
As an example, a customer requests 1000 of magnolia stellata #1. You fill 700 of #1, then substitute 100 of #2, but are still 200 short of the original quantity. With this method selected, the back order recognizes magnolia stellata #1 as the want product and transfers it to the back order with a quantity of 200.Back orders receive their own order number along with a back order sequence number ("BO #1", "BO #2", etc.), and always retain the original shipping order number, even when a back order is made from a previous back order. Like regular shipping orders, back orders also reduce availability.
Make a Back Order
Back ordering involves four stages: revise confirmed quantities on the shipping order; make, edit, and post a pick list; execute a back order; process the back order as a regular shipping order. The process varies slightly according to the method you're using (see step 3).
Beyond setting the "bomethod," you may wish to establish a routine for back order pricing with the admin option "pricefind": "prcchg" uses the original shipping order price (CompuPlants' default); "catalog" uses the product catalog price. Lastly, control the display of the back order quantity field with "oehideboqty". Set to "0" to show the field (default setting), or "1" to hide it.
- Within the Schedule tab on the order header form, change the Doc Stage to shipped (SH). This permits the program to calculate back order quantities.
* "Confirmed" quantity becomes "shipped" quantity on the detail page. - Click "Save" and go to the Detail page.
- Calculate back order quantities on the original order:
- If using the standard method and "oebackorderfrom" is equal to 0 or 1, enter the shipped quantity. The program calculates the remaining quantity and displays it in the "Back Order" field.
- If using the standard method and "oebackorderfrom" equals 2, right-click on the order detail grid and select "Back Order" (you may select multiple rows at once; click here for a refresher). The program changes the shipped quantity to "0" and transfers the last confirmed quantity to the back order.
- If using the wanted method, update shipped quantities for the confirmed products. No further action on the order detail page is necessary.
- (Optional) On the Shipping tab, check the "Backorders" flag. This indicates that the customer receives back orders. It may be set by default in the customer file.
- Click "Save."
- Make, edit, and post a pick list.
- Execute the back order:
- (Optional) Call up the newly made back order to double-check quantities.
* If using the wanted method and line item notes, you may want to verify that the desired notes transferred to the back order. - After loading the back order onto a truck, determine the next step:
- If all quantities have been filled, continue to process the order as a regular shipping order: make, edit, and post a pick list, and post the order to receivables.
- If unfilled quantities remain, you may make a subsequent back order.
-
a. Go to Duplicate, Cancel, and Back Orders > Make a Back Order.
b. Enter the shipping order number.
c. Click "Execute." The program logs a back order.
Price Origins
When a product is added to a shipping order, the application first consults the master order (if one exists). If none exists, it uses the product catalog and order want date to arrive at the correct price:
Start here: Master Order Price
* If "ignore master order prices" is checked in the customer file, the price is set to $0.
Next: Discount Date Price
* No master order.
* Order want date must fall within the discount date range.
Next: Volume Price
* No master order.
* No discount date provided; or order want date falls outside the discount date range.
* The volume flag in the product catalog must be checked.
Next: Catalog Price
* No master order.
* No discount date provided; or order want date falls outside the discount date range.
* The volume flag in the product catalog is NOT checked.
* The order want date must fall on or before the date specified by oestopcatprice.
Next: Future Price
* No master order.
* No discount date provided; or order want date falls outside the discount date range.
* The volume flag in the product catalog is NOT checked.
* The order want date falls after the date specified by oestopcatprice.